I pulled a warm sheet of cookies from the oven one quiet February evening, watched the chocolate soften and the sprinkles hold their cheerful shapes, and felt a silly, stubborn joy that told me this recipe had earned a place in my little rotation of trusted sweets. The smell filled the kitchen like a familiar story, and I thought of how easy it would be to swap colors or share a half sheet with the neighbor who knocks with a bouquet. If you ever want a playful, dependable cookie that feels like a small celebration, this is the one I return to, right after testing similar treats like my favorite Valentine sugar cookie batch that taught me how different sugars behave in the oven.
Why These Valentine Sprinkle M&M Cookies Became a Favorite
This recipe matters because it arrived at the table after nights of small changes and quiet tasting. I tested doughs that spread too thin, batches that stayed stubbornly pale, and batches that tasted great but looked tired. The version you see here came from a few simple choices that made the cookies feel lively.
I learned to trust a soft but slightly glossy dough before baking, and to keep the M&Ms chunky and generous so each bite has a flash of chocolate and crunch. I also embraced the sprinkles not as decoration but as texture, a tiny crackle on the cookie surface that brings a smile.
These cookies balance comfort and curiosity. They are forgiving enough for a beginner, yet they still reward a curious baker who wants to tune texture and color. I love that they read as festive without being fussy.
At the end of the day, they make people want to reach in and taste one right away, and that is often the truest test for me. If a cookie can start a conversation or quiet a busy afternoon, I know I have something worth keeping.
The Story Behind This Small-Batch Valentine Sprinkle M&M Cookies
I never intended to make a “special” Valentine cookie at first. It started as a way to use a bag of themed M&Ms that sat in my pantry after a holiday sale. I made tweaks because a few friends mentioned texture, and I kept what worked. The cookies felt finished the night I stopped changing anything.
Early on I tried adding more flour, then less, and I learned how that tugged at chewiness. I also learned that rolling dough in the sprinkles right before baking keeps the colors bright and lets the sprinkles sit on the surface just enough to add that playful crunch.
Small batch testing let me refine oven time and dough shape so the cookies would come out soft but not raw in the middle. That kind of slow, patient tasting is what this recipe is built on. It is the result of curiosity that respects the basic science of baking.
Watching It Transform
“The moment the texture shifts, you know it’s ready.”
When you cream the butter and sugars, watch for a silky sheen that lifts easily from the sides of the bowl. That gentle gloss tells you air has been worked in, which leads to a lighter bite.
As you add the eggs, the dough will loosen and feel silkier. It should not be runny, but it should move with a confident sweep of the spoon when you stop.
Once the dry ingredients are folded in, look for a dough that holds together and still looks soft, almost plush. That plushness is the promise of a cookie that will bake to tender edges and a soft center.
When the cookies first come out, you will see chocolate slightly glossy and sprinkles perched on top. Let the cookies rest on the sheet a minute so they finish setting, then transfer them. The shifts in sheen and the slight give at the center are what tell you success is near.
Ingredients You’ll Need
1 cup butter, softened, this adds richness and helps the dough spread in a controlled way.
1 cup brown sugar, this brings moistness and a warm caramel note.
1/2 cup granulated sugar, this balances sweetness and helps with structure.
2 large eggs, these bind the dough and add lift.
1 teaspoon vanilla extract, this rounds the flavors and smells like home.
2 1/2 cups all-purpose flour, this is the main structure for the cookie.
1 teaspoon baking soda, this gives a gentle rise and light texture.
1/2 teaspoon salt, this sharpens sweetness and deepens flavor.
1 cup milk chocolate chips, this adds pockets of melty chocolate.
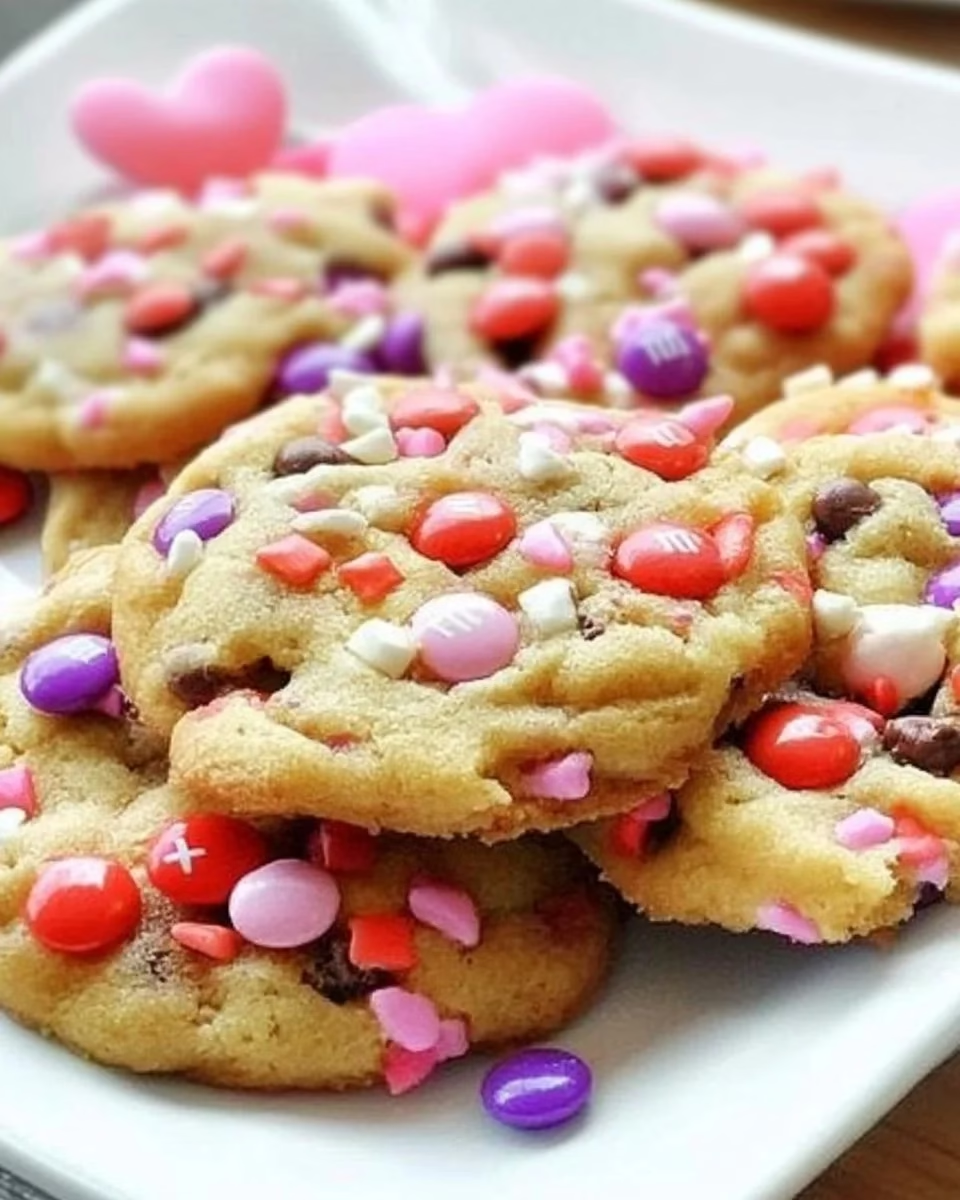
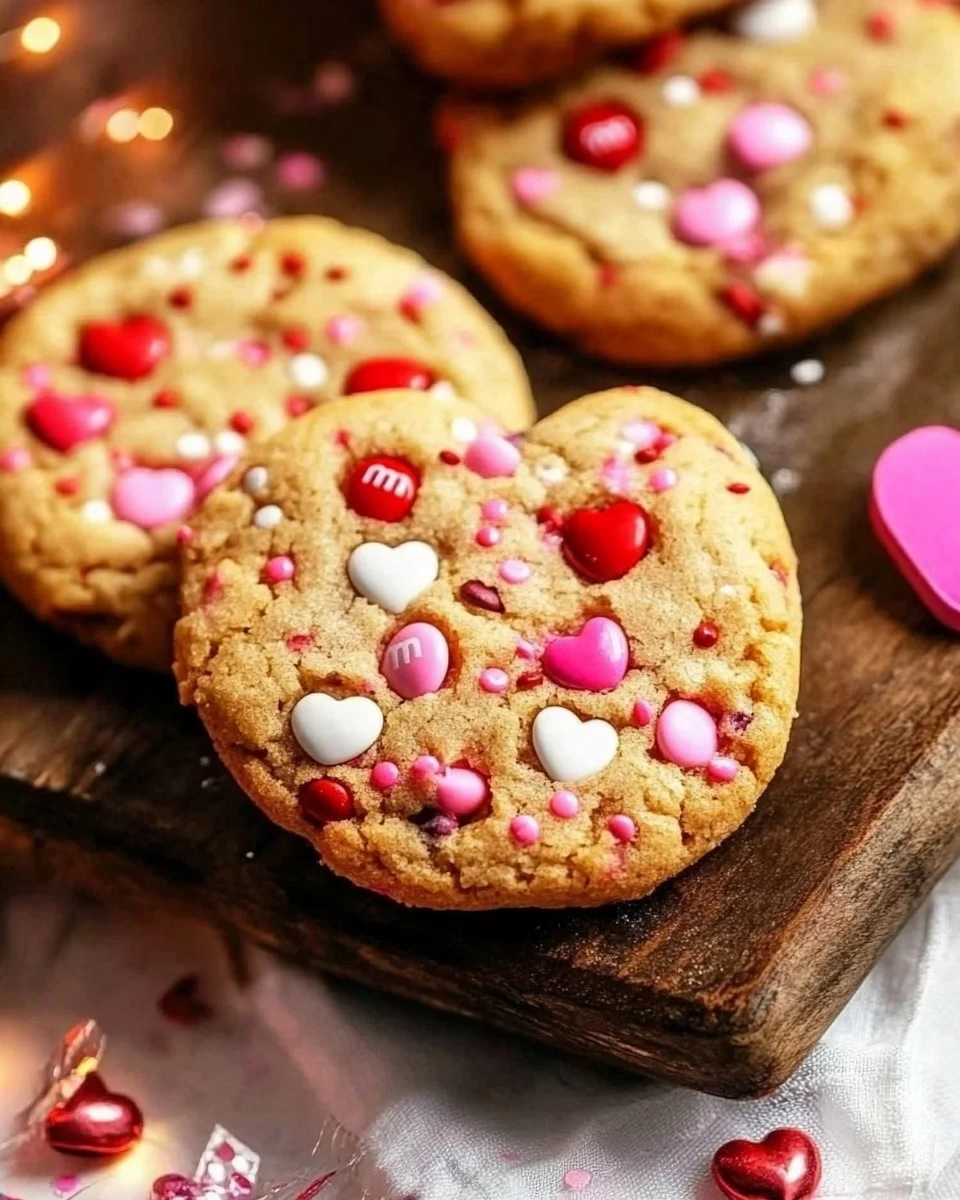
1 cup Valentine M&Ms, these bring color, crunch, and chocolate bursts.
1/2 cup colorful Valentine sprinkles, these add tiny crunchy pops and visual fun.
Each ingredient has a small job and none overpower the others. If you read this list and feel unsure, take a breath and gather things calmly. The familiarity of these items makes the whole recipe approachable.
Step-by-Step Directions
- Preheat the oven to 350°F (175°C). Make sure the rack is in the middle of the oven so the cookies bake evenly. A warmed oven gives a steady rise and consistent color.
- In a large bowl, cream together the softened butter, brown sugar, and granulated sugar until smooth. Watch for a gentle sheen and a lighter color, which means air has been worked in. Stop when the mixture looks silky and lifts a bit from the bowl.
- Beat in the eggs one at a time, then stir in the vanilla. Add each egg fully before the next so the texture stays steady. The dough should feel glossy and flow in a soft ribbon from the beater.
- In another bowl, combine the flour, baking soda, and salt. Gradually add to the creamed mixture. Fold with a spatula until just combined and the dough looks plush without dry streaks. Do not overmix or the cookies will toughen.
- Fold in the chocolate chips and M&Ms. Gently press them into the dough so they spread evenly without breaking the candies. You want big cheerful chunks and soft pockets of chocolate.
- Roll the dough into balls, then roll each in Valentine sprinkles. Make balls about one to one and a half tablespoons each for a small-batch feel. The sprinkles should cling to the surface and add a bright finish.
- Place on ungreased baking sheets. Give each cookie space to spread, roughly two inches apart. If you like a softer edge, gently press each ball down a touch before baking.
- Bake for 10 to 12 minutes or until golden. Watch the edges for golden hints and the centers for a slight set. They will still be soft when hot, so err on the side of gentle color rather than deep brown.
- Let cool on wire racks. Allow cookies to rest on the sheet for a minute or two before moving them so they finish setting. When cooled, the chocolate will be set but still soft to the bite.
The Rhythm of Making Valentine Sprinkle M&M Cookies
There is a rhythm to this recipe that feels like a short, satisfying ritual. Creaming, adding, folding, rolling, and waiting for that first warm scent from the oven all fall into a comfortable order. The best part is the small rewards at each step.
When you cream the sugars and butter, you begin to hear the subtle promise of a good texture. It is simple work with a clear sign to watch for. From there, the dough forms in predictable ways that let you feel confident even on a rushed afternoon.
Rolling dough into sparkly balls feels playful and quick. You can line up the balls like little candies on a stage. Baking time is the only quiet pause, and that short wait is where small homes fill with a friendly aroma.
Once they are cool enough to taste, you get that nice contrast of soft cookie and crunchy sprinkle. The rhythm of the bake makes it a recipe I return to when I want something that feels like a treat without fuss.
Sharing Valentine Sprinkle M&M Cookies
These cookies are made for sharing and for small celebrations. They arrive at a table with a casual charm that invites people to pick one and smile. I like to bring a plate to a friend, leaving a few at the door with a note.
Serve them at a casual gathering on a simple platter, or wrap a few in a paper bag for a neighbor. They pair well with tea, coffee, or a small glass of cold milk. The bright sprinkles make them an instant conversation starter at any dessert tray.
If I am taking them to a gathering, I bake a little earlier in the day and keep them in a single layer so the colors stay crisp. When I serve at home, I let guests pick their favorites and notice which color they reach for most. It is a small, joyful thing.
These cookies also travel well. Pack them with parchment between layers to keep sprinkles from rubbing off. They are a friendly, low-stress way to share something homemade.
In a similar spirit of sharing and testing, I often compare notes with other cookie recipes I trust, such as a tested almond cherry cookie that taught me how different add-ins change bake time and feel. That comparison helps me decide how bold to be with mix-ins.
Keeping Valentine Sprinkle M&M Cookies Fresh
Store baked cookies in an airtight container at room temperature for up to three days for best texture. If you like a softer cookie, add a slice of bread to the container to keep moisture in. The bread will dry out while the cookies stay tender.
For longer storage, freeze baked cookies in a single layer on a tray, then transfer to a freezer-safe bag. Thaw at room temperature before serving. Frozen and thawed cookies keep their flavor well, though sprinkles may soften a touch.
If you freeze unbaked dough, shape the balls and freeze them on a tray first. Once solid, move them to a bag and bake from frozen, adding a minute or two to the bake time. This is a good option when you want fresh-baked cookies on demand.
Keep in mind the sprinkles may lose a little crunch if stored in humid conditions. In dry climates they hold up beautifully for several days. Small tests at home will tell you which method you prefer.
Carol’s Baking Notes
- Use real butter for the best flavor. Margarine changes the mouthfeel and can make the dough too soft. Butter also helps the edges brown in a way that matches the flavor.
- Watch the creaming step. Overbeating can add too much air and make cookies tall and fragile. Underbeating leaves sugar unmixed and can lead to flat edges. Aim for a glossy, slightly lighter mix.
- Keep an eye on M&M size and brand. Minis distribute a bit differently than full-size candies. If you use small candies, you may get more even color, while larger ones make dramatic chocolate pockets.
- If your dough feels very stiff, let it sit for five minutes before rolling. That short rest hydrates the flour and makes the dough easier to shape. A relaxed dough rolls smoother and bakes more evenly.
- Test one or two cookies on a sheet to check your oven’s sweet spot. Ovens vary and that little trial will save you from a whole sheet of over- or underbaked cookies. I often bake one sheet while the others chill a bit.
These notes are small things I learned by making mistakes and fixing them. They are practical fixes more than rules, and they help you arrive at a reliable result.
Variations I’ve Tried
I swapped half the chocolate chips for white chocolate once and the cookies turned a little sweeter and creamier. That version is a hit if you like a softer chocolate note and a bright contrast with the sprinkles.
I also tested adding a teaspoon of instant espresso powder to deepen the chocolate flavor without making the cookie taste like coffee. It worked well for a richer background flavor that still reads as chocolate-forward.
A lover of nuts asked me to try chopped toasted pecans. The nuts added a pleasant crunch and a warm flavor, but I recommend keeping the chop size small so the cookie still holds together easily. Large pieces can make the dough fragile.
If you want a gluten-free option, try a 1-to-1 gluten-free flour blend and decrease baking time slightly until you find the right color and set. The texture changes but the idea of bright sprinkles and gooey chocolate remains delightful.
Each variation kept the recipe structure intact and only changed one element at a time. That way, I knew what each tweak did to texture and flavor.
Little Things That Made a Difference
I found that rolling the dough into slightly smaller balls made the cookies bake more evenly and look friendlier on a plate. Large lumps sometimes spread unevenly and lost that soft center.
Pressing the tops slightly before baking created a predictable flatness that lets the sprinkles stick. Without that gentle press some sprinkles would roll off during baking and the surface would look sparse.
When I chilled a tray of dough for fifteen minutes the cookies held shape better and the centers stayed softer. This is the trick I use when I want a thicker, chewier finish.
Slight variations in sugar ratio also change chewiness. A little more brown sugar gives more moisture and chew, but too much and the cookie risks being nearly cake-like. The balance in this recipe is where I felt comfortable for texture and flavor.
FAQs About Valentine Sprinkle M&M Cookies
Can I make this ahead of time?
Yes, you can shape the dough and refrigerate it overnight, which helps the flavors meld and can improve texture. Refrigerated dough often makes a chewier cookie and may need an extra minute in the oven.
Can I freeze the dough?
Yes, freeze the shaped dough on a tray first, then transfer it to a bag for longer storage. Bake from frozen and add a minute or two to the bake time so the centers set without overbrowning.
What if my cookies spread too much?
Chill the dough briefly and reduce the roll size to prevent excessive spread. Also check your oven temperature with an oven thermometer because a hot oven can make cookies spread before they set.
Can I replace the sprinkles with something else?
Yes, seeds, small candy pieces, or a light dusting of coarse sugar work as alternatives. Keep to small pieces so they sit on the surface and do not weigh the cookie down.
Are these safe for kids to help make?
Yes, these are kid-friendly with simple steps like rolling dough and sprinkling. Keep the oven work to an adult, and let children enjoy the creative part of adding sprinkles.
Each question comes from things friends asked when I gave them a plate of fresh cookies. I answer them as I would across a kitchen counter.
A Final Thought
I hope this Valentine Sprinkle M&M Cookies recipe encourages you to try something playful in your kitchen while trusting your instincts. Baking is a mix of science and small delightful surprises, and these cookies remind me that simple choices often bring the most joy. If you try them, notice the texture, listen for that tiny shift as the dough comes together, and share a warm one with someone who will smile. From my oven to yours, enjoy the process and the crumbs.
Valentine Sprinkle M&M Cookies
Ingredients
For the base
- 1 cup butter, softened This adds richness and helps the dough spread.
- 1 cup brown sugar This brings moisture and a warm caramel note.
- 1/2 cup granulated sugar Balances sweetness and helps with structure.
- 2 large eggs These bind the dough and add lift.
- 1 teaspoon vanilla extract Rounds the flavors.
For the dry ingredients
- 2 1/2 cups all-purpose flour Main structure for the cookie.
- 1 teaspoon baking soda Gives a gentle rise and light texture.
- 1/2 teaspoon salt Sharpens sweetness and deepens flavor.
For the mix-ins
- 1 cup milk chocolate chips Adds pockets of melty chocolate.
- 1 cup Valentine M&Ms Brings color, crunch, and chocolate bursts.
- 1/2 cup colorful Valentine sprinkles Adds crunchy pops and visual fun.
Instructions
Preparation
- Preheat the oven to 350°F (175°C). Ensure the rack is in the middle of the oven.
- In a large bowl, cream together the softened butter, brown sugar, and granulated sugar until smooth.
- Beat in the eggs one at a time, then stir in the vanilla.
- In another bowl, combine the flour, baking soda, and salt. Gradually add to the creamed mixture.
- Fold in the chocolate chips and M&Ms.
- Roll the dough into balls, then roll each in Valentine sprinkles.
Baking
- Place on ungreased baking sheets with roughly two inches apart.
- Bake for 10 to 12 minutes or until golden.
- Let cool on wire racks for a minute before moving them.