The oven light catches the glossy swirl on the top of a fresh pan and for a moment the kitchen feels like a small stage where smell and texture do the talking; the warmth is the same as the night I first cracked an egg into warm peanut butter and watched the batter pull away from the bowl in a slow, shiny ribbon. In that quiet, I riffed on a favorite idea and landed on a small batch that always makes me smile, the same way a riff of chocolate can surprise you when it folds into peanut butter. If you like playful takes on classic sweets, you might enjoy how this recipe sits next to my notes on peanut butter swirled brownies where a similar curiosity led to a dependable, friendly treat.
Why This The BEST Peanut Butter Brownies EVER Became a Favorite
This small recipe grew from late night testing and modest expectations. I wanted something that tasted like a fudgy brownie and a peanut butter cookie at once, without fuss or a long ingredient list. After a few attempts, the combination of equal parts peanut butter and sugar with two eggs struck the right balance between dense and tender.
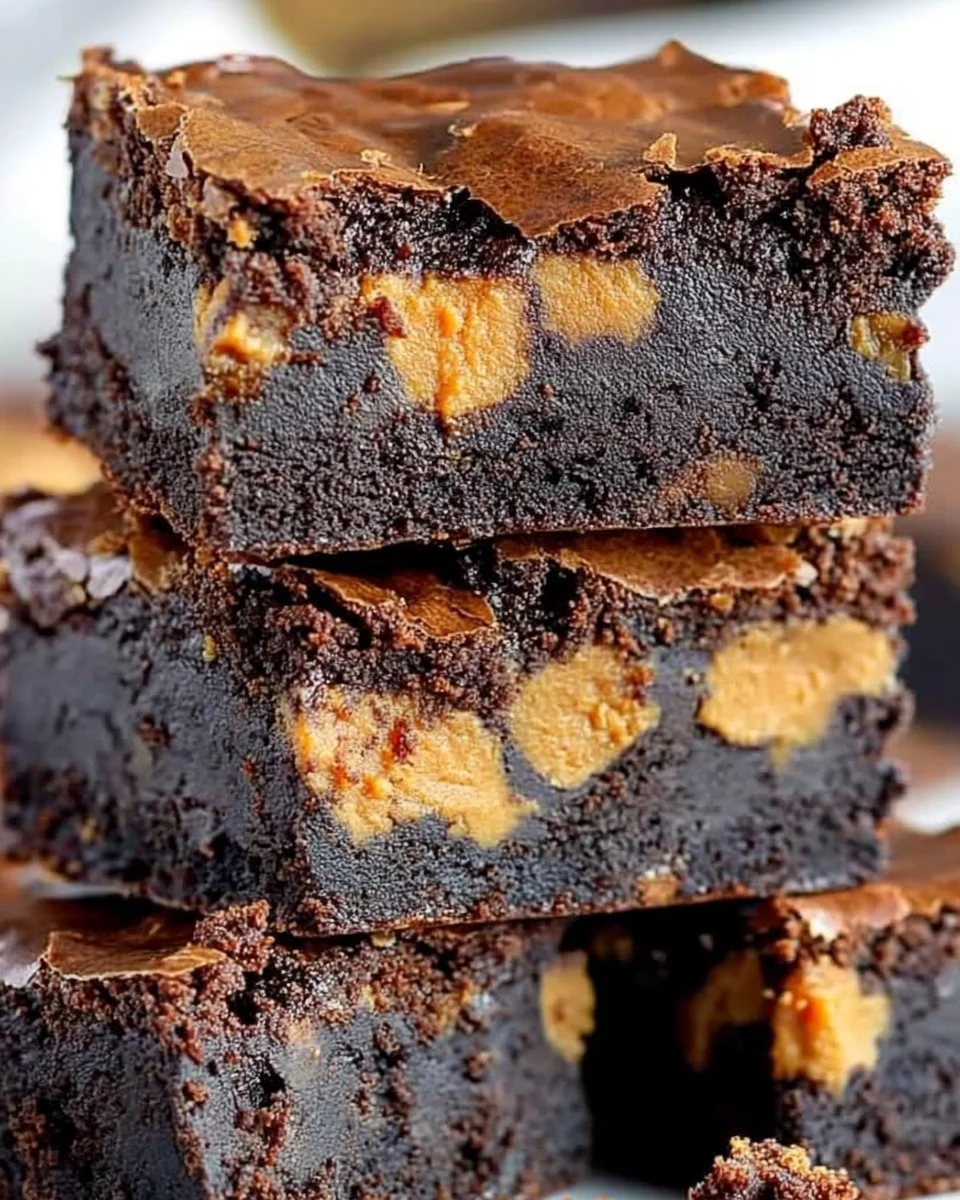
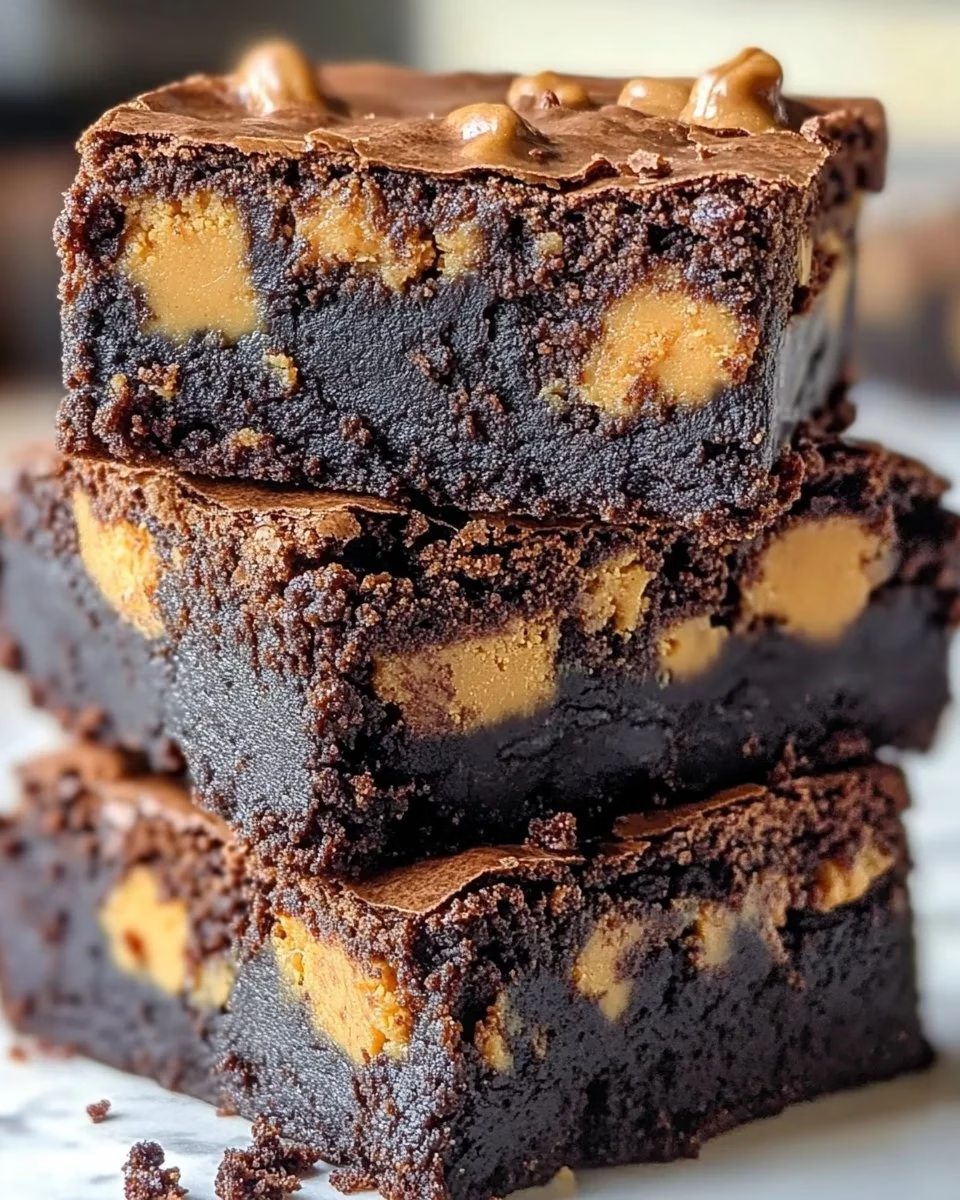
What made it stick was how forgiving it proved to be. I could misjudge the measuring by a spoon here or there and still end up with a pan anyone would be proud to take to a neighbor. The crumb stayed soft, the top took on a dull sheen that hinted at moisture inside, and the cocoa brought the chocolate note without fighting the peanut butter.
This recipe matters because it speaks to real kitchens. I tested it in small batches at different temperatures and with different peanut butters. Each test taught something useful and made the final version both playful and reliable. It is a recipe I return to when I want comfort food that feels a little clever.
The Story Behind This Small-Batch The BEST Peanut Butter Brownies EVER
The moment it felt right was when I watched a spatula pull across the batter and leave a glossy, slow-moving trail. Earlier attempts were either too cakey or too oily. I kept lowering the flour like ingredients and trusted the structure from the eggs, sugar, and baking soda to do the rest. The breakthrough came when I looked for visual cues rather than exact times alone.
I remember serving a tiny pan to a friend who said it tasted like nostalgic candy and a homemade cookie at the same time. That comment stuck because it echoed what I was chasing. Since then I have kept the recipe simple on purpose. Simplicity invites experimentation and makes it easier to share.
The Rhythm of Making The BEST Peanut Butter Brownies EVER
“The moment the texture shifts, you know it’s ready.”
Making this recipe feels like a short piece of music. You start with a hum of peanut butter and sugar, add the eggs and vanilla and watch the batter come together in a predictable rhythm. Then the cocoa and leavens are folded in to settle the texture.
Watch for the surface to take on a soft sheen before it goes into the oven. That gloss is a small victory. Once baked, the edges should pull away slightly from the pan and the center should still have a close, tender give when you press it lightly.
Ingredients You’ll Need
1 cup peanut butter (this helps with structure and flavor)
1 cup granulated sugar (gives sweetness and a slightly crisp top)
2 large eggs (these provide lift and structure)
1 teaspoon vanilla extract (adds warmth without taking over)
1/2 cup cocoa powder (for chocolate depth without heaviness)
1/4 teaspoon salt (balances sweetness and highlights flavors)
1/2 teaspoon baking soda (gives a gentle rise and light crumb)
1/2 cup chocolate chips (optional) (fold in for pockets of melted chocolate)
Each ingredient plays a clear role and keeps the recipe approachable. You do not need specialty flour or equipment. If you choose a natural peanut butter or a creamy one, the result will vary slightly in sheen and texture but stay within the same comforting family.
How This The BEST Peanut Butter Brownies EVER Comes Together
The beauty here is in trusting small, visible cues. Start by stirring peanut butter and sugar until they look glossy and smooth. When eggs go in, the batter will brighten and thin a little. Once the cocoa mixes in, stop when you see a uniform chocolate color without streaks.
The baking time is a guideline because oven heat and pan material change the outcome. I test with a toothpick and by pressing the center lightly with a fingertip through an oven mitten. The brownies are ready when the center feels soft but set and a toothpick shows a few moist crumbs.
Step-by-Step Directions
-
Preheat your oven to 350°F (175°C) and grease a baking pan. Make sure the oven is fully warm before you slide the pan in, and use a pan size that matches the recipe so the bake time stays true. A lightly greased pan helps the edges release cleanly when cooled.
-
In a mixing bowl, combine peanut butter and sugar until smooth. Stir until the mixture has a glossy, even texture and no large lumps remain, watching for a silky sheen that tells you they are well combined. This step sets the tone for the final crumb.
-
Add in the eggs and vanilla extract, and mix well. Beat until the batter lifts into a ribbon and blends to a consistent color, which shows the eggs are fully incorporated. The mixture should lighten and thin slightly, which is a good sign.
-
Stir in the cocoa powder, salt, and baking soda until just combined. Fold gently to keep the batter dense but not overworked; stop once the cocoa disappears and you have a uniform chocolate color. Overmixing can tighten the crumb, so trust the look rather than counting strokes.
-
Optionally, fold in chocolate chips for extra fudginess. Scatter them in and fold a few times so pockets of chocolate appear, but do not stir until the chips dissolve. Their placement will give surprise bites of melted chocolate.
-
Pour the batter into the prepared baking pan and spread evenly. Use a spatula to smooth the surface and tap the pan gently on the counter to settle any air bubbles. A level top helps the bake finish evenly.
-
Bake for 20-25 minutes, or until a toothpick inserted comes out with a few moist crumbs. Start checking close to 18 minutes because oven heat varies; look for edges that are just set and a center that still looks slightly glossy. The brownies will finish setting as they cool.
-
Let cool before cutting into squares and enjoying. Allow at least 20 minutes for the pan to lose the initial heat, during which the center firms and the flavors meld. Cut with a sharp knife and wipe it between passes for neat squares.
Sharing The BEST Peanut Butter Brownies EVER
These brownies are built for sharing in small, friendly ways. They make a quiet Saturday treat and they travel well tucked into a box with parchment. I like to bring a pan when friends stop by, because the smell of warm peanut butter and cocoa is an immediate welcome.
Serve them slightly warm with a scoop of plain ice cream or a dollop of whipped cream for contrast. They also do well with a sprinkle of flaky salt on top to highlight the peanut flavor. When I need a simple dessert that feels thoughtful, these brownies are my go to.
You can pair them with other comforting recipes for a small buffet. One afternoon I placed them beside a tray of roasted sweet potatoes and found the contrast delightful, similar to how a dinner of candied roots can balance a rich dessert like the best ever Southern candied yams in a casual holiday spread.
Keeping The BEST Peanut Butter Brownies EVER Fresh
Store cooled brownies in an airtight container at room temperature for up to three days. The texture will remain tender and the flavors will deepen. If you plan to keep them longer, refrigerate for up to a week; the chill tightens the crumb but it warms nicely to room temperature.
If you freeze them, wrap individual squares in plastic wrap and place them in a freezer bag for up to two months. Thaw at room temperature or warm briefly in a low oven. The texture may soften slightly after freezing, but the flavor remains good and reliable.
Moisture is the main thing to watch. If your kitchen is humid, a quick line of parchment in the container helps absorb a bit of condensation. For the crispiest top, store at room temperature rather than the fridge.
Carol’s Baking Notes
-
Use creamy peanut butter for the smoothest batter. Chunky works too, but the texture changes and you will notice peanut pieces in the crumb. I prefer creamy for a more even, fudgy bite.
-
Cocoa powder choice matters. Dutch process will give a rounder flavor while natural cocoa can be brighter. Either is fine, but pick one and stick with it so your results are predictable. I often reach for natural for its sharper chocolate note.
-
Watch the bake time closely. I often pull the pan a couple minutes early and let residual heat finish it. This keeps the center soft and prevents an overcooked edge. The toothpick with a few moist crumbs is the best check.
-
If your batter seems too stiff, add a teaspoon or two of neutral oil or a splash of milk. The goal is a dense but spreadable batter. Small adjustments like this are part of practical testing, not failure.
-
Salt works magic. A small sprinkle on top right after the pan comes out of the oven brings out the peanut butter and chocolate in a one simple step. Use a flaky finishing salt for the nicest textural contrast.
Variations I’ve Tried
Chocolate chip swirl. Stir half the chocolate chips into the batter and save the other half to press on top before baking for a glossy, chip‑studded top. The chips on the surface create tiny molten pools.
Thin and crispy. Spread the batter thinner in a larger pan and shave a few minutes off the bake. This makes an almost cookie like brownie that is bright on the edges and chewy in the middle.
Peanut butter frosting. Make a quick frosting with peanut butter, powdered sugar, and a splash of milk. Spread it over cooled brownies for a richer, more dessert like finish. I reserve this when I need a special treat.
Nut and sea salt. Fold in chopped toasted peanuts or pecans for crunch and finish with a light dusting of salt. The nut texture lifts each bite and nods to classic peanut desserts.
Spicy chocolate. Add a pinch of cayenne or ground chili to the batter for a warm, unexpected kick. It is subtle and brings depth to the cocoa.
These variations respect the recipe’s simple structure and let you explore without breaking the method.
FAQs About The BEST Peanut Butter Brownies EVER
Can I make this ahead of time?
Yes, and in many cases it benefits from resting. Once the brownies cool fully, the texture settles and flavors knit together, so making them a day ahead often makes them taste even more cohesive.
What peanut butter should I use?
Creamy peanut butter gives the creamiest, most even crumb. Natural peanut butter can work but watch for oil separation and stir it in if needed. If you like visible peanut pieces, use chunky.
Can I make them vegan or egg free?
I have not fully converted this exact formula, but many bakers swap each egg for a flax egg and increase baking time slightly. Results vary and the texture will be different, leaning more cake like. If you try a substitute, treat it as a small test.
Why do my brownies come out crumbly?
Crumbly brownies often mean overbaking or not enough fat. Try shortening the bake by a few minutes, or check your peanut butter choice. A peanut butter with higher oil content can help, as can a touch of added oil if the batter seems too stiff.
How do I get that glossy top?
A smooth, glossy top comes from properly creamed peanut butter and sugar and the right bake time. Avoid overmixing after adding cocoa and watch the oven closely so the top sets without drying out.
A Final Thought
I hope these brownies invite you into playful testing and steady comfort. They are a recipe that rewards small experiments and honest observations, the kind of thing that feels right on a weekday afternoon and special enough for a weekend treat. Bake a pan, notice the little cues, and make small notes; in my kitchen that gentle curiosity keeps dessert baking both reliable and joyful.
From my kitchen to yours, may you find a few golden moments with each bite of The BEST Peanut Butter Brownies EVER and feel confident to make them your own.
Peanut Butter Brownies
Ingredients
Main Ingredients
- 1 cup peanut butter this helps with structure and flavor
- 1 cup granulated sugar gives sweetness and a slightly crisp top
- 2 large eggs these provide lift and structure
- 1 teaspoon vanilla extract adds warmth without taking over
- 1/2 cup cocoa powder for chocolate depth without heaviness
- 1/4 teaspoon salt balances sweetness and highlights flavors
- 1/2 teaspoon baking soda gives a gentle rise and light crumb
- 1/2 cup chocolate chips (optional) fold in for pockets of melted chocolate
Instructions
Preparation
- Preheat your oven to 350°F (175°C) and grease a baking pan.
- In a mixing bowl, combine peanut butter and sugar until smooth.
- Add in the eggs and vanilla extract, and mix well.
- Stir in the cocoa powder, salt, and baking soda until just combined.
- Optionally, fold in chocolate chips for extra fudginess.
- Pour the batter into the prepared baking pan and spread evenly.
Baking
- Bake for 20-25 minutes, or until a toothpick inserted comes out with a few moist crumbs.
- Let cool before cutting into squares and enjoying.
