
The air in my kitchen smelled like warm milk and soft butter the first night I tested these stovetop custard cream buns, and that small comfort folded into the dough with every press of my palm. I remember thinking that a late night batch would pair perfectly with something cool and nutty, like a simple scoop of almond butter paleo ice cream, just to balance the pillowy bread and sweet custard. That quiet mix of curiosity and hands-on work is what brought this recipe into being and what I hope you feel when you try it.
Why This Stovetop Custard Cream Buns Became a Favorite
I fell for these buns because they ask for little but give a lot. They use a small bowl of pantry staples and a stovetop pot instead of an oven, which makes them feel playful and possible on any night.
The first time the dough rose into soft mounds on my counter, it felt like a small, steady triumph. I kept notes on timing, dough feel, and how the custard behaved inside the bun so the final method would be forgiving.
I tested in small batches and adjusted temperatures until the buns were tender, not dense, and the custard stayed creamy, not runny. That mix of testing and hands-on fixing is the heart of how this recipe became a keeper.
The Rhythm of Making Stovetop Custard Cream Buns
“The moment the texture shifts, you know it’s ready.”
There is a quiet rhythm to this recipe that I love. Heat the milk, bring the dough together, let it rest, shape the buns, and then watch them rise again on the stovetop.
Look for a dough that feels soft and slightly tacky but not sticky to the touch. When I knead, I listen for a smoothness under my palms and watch the surface get a slight sheen as gluten forms.
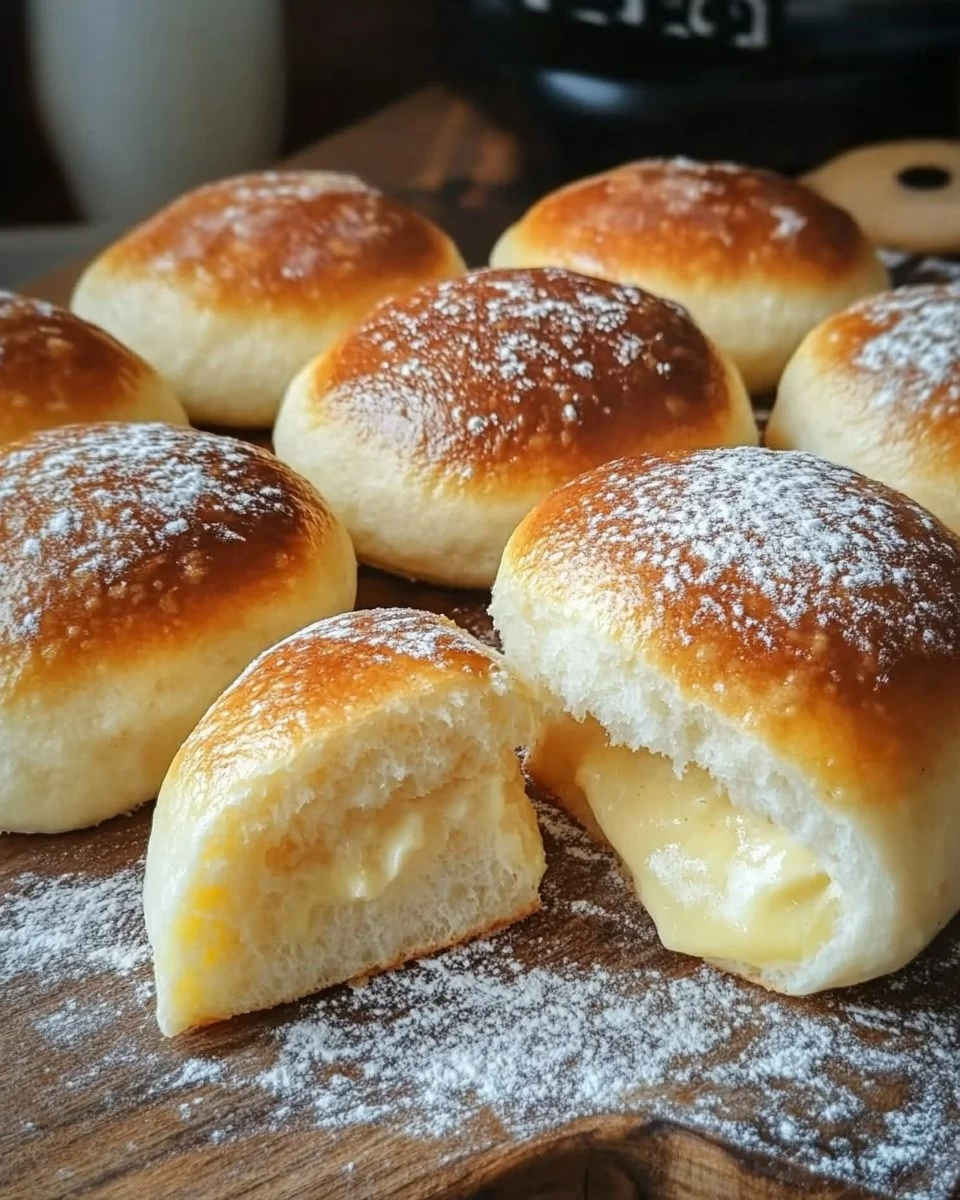
While they cook, steam builds inside the pot and the tops turn matte and tender. When I lift the lid and smell the warm custard and butter, I know the buns are close. The texture shifts from doughy to fluffy in a few soft, decisive moments.
Ingredients You’ll Need
2 cups all-purpose flour — this helps with structure and keeps the bun tender.
1/4 cup sugar — for a gentle sweet backbone without being cloying.
1 packet (2 1/4 tsp) active dry yeast — the lift and air that make the buns soft.
1/2 cup milk — adds richness and helps the dough come together.
1/4 cup butter — for richness and a soft crumb.
1/2 teaspoon salt — balances the sweetness and strengthens the dough.
1/2 cup custard (prepared) — the creamy center that brings comfort.
1/2 cup water — used to adjust dough consistency and steam in the pot.
1 egg (for egg wash) — gives a gentle gloss and color to the tops.
Each item plays a clear role and the list stays small so you can focus on feel and timing rather than a long shopping list. The custard can be store bought or homemade. If you make it yourself, cool it fully so it does not make the dough soggy when you fold it in.
Step-by-Step Directions
- In a bowl, combine flour, sugar, yeast, and salt. Mix briefly until the dry ingredients look even and pale, showing no clumps. I watch for a balanced blend with yeast spread evenly so each bun rises the same.
- Heat milk and butter until warm; add to dry ingredients and mix until a dough forms. Aim for warmth that feels like a cozy bath on your wrist, not hot. Stir until the mixture becomes a rough dough and no dry flour pockets remain.
- Knead the dough for about 10 minutes, then let it rise in a warm place for 1 hour. Knead until the dough feels smooth and slightly elastic under your hands, with a faint sheen. Place it in a lightly greased bowl, cover, and stop when it has roughly doubled in size.
- Once risen, punch down the dough and divide it into equal pieces. I shape pieces that fit comfortably in my palm so they cook evenly on the stovetop. Watch that the dough has air pockets when you press it lightly and then springs back slowly.
- Flatten each piece and place a spoonful of custard in the center, folding the dough over to seal. Use a small spoon of cold custard so it stays contained during cooking. Press seams gently and tuck ends under to make neat little packages that hold their shape.
- Place the buns on a greased stovetop pot, cover, and let rise for another 30 minutes. Grease the pot well so the buns do not stick as they puff. Let them rest until you see slight rounding and a hint of spring when touched.
- Cook on low heat for about 20-25 minutes until fluffy, brushing with egg wash before cooking. Brush the tops lightly with beaten egg for a soft gloss and color, then cover and keep the heat low so they steam rather than burn. Stop once the buns feel set and the bottom sounds hollow when tapped gently.
When I Serve Stovetop Custard Cream Buns
These buns feel right for slow weekend breakfasts, a cozy dessert after a simple meal, or as a warm surprise at tea. I like to plate two or three on a small board with a clean cloth napkin so they look inviting but casual.
For a relaxed dessert, serve with a small jug of extra custard or a dusting of powdered sugar. For a breakfast twist, pair with fruit and a cup of tea or coffee. The buns hold their warmth and the custard stays soft long enough to savor.
If I share them with friends, I cut one open to show the custard center and let them choose a favorite bite. They make a gentle centerpiece for a small gathering because they are hand-held, comforting, and easy to pass around.
Keeping Stovetop Custard Cream Buns Fresh
Store leftover buns in an airtight container at room temperature for up to one day. The soft crumb and custard hold up best on the day you make them, when steam and freshness are still present.
You can keep them in the fridge for up to three days, though the dough will firm and the custard will set more. To revive a chilled bun, warm it gently in a covered skillet on low heat or steam it briefly until soft again.
If you want to freeze, place buns in a single layer on a tray until firm, then wrap individually and freeze for up to one month. Thaw slowly in the fridge and reheat gently so the custard regains a creamy feel without becoming runny.
Carol’s Baking Notes
- Temperature makes a quiet but real difference. Warm milk helps yeast wake quickly. If your milk is too hot or too cold the rise will take longer or be uneven.
- Kneading time matters but does not need to be perfect. Aim for about 10 minutes by hand or 6 to 8 minutes on a low speed. You want a smooth, slightly elastic dough that springs gently when pressed.
- Custard temperature is important at filling. Use cold custard straight from the fridge so the dough does not absorb moisture and become soggy. If your custard seems thin, chill it longer or thicken slightly with a little cornstarch.
- Low, steady heat on the stovetop is your friend. I tested higher heat and the outsides browned too fast while the centers stayed undercooked. A slow, covered cook gives the buns a tender crumb.
- Egg wash should be light. Too much makes the surface go shiny and thick. A gentle brush gives color and a soft sheen without sealing the bun tight.
Variations I’ve Tried
I like to add a whisper of citrus zest to the custard for brightness and the results are often a little surprising. It cuts the sweetness and makes each bite feel lively, especially if you use orange or lemon.
For a nutty variation, sprinkle a little toasted almond on the custard before sealing each bun. The crunch pairs well with soft bread and a creamy middle. If you want to try a richer filling that changes the texture, I have also tested a light cream cheese blend and it made a denser but still lovely bun.
If you love layered sweets, try pairing these buns with a recipe for flaky nutty treats like baklava cream sandwich cookies for a dessert spread that mixes soft and crisp textures. That pairing was a fun test in contrast and it felt like a small party on a plate.
Other small twists that worked: a pinch of cinnamon in the dough for warmth, a small jam dollop under the custard for a sweet surprise, or brushing with a light honey glaze after cooking for a glossy finish.
FAQs About Stovetop Custard Cream Buns
Can I make this ahead of time?
Yes, and in some cases it actually sets better after resting, especially once the texture has fully settled. Make the buns and keep them chilled, then reheat gently before serving.
What if my dough is sticky?
Dust lightly with flour and continue kneading for a few minutes. Sticky dough often means it needs a touch more flour or a longer knead to develop the gluten.
How do I know if they are cooked through?
Tap a bun gently; a hollow sound or a set, springy top usually means they are done. You can also check one by opening it to ensure the dough is not raw around the custard.
Can I use instant yeast instead of active dry?
Yes, but decrease the rise time slightly since instant yeast works faster. Keep an eye on the dough and stop rising when it has doubled.
Can I make the custard from scratch?
Absolutely. A simple stovetop custard made with milk, sugar, egg yolks, and a touch of corn starch will work. Cool it completely before using so it stays put inside the bun.
A Final Thought
I hope this Stovetop Custard Cream Buns encourages you to experiment a little and trust your instincts the way I have learned to trust mine. Baking in small batches teaches you to notice texture and smell and to enjoy the quiet moments in the kitchen.
Make a batch on a slow afternoon, share one with a friend, and keep the rest warm if you can. The best part of these buns is the way small care and a curious touch turn simple ingredients into something comforting and a little brave.
Stovetop Custard Cream Buns
Ingredients
Dough Ingredients
- 2 cups all-purpose flour This helps with structure and keeps the bun tender.
- 1/4 cup sugar For a gentle sweet backbone without being cloying.
- 1 packet active dry yeast (2 1/4 tsp) The lift and air that make the buns soft.
- 1/2 cup milk Adds richness and helps the dough come together.
- 1/4 cup butter For richness and a soft crumb.
- 1/2 teaspoon salt Balances the sweetness and strengthens the dough.
- 1/2 cup water Used to adjust dough consistency and steam in the pot.
- 1 egg for egg wash Gives a gentle gloss and color to the tops.
Custard Filling
- 1/2 cup custard (prepared) The creamy center that brings comfort; can be store-bought or homemade.
Instructions
Preparation
- In a bowl, combine flour, sugar, yeast, and salt. Mix briefly until the dry ingredients look even and pale.
- Heat milk and butter until warm; add to dry ingredients and mix until a dough forms.
- Knead the dough for about 10 minutes, then let it rise in a warm place for 1 hour.
- Once risen, punch down the dough and divide it into equal pieces.
- Flatten each piece and place a spoonful of custard in the center, folding the dough over to seal.
Cooking
- Place the buns on a greased stovetop pot, cover, and let rise for another 30 minutes.
- Cook on low heat for about 20-25 minutes until fluffy, brushing with egg wash before cooking.