Sometimes the best afternoons are quiet ones in the kitchen, with a kettle warming and the smell of cocoa and butter folding through the house as I make a batch of red velvet cookies for people I love. I remember a winter when I carried a plate of these warm, soft cookies from my oven to a small gathering and watched everyone slow down, smile, and take a moment. Baking these cookies is an act of care that asks for patience and gives back familiarity. I often think a slice of something rich on the side can make the moment feel complete, and once I served these beside a Christmas Red Velvet Cheesecake for a holiday brunch and it felt like the whole room exhaled.
Why This Red Velvet Cookies Has Always Been a Favorite
I first wrote this recipe down on a scrap of paper when my youngest was small and afternoons were for easy treats and quiet conversation. It became a favorite because the dough is forgiving and the cookies come out with a soft center and a tender edge, the kind that invites you to linger with a cup of tea. Over the years I kept returning to the same method because it rewards care with steady, comforting results.
There is a kind of ritual in making these cookies that feels rooted and simple. I measure with respect, I bring ingredients to room temperature when they ask for it, and I watch the dough change. That steady practice gives these cookies their warmth, and it keeps them in my rotation whenever I want to bake for family or bring a small kindness to a neighbor.
This recipe has the right balance of sweetness and soft texture, and the white chocolate and sprinkles finish it in a way that feels festive without fuss. It is the sort of recipe you hand down, because it is easy to follow and hard to ruin. That is why it has stayed with me and why I still make it when I want to offer something familiar and true.
The Story Behind This Red Velvet Cookies
There is a small story stitched into every batch I make. Once, on a gray afternoon, my little grandson helped me drop dough onto the baking sheet and hummed while we waited for the oven to do its work. We watched through the oven window together and when the timer rang he declared them perfect. That moment is the kind of memory these cookies hold.
They have been on birthday tables and simple weekday dessert plates, and they show up when I need a reliable recipe that comforts without being elaborate. The red color feels special, and the cocoa gives a quiet depth that keeps the cookies from being overly sweet. When friends ask for a recipe that feels like home, this is the one I give them.
I like how the recipe keeps things honest and steady. It asks for a little patience and pays that back with a reliable texture and flavor every time. That steady nature has made it feel like a small tradition in my kitchen, one I am happy to share.
Bringing Red Velvet Cookies Together
“Some recipes just feel right the moment they come together.”
The real pleasure in making these cookies is in the gentle process. Start by bringing your butter and eggs to room temperature so they blend smoothly. Mix until the butter and sugar are light and fluffy, and you will feel how the texture becomes airy and soft.
When you add color and vinegar to the batter the dough takes on a bright warmth, and that hue always brings a little cheer to the work. I like to mix the dry ingredients separately and add them slowly, watching the dough change texture as it comes together. These small moments remind me that baking is patient work and that a calm hand makes better cookies.
Ingredients You’ll Need
2 1/2 cups all-purpose flour, sift lightly if it looks packed
2 tablespoons unsweetened cocoa powder, for a delicate chocolate depth
1 teaspoon baking soda
1/2 teaspoon salt
1/2 cup unsalted butter, softened, room temperature helps with texture
1 1/2 cups granulated sugar
2 large eggs, room temperature blends more evenly
1 cup buttermilk, slightly warmed brings a tender crumb
2 tablespoons red food coloring, for a bright, festive color
1 teaspoon vanilla extract, this adds a classic richness
1 teaspoon white vinegar
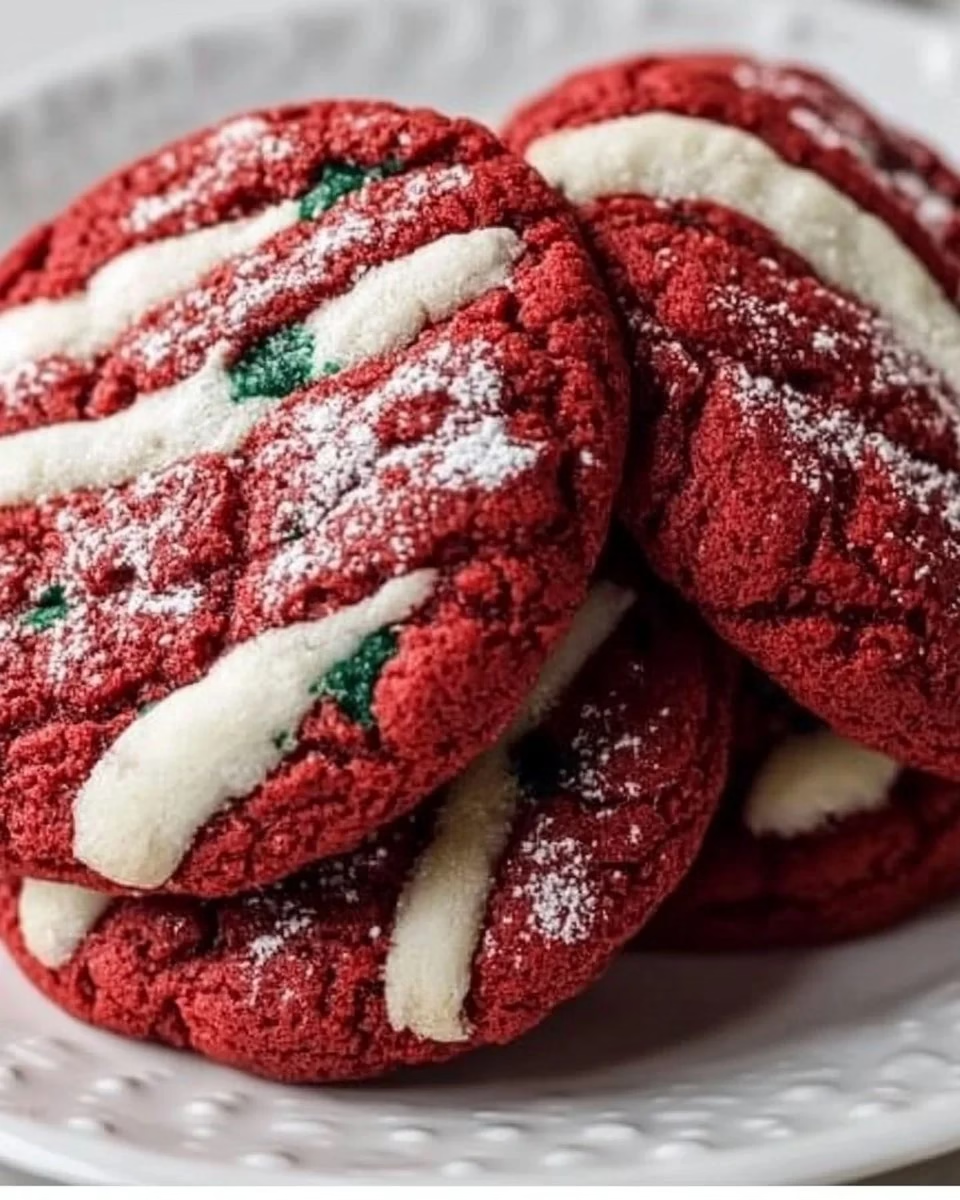
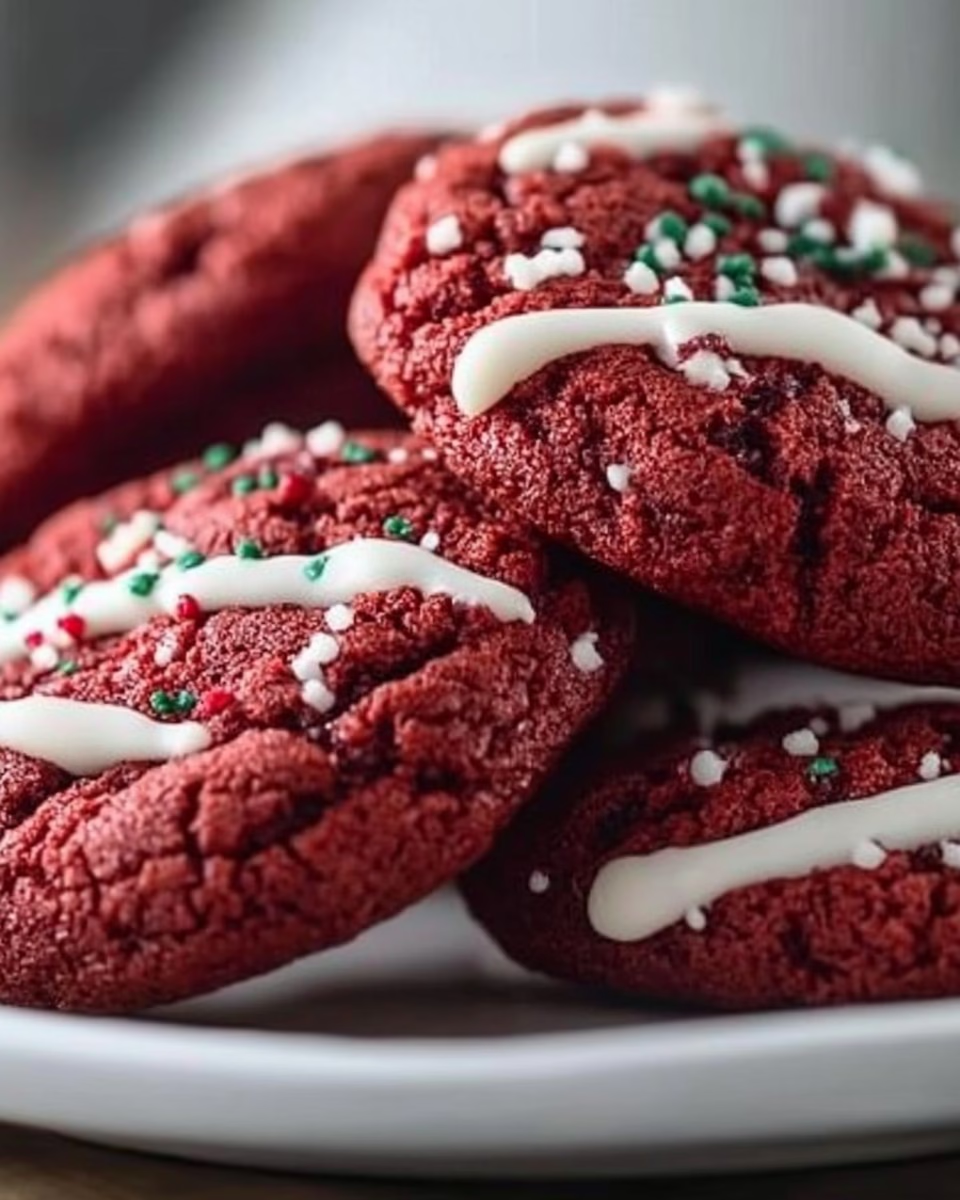
12 oz white chocolate chips or melting wafers, for dipping and gentle sweetness
Festive holiday sprinkles for decoration, add just before chocolate sets
I list these carefully because each one plays a quiet part in how the cookies come out. The butter and eggs at room temperature make the dough smooth. The vinegar is a small but important twist that helps the color and texture settle just right. The white chocolate and sprinkles are optional in spirit but lovely for a holiday feel.
Step-by-Step Directions
-
Preheat your oven to 350°F (175°C) and line two large baking sheets with parchment paper. Make sure the oven rack sits in the middle so heat is even and the cookies bake gently. Having the pans ready keeps the dough moving and stops it from sitting too long.
-
In a medium bowl, whisk together the all-purpose flour, cocoa powder, baking soda, and salt until well combined. This gives an even lift and a smooth chocolate tone through every bite. Set this dry mixture aside so you can add it evenly to the batter.
-
In a large mixing bowl, beat the softened butter and granulated sugar together using an electric mixer on medium speed until light and fluffy, about 3-4 minutes. Scrape the bowl down and add the eggs one at a time, beating well after each addition. Mix in the vanilla extract, red food coloring, and white vinegar until the mixture is uniformly bright red and fragrant.
-
With the mixer on low speed, alternate adding the dry ingredients and buttermilk to the butter mixture, beginning and ending with the dry ingredients. Mix just until combined after each addition, being careful not to overmix so the cookies stay tender. The dough should be soft and slightly sticky with a vibrant red color and a gentle, even texture.
-
Using a cookie scoop or tablespoon, drop rounded balls of dough onto the prepared baking sheets, spacing them about 2 inches apart. Bake for 10-12 minutes, or until the cookies are set around the edges but still soft in the center. They should not brown so watch the time and check for a soft set.
-
Remove from oven and let cool on the baking sheet for 5 minutes before transferring to a wire rack to cool completely. They will continue to set as they cool, so give them this little rest before decorating. If you gamble on decorating while too warm, the chocolate may not hold its shape.
-
Once cookies are completely cooled, melt the white chocolate chips in a microwave-safe bowl in 30-second intervals, stirring between each interval until smooth. Dip the top half of each cookie into the melted white chocolate, allowing excess to drip off. Immediately sprinkle with festive holiday sprinkles before the chocolate sets.
-
Place on parchment paper and allow the chocolate to harden completely, about 15-20 minutes. You can chill them briefly to speed this along, but mostly let them sit at room temperature so the chocolate keeps a gentle gloss. When the chocolate is firm, they are ready to serve or store.
Serving Red Velvet Cookies With Care
I like to serve these cookies on a simple plate placed in the center of a table so people can help themselves. They make a calm addition to a tea tray or a small after-dinner dessert plate. Their bright color and soft center invites conversation and slow, appreciative bites.
For a festive spread, I sometimes arrange these cookies with other small sweets and a pot of coffee or a mug of warm milk. The white chocolate and sprinkles make them feel like a celebration without being fussy. For a playful holiday table, we sometimes place a tray of these cookies beside a plate of Grinch Oreo Balls with Red Velvet Oreos so the kids can choose and of course grin at the bright colors.
If you are bringing them to a gathering, place them in a shallow tin lined with parchment so they do not crush. A small note tied on top can make a simple batch feel like a thoughtful gift. The cookies travel well when cooled and wrapped gently.
Storing Red Velvet Cookies for Later
Store cooled cookies in an airtight container at room temperature for up to four days. Place a sheet of parchment paper between layers if you stack them so the chocolate stays neat. These cookies soften slightly over time, which I find comforting, but if you prefer a firmer texture keep them out of humidity.
For longer storage, freeze the baked and cooled cookies in a single layer on a baking sheet until firm, then transfer them to a zip-top bag or airtight container. They keep well for up to three months this way and thaw quickly on the counter. If you wish to freeze dough balls, place them on a baking sheet until firm and then bag them; bake from frozen, adding a minute or two to the time.
To freshen a cookie that has gone slightly stale, warm it for a few seconds in the microwave or for a short time in a low oven until just warm. That small heat brings back the softness and the aroma feels like a hug from the kitchen.
Mary’s Baking Notes
-
Bring ingredients to room temperature when possible. Butter and eggs that warm slightly will blend more smoothly and give a tender crumb. It also makes mixing easier and more predictable.
-
Watch your oven closely. Every oven has its own personality, and these cookies should not brown. Pull them when the edges feel set and the centers are still soft to the touch. They will continue to firm as they cool.
-
Do not overmix once you add the dry ingredients. Mix just until the flour disappears and the dough looks even. Overworking the dough can make the cookies tougher, and the joy of these cookies is in their delicate texture.
-
Use white chocolate chips or melting wafers that you trust. Some white chocolate can seize or become grainy when tempered badly. Melt slowly and stir patiently to keep a smooth shine for dipping.
-
If you like a milder red, reduce the food coloring slightly or blend with a drop of cocoa for a dustier tone. The color should feel warm and inviting, not harsh, and a softer red often reads as more homey and comforting.
Family Variations on Red Velvet Cookies
Add a little cream cheese frosting between two cookies to make a sandwich cookie reminiscent of a familiar cake. The tang of cream cheese pairs wonderfully with the cocoa and butter in the cookie and makes a dessert that feels festive and a bit old fashioned.
Stir in a handful of chopped nuts if your family likes a gentle crunch. Pecans or walnuts add a toasted note that sits well with the cocoa. Toast them lightly in a dry pan first to bring out more flavor.
Swap the white chocolate for a gentle drizzle of dark chocolate for a less sweet finish. It brings a nice balance to the red velvet taste while preserving the soft center. A sprinkle of sea salt on the dark chocolate adds a grown-up touch that still feels homey.
Make mini cookies for a cookie tray by reducing scoop size and the baking time. They bake fast and are perfect for a party where people want a little bite of many things. The festive color and quick bite make them a favorite at gatherings.
For a winter twist, add a pinch of cinnamon or a whisper of orange zest to the batter. Both are small changes that keep the cookies close to the original while giving a seasonal note that reminds me of evenings with friends.
FAQs About Red Velvet Cookies
Can I make this recipe ahead of time?
Yes, and it often holds up beautifully, especially when stored properly and allowed to rest overnight. If you want to prepare dough ahead, keep it chilled for up to 48 hours or freeze it for longer storage.
How can I get the cookies to stay soft without spreading too much?
Use room temperature butter and chill the dough briefly if your kitchen is warm. Also make sure the oven is at the stated temperature and do not overmix after adding flour; the cookies should hold shape and remain tender.
What if I do not have buttermilk?
You can make a quick substitute by adding one tablespoon of vinegar or lemon juice to a cup of milk and letting it sit for a few minutes. It will thicken slightly and give the same tender effect as buttermilk in the dough.
Can I use a different type of chocolate for dipping?
Yes, you can use dark chocolate or milk chocolate if you prefer. Be mindful of melting times and stir patiently so the chocolate remains smooth for dipping. If you use darker chocolate, a light sprinkle of flaky salt can brighten the flavor.
Are the sprinkles necessary?
No, they are optional and meant to add a cheerful finish. If you do not have sprinkles on hand you can leave the cookies plain, or finely chop extra white chocolate and press it on while the chocolate is still soft for a neat look.
A Final Thought
I hope this recipe brings a gentle kind of comfort to your kitchen, the same way it has in mine across many quiet afternoons and small gatherings. Baking is a patient gift we give to people we love, and these cookies carry that warmth in each soft bite. Take your time with the steps, trust the little cues, and enjoy the bright color and tender texture that come from careful work and a steady hand.
Red Velvet Cookies
Ingredients
Dry Ingredients
- 2 1/2 cups all-purpose flour Sift lightly if it looks packed
- 2 tablespoons unsweetened cocoa powder For a delicate chocolate depth
- 1 teaspoon baking soda
- 1/2 teaspoon salt
Wet Ingredients
- 1/2 cup unsalted butter Softened; room temperature helps with texture
- 1 1/2 cups granulated sugar
- 2 large eggs Room temperature blends more evenly
- 1 cup buttermilk Slightly warmed brings a tender crumb
- 2 tablespoons red food coloring For a bright, festive color
- 1 teaspoon vanilla extract Adds a classic richness
- 1 teaspoon white vinegar
For Decoration
- 12 oz white chocolate chips or melting wafers For dipping and gentle sweetness
- Festive holiday sprinkles Add just before chocolate sets
Instructions
Preparation
- Preheat your oven to 350°F (175°C) and line two large baking sheets with parchment paper.
- In a medium bowl, whisk together the all-purpose flour, cocoa powder, baking soda, and salt until well combined. Set aside.
- In a large mixing bowl, beat the softened butter and granulated sugar together until light and fluffy, about 3-4 minutes.
- Scrape the bowl down and add eggs one at a time, beating well after each addition. Mix in vanilla extract, red food coloring, and white vinegar.
Mixing
- With the mixer on low speed, alternate adding the dry ingredients and buttermilk to the butter mixture, beginning and ending with the dry ingredients.
- Mix just until combined after each addition, being careful not to overmix.
Baking
- Using a cookie scoop or tablespoon, drop rounded balls of dough onto the prepared baking sheets, spacing them about 2 inches apart.
- Bake for 10-12 minutes, until the cookies are set around the edges but still soft in the center.
- Remove from oven and let cool on the baking sheet for 5 minutes before transferring to a wire rack.
- Once cool, melt the white chocolate chips in a microwave-safe bowl in 30-second intervals, stirring until smooth.
- Dip the top half of each cookie into the melted white chocolate and sprinkle with holiday sprinkles before the chocolate sets.
- Allow the chocolate to harden completely before serving.