I can still smell the warm chocolate and peanut butter when I close my eyes, the way it fills the kitchen like a blanket on a quiet afternoon. I remember setting a simple pan of brownies on the counter while children did homework and neighbors came by for a cup of tea. That ordinary day turned gentle and slow, the kind of baking that makes a house feel like home. If you enjoy small, comforting treats, you might also like my chocolate-covered peanut buttercream truffles, which carry the same cozy notes in a different shape.

Peanut Butter Swirled Brownies
Ingredients
For the Brownies
- 1/2 cup unsalted butter room temperature helps with texture and keeps the batter silky.
- 1 cup granulated sugar this adds classic sweetness and the familiar shiny top.
- 2 large eggs bring them closer to room temperature for a smoother batter.
- 1 teaspoon vanilla extract this adds warmth and a soft background note.
- 1/3 cup unsweetened cocoa powder look for a natural cocoa for that honest chocolate flavor.
- 1/2 cup all-purpose flour the small amount keeps the brownies tender and not cakey.
- 1/4 teaspoon salt this brings the flavors into balance.
- 1/4 teaspoon baking powder a little lift keeps the texture light.
- 1/2 cup creamy peanut butter creamy works best for smooth swirls and even ribbons.
Instructions
Preparation
- Preheat your oven to 350°F (175°C) and grease a 9×9 inch baking pan.
- In a medium saucepan, melt the butter over low heat.
- Remove from heat and stir in sugar, eggs, and vanilla until the mixture looks smooth and glossy.
Mixing
- Mix in cocoa, flour, salt, and baking powder until just combined.
- Pour half of the batter into the prepared pan and spread it evenly.
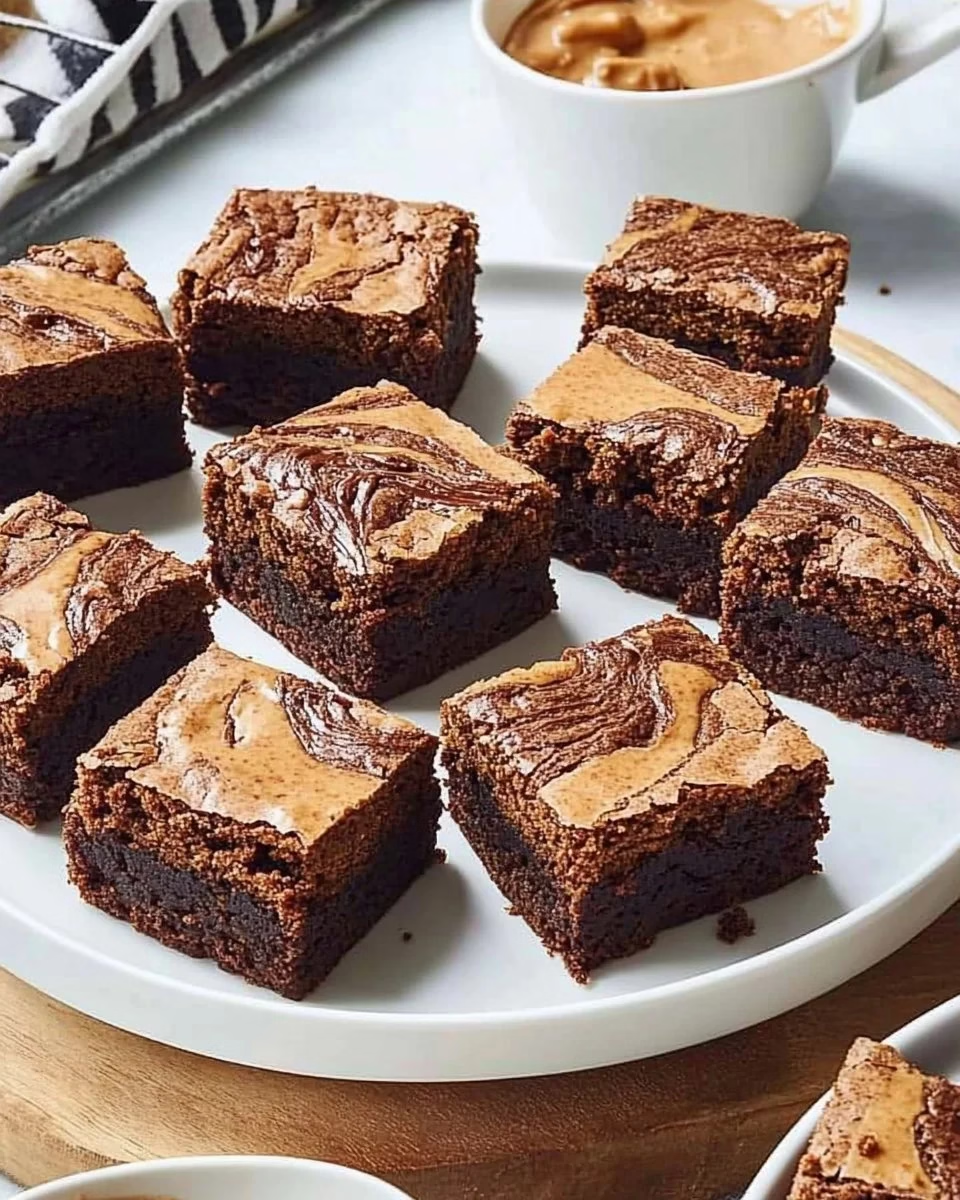
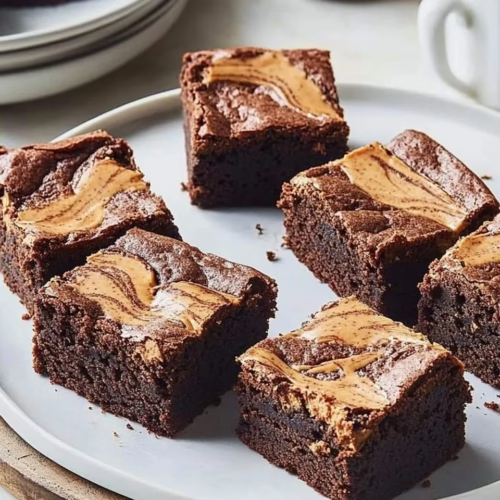
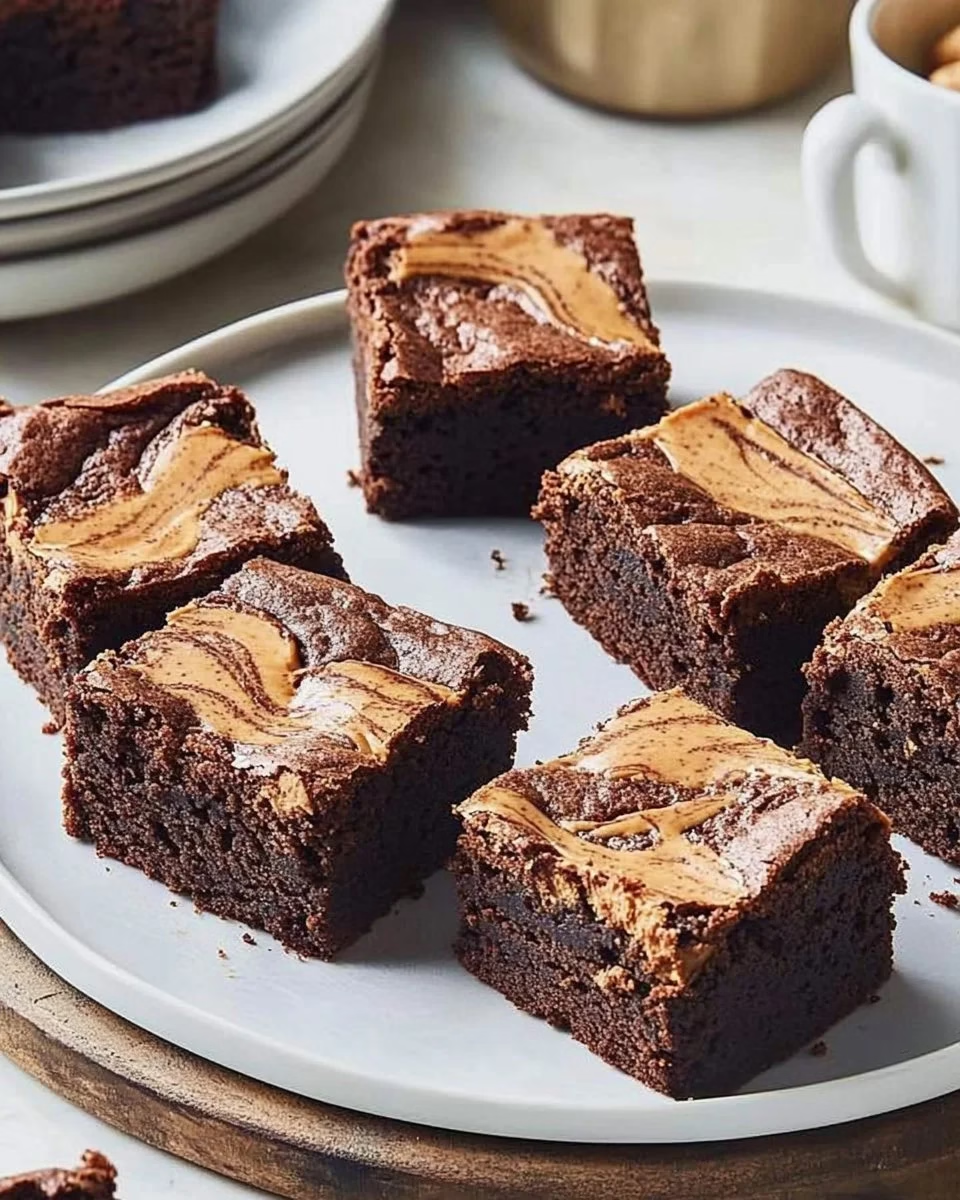
- Drop spoonfuls of peanut butter over the brownie batter, then swirl with a knife.
- Pour the remaining brownie batter over the top and spread evenly.
Baking
- Bake for 20-25 minutes or until a toothpick inserted comes out with a few moist crumbs.
- Allow the brownies to cool before cutting into squares.
Notes
Nutrition
The Story Behind This Peanut Butter Swirled Brownies
This recipe has a way of arriving at the right time. I first made it on a rainy afternoon years ago when I wanted something simple and honest. I had a little jar of peanut butter left over from a school lunch, and I thought to fold it into the familiar brownie batter. The first pan came out with a soft, glossy top and peanut butter ribbons that reminded me of the quilts my grandmother kept folded on the sofa.
It stayed in rotation because it is easy to trust. The ingredients are ones most kitchens already have and the steps do not demand speed or perfect timing. That makes it a good recipe for the days when you need comfort more than fuss. It also means you can teach it to a young helper who wants to learn the small rituals of baking.
Over time the recipe became a thing we share. I bring a pan to a neighbor who is ill, send a dish with new parents, and take a warm tray to the front porch when a friend needs to talk. The familiar aroma of cocoa and roasted peanuts seems to smooth out the frayed edges of a busy week. It is not showy. It is steady and comforting, the kind of sweet that arrives exactly where it should.
Small changes through the years have made the recipe friendlier without changing its heart. Sometimes I add a pinch more salt when tiny hands are around, and other times I stir the peanut butter a touch before dropping it in so it ribbons more easily. The result is always familiar, like a remembered line of a song you hum without thinking.
What Makes This Recipe So Reliable
Peanut Butter Swirled Brownies are reliable because they are simple and forgiving. There is no complicated tempering or precise timing that makes my palms sweat. The butter melts, sugar blends in, eggs and vanilla bring the batter together, and cocoa does the heavy lifting for flavor. The peanut butter adds warmth and a silky counterpoint that keeps each bite from feeling the same.
When I teach this recipe, I focus on gentle cues. The batter should look glossy and soft, not heavy and dry. The edges will tell you more than the clock. Once they feel set but still tender toward the center, the brownies are ready. That small reading of the oven and the batter is what keeps these squares tender and not overdone.
This recipe also sits well with a variety of tastes. If someone in your house prefers a nuttier bite, you can stir in a handful of chopped peanuts or a few chocolate chips. If the family likes their sweets a touch less sweet, a little extra cocoa will deepen the chocolate without stealing the peanut butter voice. Those small, careful choices make the recipe live in many homes long after it first arrives.
Bringing Peanut Butter Swirled Brownies Together
“Some recipes just feel right the moment they come together.”
Start calmly and set out your ingredients. Take a moment to measure and let the eggs come to room temperature if you can. Working steadily and without hurry is the point here. The batter will come together in a few steps and the peanut butter will settle into sweet ribbons that feel like a small piece of home in every slice.
I like to use a small saucepan to melt the butter and stir in the sugar and eggs off the heat. It keeps the batter smooth and helps the sugar dissolve a bit before the flour and cocoa step in. Once the batter is made, pouring it into the pan and then adding spoonfuls of peanut butter feels a bit like painting. Swirl gently with a knife and take a moment to enjoy the patterns as they come together.
If you are sharing this with a child or a new baker, let them handle the swirls. It is a forgiving place to make a mark. The oven does the rest, and the brownies bake into a familiar texture that is moist yet holds together when sliced. From there you can think about how to serve them, whether warm with a cup of tea or cooled and wrapped for a small gift.
I sometimes suggest trying a sibling recipe for a different day, such as peanut butter confetti squares, when you want to layer more colors and textures. The pantry can be your friend; these recipes share a similar heart and they teach the same patient approach to baking.
Ingredients You’ll Need
1/2 cup unsalted butter — room temperature helps with texture and keeps the batter silky.
1 cup granulated sugar — this adds classic sweetness and the familiar shiny top.
2 large eggs — bring them closer to room temperature for a smoother batter.
1 teaspoon vanilla extract — this adds warmth and a soft background note.
1/3 cup unsweetened cocoa powder — look for a natural cocoa for that honest chocolate flavor.
1/2 cup all-purpose flour — the small amount keeps the brownies tender and not cakey.
1/4 teaspoon salt — this brings the flavors into balance.
1/4 teaspoon baking powder — a little lift keeps the texture light.
1/2 cup creamy peanut butter — creamy works best for smooth swirls and even ribbons.
I list them plainly because simple ingredients are often the most comforting. If you have slightly different brands, that is fine. The small details, like letting eggs warm a touch or giving the butter time to rest, yield gentle improvements that any home baker can notice.
Step-by-Step Directions
Preheat your oven to 350°F (175°C) and grease a 9×9 inch baking pan. Make sure the oven rack sits in the middle so the heat reaches the pan evenly. Grease the pan with a bit of butter or line it with parchment for easier removal.
In a medium saucepan, melt the butter over low heat. Remove from heat and stir in sugar, eggs, and vanilla. Stir until the mixture looks smooth and glossy, with the sugar starting to settle in and the eggs fully mixed.
Mix in cocoa, flour, salt, and baking powder until just combined. Pour half of the batter into the prepared pan. Use a spatula to spread it gently so the surface is even and the batter reaches the corners.
Drop spoonfuls of peanut butter over the brownie batter, then swirl with a knife to create marbled patterns. Take your time and make soft, sweeping motions so the peanut butter ribbons through without fully blending.
Pour the remaining brownie batter over the top and spread evenly. Work gently so the peanut butter swirls stay visible and the top looks smooth enough to bake into a glossy finish.
Bake for 20-25 minutes or until a toothpick inserted comes out with a few moist crumbs. Watch for lightly golden edges and an overall set top, then test with the toothpick near the center for that tender crumb.
Allow to cool before cutting into squares and serving. Let the pan rest until the brownies hold their shape and you can slice cleanly, then cut and enjoy.
Serving Peanut Butter Swirled Brownies With Care
I like to cut these into modest squares and arrange them on a simple plate. They are easy to pass around at a small gathering or to tuck into a lunchbox. When warm, they feel like a soft hug; when cooled, they keep their texture and are easier to pack for a longer day.
A hot mug of coffee or a glass of cold milk makes a quiet companion to each bite. For a little extra warmth, you can pop a square in the microwave for ten seconds and watch the peanut butter shine. Serve on a low plate so people can reach in and take one without ceremony.
If you are giving these to someone, wrap them in parchment and tie with a bit of twine. The gesture matters more than perfect presentation. A small note or a simple ribbon turns a pan of brownies into a thoughtful offering that says you cared enough to bake.
At family gatherings we often place the pan in the center and let people help themselves. Children love the marbled tops and insist on the edge pieces while older hands often reach for the center. That little negotiation is part of the ritual. The brownies soften conversation and give people a reason to gather around the counter for a minute.
Storing Peanut Butter Swirled Brownies for Later
If you have leftovers, store them in an airtight container at room temperature for two to three days. They stay pleasantly soft and the peanut butter notes mellow into the chocolate. Keep them away from direct heat to avoid making the top overly sticky.
For longer storage, you can freeze individual squares. Wrap each piece in plastic wrap and slide them into a freezer bag. When you want one, thaw it on the counter for a half hour or warm it briefly in the microwave. The texture will be close to fresh and the flavor will be ready when you are.
If you are packing them for school lunches or work, put a small sheet of wax paper between layers to keep them from sticking. They travel well and arrive with their familiar scent and comforting feel intact. Trust that the brownie will soften rather than dry out when stored properly.
When reheating, go slow. Short bursts in the microwave or a few minutes in a low oven will warm the peanut butter ribbons without making the chocolate overly soft. That gentle return to warmth keeps the flavors bright and the texture right.
Mary’s Baking Notes
Use room temperature eggs when you can. They blend more smoothly into the batter and help it come together without overmixing. A smoother batter means a more tender finished brownie.
Stir the peanut butter before spooning it into the batter if it tends to separate in the jar. It makes the swirls more even and easier to swirl. The smoother the peanut butter, the neater the marble patterns.
Do not overbake. The center should be a bit soft when you take it out because it will continue to cook as it cools. A few moist crumbs on the toothpick are the sign of a brownie that will be tender and not dry.
If you do not have a 9×9 pan, use a similar sized square pan and adjust baking time in small increments. A slightly larger pan will make the brownies thinner and reduce the baking time by a few minutes, while a smaller pan will need a little more time.
Use a sharp knife for cutting and wipe it between slices for cleaner edges. If you want a softer look, a gentle hand and a serrated knife can give you rustic slices that still taste wonderful.
Family Variations on Peanut Butter Swirled Brownies
For a nutty twist, fold in a handful of chopped peanuts into the batter before pouring it into the pan. You get small pockets of crunch that lift each bite without changing the simple heart of the recipe.
If you like a more fudgy bite, reduce the baking powder by a pinch and watch the baking time closely. The brownies will stay denser and richer, which some of my family prefers for an after-dinner treat.
Add a sprinkle of flaky sea salt on top just before baking. It brightens the chocolate and gives a little contrast to the peanut butter ribbons. It is a small touch that feels grown-up and thoughtful.
For a seasonal change, stir in a teaspoon of cinnamon or a splash of orange extract into the batter. These small additions tuck the brownies into a particular time of year without stealing the familiar taste that makes them comforting.
If you want to make them more like a bar cookie for a picnic, press a few chocolate chips into the top halfway through baking so they melt slightly and create a soft, chip-studded crust.
FAQs About Peanut Butter Swirled Brownies
Can I make this recipe ahead of time?
Yes, and it often holds up beautifully, especially when stored properly and allowed to rest overnight. The flavors settle and the texture becomes more cohesive, which some of my family prefers the next day.
Can I use natural peanut butter instead of creamy?
You can, but natural peanut butter may be looser in texture and could sink into the batter more. Stir it well and consider chilling the spooned dollops briefly before swirling if it seems too thin.
How do I know when the brownies are done?
Look for lightly golden edges and a top that is set but still gives slightly when pressed. A toothpick that comes out with a few moist crumbs is the best guide. If you wait for a completely clean toothpick, the brownies may be overbaked.
Can I double this recipe for a larger crowd?
Yes, you can double it and bake in a larger pan, though you will need to watch the baking time. A deeper pan will require a little more time, and a larger, shallower pan will bake faster. Check with the toothpick and by watching the edges.
What if I want chunkier peanut butter pieces?
Fold in some coarsely chopped roasted peanuts or use a chunky peanut butter instead of creamy. The texture changes, but the warmth and familiar flavors remain.
More Sweet, Familiar Treats You’ll Love
If these Peanut Butter Swirled Brownies brought a little calm to your kitchen, there are a few other familiar sweets that often find their way onto my table as well. For bright mornings and tender crumbs, Lemon Poppy Seed Muffins carry that same quiet comfort in a lighter form. When a celebration calls for something layered and joyful, Layered Celebration Cake brings color and softness to the center of the table. On days when chocolate feels especially grounding, while Buckeye Brownies echo the same chocolate-and-peanut-butter warmth that makes this recipe so beloved.
you can always find me sharing from my kitchen on Pinterest and over on Facebook.
