I pulled a tray of Peanut Butter Easter Eggs from the freezer late one spring night and stood under the kitchen light, watching the white chocolate glaze bloom into a silky blue. The kitchen smelled like toasted peanut butter and warm vanilla, and as I tapped a toothpick to lift an egg, the shell snapped with a soft, clean sound. That small moment of trust — when a simple recipe that began as an experiment finally behaved the way I wanted — is what I chase in my baking. If you like hands-on sweets that reward patience with cheerful color and a tender, nutty center, these treats will feel like a small celebration in your kitchen and pair nicely with memories of other peanut butter comforts like chocolate covered peanut butter truffles you might already love.
The Story Behind This Small-Batch Peanut Butter Easter Eggs
This recipe began as a quiet test. I wanted something that looked like a candy shop find but tasted like homemade comfort. I made tiny changes over several evenings, watching how the filling tightened and how the glaze behaved at different temperatures. Early on I learned that runniness in the peanut butter can be a friend or foe. It gives a silky mouthfeel but needs a little structure to hold an egg shape. A dusting of powdered sugar and a modest measure of almond flour gave the filling just enough body while keeping that soft, melt-in-your-mouth sensation.
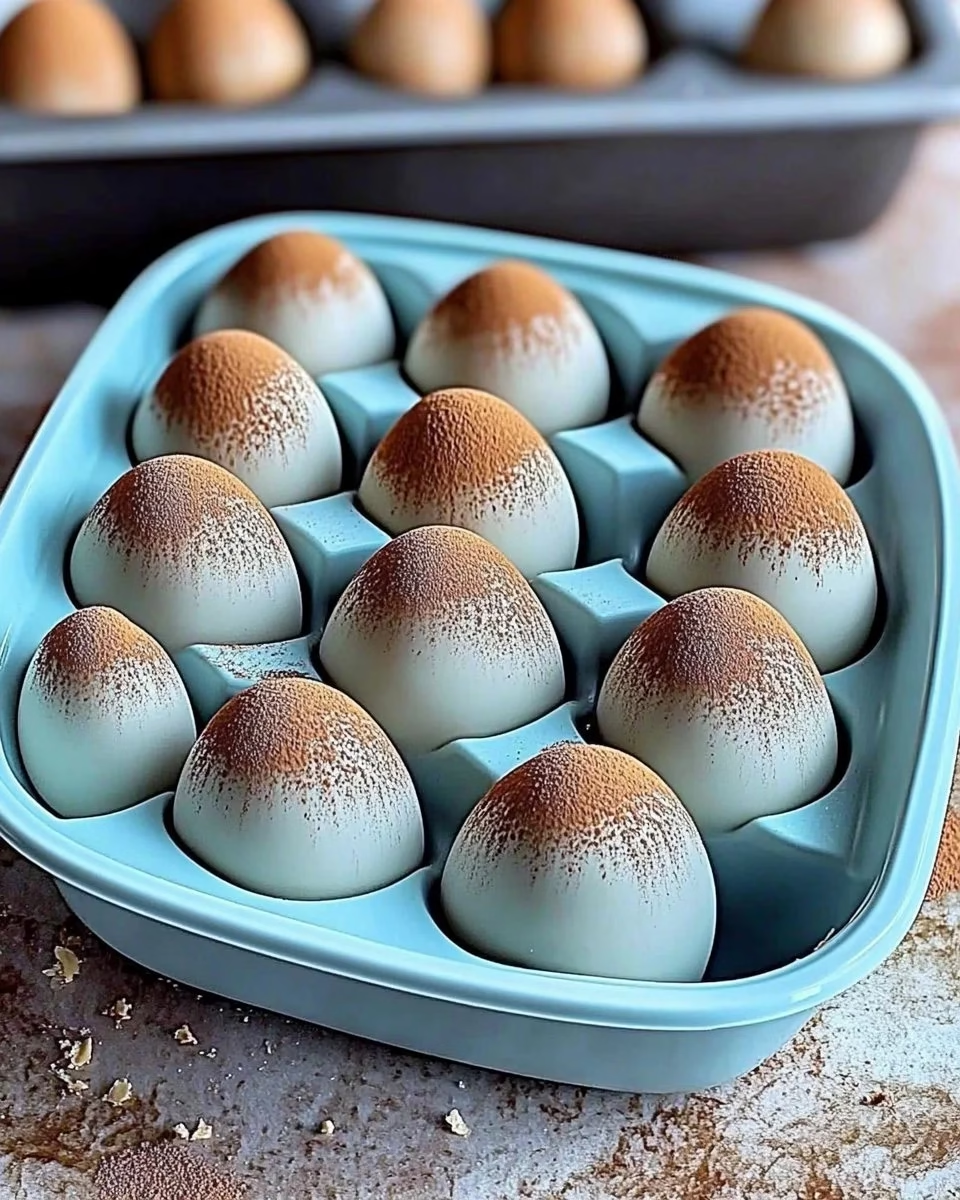
What finally made this feel like mine was the cooling rhythm. Freezing the shaped eggs briefly before dipping made the coating snap on contact and kept the white chocolate from pooling. I also fell in love with the blue-green tint made by spirulina and matcha. It reads like spring without being loud, and the cocoa speckles add a grown-up rustic look. This recipe is small-batch by design. It fits a quiet afternoon of focused work, a weekend kitchen session, or a quick, festive gift for neighbors.
Watching It Transform
“The moment the texture shifts, you know it’s ready.”
When you make these eggs, watch the filling as you beat it. It moves from loose and glossy to tender and slightly matte. That change tells you the almond flour and powdered sugar have found their balance with the wet ingredients. When dipping, notice how the chilled egg causes the chocolate to thicken instantly at the point of contact. That quick set means less running and a nicer silhouette. Finally, when you add speckles, look for their shadowy presence rather than perfect dots. They should feel like freckles left by a summer storm.
Ingredients You’ll Need
1 1/4 cup natural, runny peanut butter (no sugar added) – this keeps the filling creamy and flavorful.
1/4 cup maple syrup – adds soft sweetness and a touch of depth.
1/4 cup powdered sugar – this helps with structure and a tender crumb.
1/3 cup almond flour – adds body without grit.
1/2 teaspoon vanilla extract – lifts the whole flavor.
Pinch of salt – balances the sweet and bright notes.
8 ounces white chocolate melting wafers (we use Ghirardelli brand) – melts smoothly and sets with a nice sheen.
2 teaspoons coconut oil – thins the chocolate for dipping and adds shine.
1/2 teaspoon blue spirulina + 1/4 teaspoon matcha powder (or use a 2:1 ratio of any blue and green food dye) – these give a soft, spring palette without artificial intensity.
For the speckles: 1 teaspoon cocoa powder + 1 tablespoon water – makes quick edible paint for that spotted look.
Step-by-Step Directions
- In a mixing bowl, beat together the peanut butter, maple syrup, powdered sugar, almond flour, vanilla extract and salt until well combined. Watch for a change from glossy to slightly matte; the mixture should hold a soft peak and feel pliant when pressed. If it clings to the spoon but still moves easily, it is just right.
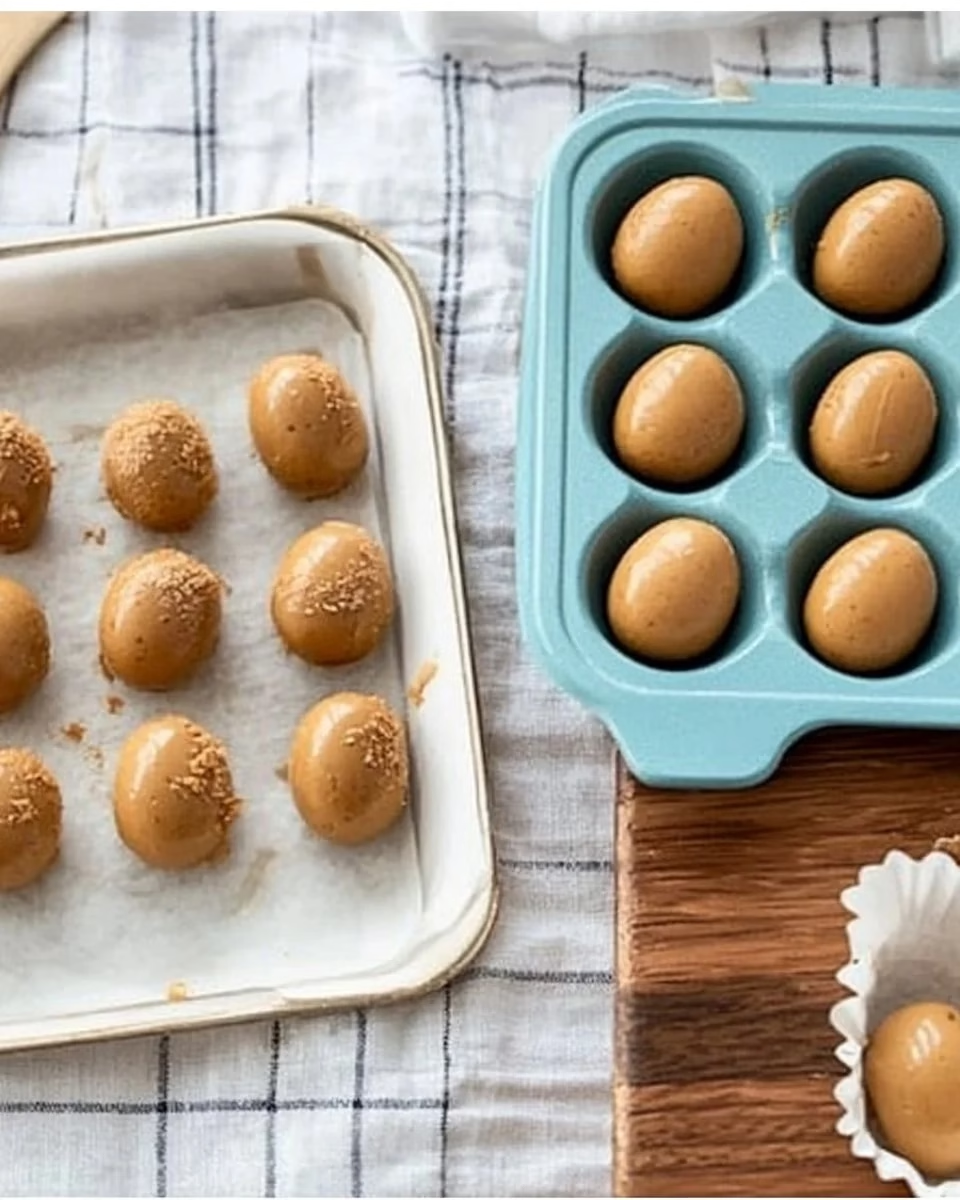
- Portion the peanut butter filling into 2-tablespoon portions. Roll each one into a ball using your hands, then use your hands to shape the ball into an oval egg. Work gently so the filling stays warm and smooth, but press firmly enough to remove air pockets. Aim for uniform size so they set evenly.
- Place on a parchment paper-lined baking sheet and freeze while you prepare the coating. Chilling tightens the filling and makes dipping easier; let them become firm but not rock hard so the toothpick can go in cleanly. This pause also gives you time to prep the speckles and chocolate.
- In a small bowl, whisk together the cocoa powder and water and set aside. You want a thin paint that will flick easily from a brush; if it seems too dry, add a drop more water until it moves smoothly. Keep it covered so it does not skin over while you melt chocolate.
- Add the white chocolate and coconut oil to a microwave-safe bowl. Microwave in 15-20 second intervals, stirring well between each interval, until fully melted. Whisk in the spirulina and matcha (or food coloring) and adjust colors as desired. Pour into a short drinking glass or a similar vessel for easier dipping. Look for a smooth sheen and a pourable but not watery consistency.
- Coating the eggs works best when they are semi-frozen. This helps the white chocolate coating firm up quickly so it does not pool when you set it down on the baking sheet. Stick a toothpick in the bottom of an egg, then dip in the white chocolate. Let the excess chocolate drip off. Wait until the white chocolate is mostly hardened, then return to the parchment paper and immediately remove the toothpick. If you wait too long to remove the toothpick, the chocolate coating may crack. A steady hand and a short freeze are your allies here.
- To make the speckles, dip a pastry brush in the cocoa powder/water mixture. Holding it about 8 inches above the baking sheet, flick the tip of the pastry brush over the eggs to create speckles. Note: this can get messy, so wear an apron. Aim for a light, uneven scatter rather than uniform dots for a natural look.
- Refrigerate until the chocolate dries out, about 10 minutes. Let them come to room temperature for a few minutes before serving so the filling is supple and the coating keeps a gentle snap. Store chilled or in a cool spot if you plan to give them as gifts.
When I Serve Peanut Butter Easter Eggs
These little eggs feel right at home on a low-key weekend table. I like to lay them on a simple plate lined with crinkled parchment and scatter a few roasted peanuts or tiny flowers around them. They make a sweet finish to a casual dinner and are easy to pack into small boxes for neighbor gifts. If I bring them to a party, I tuck a card with a quick note about the natural peanut butter so people know they will taste pure nut flavor rather than overly sweet filling.
Serve them slightly chilled if you want a firm bite and a crisp snap from the shell. Leave them at room temperature for about 10 minutes before serving for a softer, almost ganache-like center. For a small dessert spread, pair them with shortbread or a bright citrus cookie to contrast the richness.
I have also found they travel well for short trips. Pack in a single layer between parchment sheets inside a shallow tin, and keep that tin in a cooler bag if the day is warm. This technique keeps the finish intact and the speckles from smearing.
While you explore ways to present these at gatherings, I often pair them with other peanut butter recipes for variety. For a table with different textures, I might include something lighter like a no bake peanut butter pie to offer a creamy contrast to the firmer eggs.
Keeping Peanut Butter Easter Eggs Fresh
Store these eggs in an airtight container in the refrigerator for up to two weeks. The coconut oil in the coating keeps the white chocolate glossy and helps the shell stay crisp for several days. After about a week, the interior will soften a touch and the almond flour note will mellow, which I find pleasant for snacking.
If you want to freeze them, place them in a single layer on a baking sheet until solid, then transfer to a sealed container with parchment between layers. They will keep up to two months in the freezer. When ready to eat, thaw in the refrigerator for an hour, then rest at room temperature for ten minutes before serving to bring back the ideal texture.
Be mindful of strong odors in the fridge. Peanut butter picks up scents easily, so keep the container well sealed. Also avoid rapid temperature swings, which can cause the chocolate to bloom and lose its shine.
Carol’s Baking Notes
- Measure by feel when forming. When I shape these eggs, I judge finish by touch more than time. The filling should feel slightly tacky but hold its form. Frozen hard eggs will crack the coating; too soft and they will slump.
- Choose your peanut butter wisely. Natural, runny peanut butter gives the best flavor and silkiness. If your jar separates a lot, stir well so the texture is even before measuring. Avoid sweetened or overly salted versions.
- Tempering not required. I never temper the melting wafers for this recipe. The coconut oil and quick setting over a cold surface give a stable coating for small batches. If you want a glass-like shine, you can use tempered white chocolate, but it is not essential.
- Match the toothpick timing. Removing the toothpick right after the shell firms prevents a crack from forming. I mark the tray with a gentle dot where the toothpick was so no one mistakes the tiny hole for damage.
- Control the speckles. Use light flicks and stand back. Close-up splatter can look heavy, while a distant flick makes fine, elegant freckles.
Variations I’ve Tried
- Dark chocolate shell: I swapped the white wafers for tempered dark chocolate for a richer shell. The contrast between the nutty filling and bitter chocolate is lovely, and the speckles read differently on a dark background.
- Coconut-peanut blend: I added 2 tablespoons of finely shredded coconut to the filling for texture. It made the center slightly chewier and gave a pleasant tropical lift.
- Salted caramel ribbon: I piped a thin line of soft caramel across the centers before shaping. It creates a surprise pocket that pairs well with the maple syrup in the filling.
- Mini versions: I made smaller 1-tablespoon eggs when I wanted more bite-size pieces. They set faster and are great for gift boxes because you can include more in a small tin.
- Natural dye switches: If you do not have spirulina, a touch of blue food coloring and a little chlorophyll green replicate the gentle color without changing flavor.
Try one variation at a time so you can see how each swap changes texture and flavor. The base is forgiving, but small shifts in fat or liquid can make a big difference in the finish.
FAQs About Peanut Butter Easter Eggs
Can I make this ahead of time?
Yes, these hold well for up to two weeks in the refrigerator and longer in the freezer. I often make them several days before an event. Just bring them to room temperature briefly before serving for the best texture.
What if my dipping chocolate is too thick or too thin?
If it is too thick, warm it in short bursts and stir in a small extra drop of coconut oil to loosen it. If it becomes too thin, let it cool slightly on the counter until it thickens to a coatable texture. A thicker coat gives a cleaner shell.
Can I use crunchy peanut butter?
I prefer smooth for this recipe because it creates a silkier center. If you use crunchy, expect a coarser texture and slightly looser shaping. You may need a touch more powdered sugar or almond flour to keep the center stable.
How do I avoid white chocolate bloom?
Avoid frequent temperature swings and keep them in a cool, dry place. Rapid warming and cooling causes sugar crystals to migrate and appear as white streaks. A stable refrigerator or a cool room is best for short-term storage.
Can I skip the speckles?
Absolutely. The speckles are decorative and optional. They add visual interest and a slightly bitter cocoa note that balances the oval sweetness, but the eggs taste lovely without them.
Why I’ll Make This Peanut Butter Easter Eggs Again
There is something quietly satisfying about a small project that makes the kitchen feel lively. These Peanut Butter Easter Eggs are simple in ingredient list but rich in the practice of baking: measuring, feeling, watching, and adjusting. They teach patience and reward care with a clean snap, a nutty center, and a playful finish. I hope this recipe encourages you to experiment in small ways and to trust the little cues that tell you a mixture is ready.
From my kitchen to yours, take pleasure in the textures and the tiny tests that become traditions. Keep notes, swap a flavor here and there, and most of all, enjoy the moment you pull a finished egg from the tray and know you made something that tastes like spring.
Peanut Butter Easter Eggs
Ingredients
Filling Ingredients
- 1 1/4 cup natural, runny peanut butter no sugar added, keeps the filling creamy and flavorful.
- 1/4 cup maple syrup adds soft sweetness and a touch of depth.
- 1/4 cup powdered sugar helps with structure and a tender crumb.
- 1/3 cup almond flour adds body without grit.
- 1/2 teaspoon vanilla extract lifts the whole flavor.
- a pinch salt balances the sweet and bright notes.
Coating Ingredients
- 8 ounces white chocolate melting wafers melts smoothly and sets with a nice sheen.
- 2 teaspoons coconut oil thins the chocolate for dipping and adds shine.
- 1/2 teaspoon blue spirulina gives a soft, spring palette.
- 1/4 teaspoon matcha powder provides gentle green color.
- 1 teaspoon cocoa powder for speckling.
- 1 tablespoon water to mix with cocoa for speckles.
Instructions
Preparation of Filling
- In a mixing bowl, beat together the peanut butter, maple syrup, powdered sugar, almond flour, vanilla extract and salt until well combined.
- Watch for a change from glossy to slightly matte; the mixture should hold a soft peak.
- Portion into 2-tablespoon portions and roll each into an oval egg shape.
- Place on a parchment-lined baking sheet and freeze while preparing the coating.
Coating the Eggs
- In a small bowl, whisk together cocoa powder and water, keep covered.
- Melt white chocolate and coconut oil in a microwave-safe bowl in 15-20 second intervals, stirring well.
- Add spirulina and matcha (or food coloring) to the melted chocolate.
- Dip the semi-frozen eggs in the chocolate using a toothpick and let excess drip off.
- Remove toothpick once coating firms, to avoid cracking.
Finishing Touches
- Using a pastry brush, flick the cocoa mixture over the eggs for speckles.
- Refrigerate until chocolate sets, about 10 minutes, then serve or store.
