I still remember the first time my little ones and I sat around the kitchen island and built tiny peanut butter eggs together, the house smelling warm and sweet like a bakery on a slow morning, and the way their faces lit up when the first speckled egg cracked open to reveal that creamy center. In that moment I thought about how a simple recipe can create a small ritual that holds a season of memories, and if you love treats with a soft center and a shell that sings of spring, you might also enjoy the way these melt-in-your-mouth bites sit beside a plate of chocolate covered peanut buttercream truffles at family gatherings.
Why This Peanut Butter Easter Eggs Means So Much
The recipe feels like the bridge between childhood and now. When I was a kid, we had a shoebox of chocolate molds and a tangle of toothpicks and we made a fine mess on the table. My mother laughed as her hands moved quickly, and she taught me to tap the molds to remove air bubbles and to press the filling just enough so nothing leaned or slipped. That hands-on practice was less about technique and more about time together.
I make these Peanut Butter Easter Eggs now when the calendar nudges toward spring or when a neighbor stops by with a warm loaf of bread. The act of measuring, folding, and shaping is steady and calm. Smoothing the filling with a fingertip, watching the white chocolate take on a soft green-blue hue, and then creating tiny flecks of cocoa for speckles makes the kitchen feel like a small, shared studio.
There is comfort in the way the filling feels under your thumb, soft and a little forgiving, and there is joy in how the children press their thumb into a ball and claim it as their own. Over the years I have seen recipes become a language between parents and kids, one where taste and scent tell stories more clearly than spoken words. These eggs are part of that gentle language.
How to Make Peanut Butter Easter Eggs
“Every time I stir this pot, it smells just like Sunday at home.”
Making these eggs is a rhythm you will learn by ear and touch. You start with a glossy mix that hugs the spoon and ends with a thin shell that cracks just so. There is a soft hush when the white chocolate melts and the kitchen fills with sweet, buttery notes.
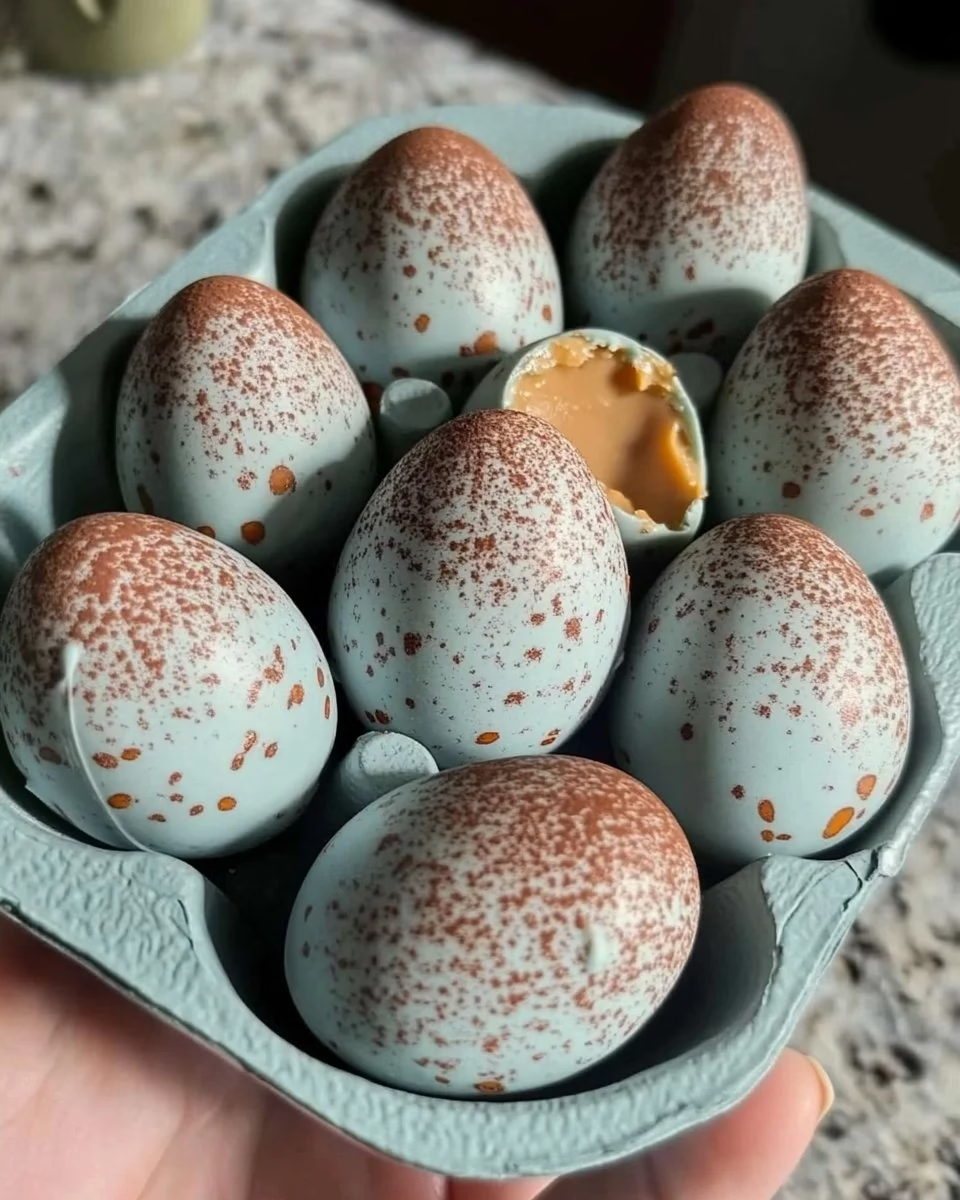
Begin by gathering a bowl, a spatula, and a tray lined with parchment. I like a small cookie scoop for uniform shapes and a toothpick for dipping. The process moves from pliable filling to crisp coating, and the best part is when the speckles go on and the eggs look like a little piece of sky and meadow.
There are moments of patience. Freeze the little ovals so they hold their shape under the warm chocolate. Work in batches so the melted chocolate stays smooth and glossy. When you set them on the tray and they begin to firm, you will hear that quiet, satisfying snap.
Ingredients You’ll Need
1 1/4 cup natural, runny peanut butter (no sugar added)
1/4 cup maple syrup (a little extra if you love a cozy aroma)
1/4 cup powdered sugar
1/3 cup almond flour
1/2 teaspoon vanilla extract (a little extra vanilla if you love a cozy aroma)
Pinch of salt
8 ounces white chocolate melting wafers (we use Ghirardelli brand)
2 teaspoons coconut oil
1/2 teaspoon blue spirulina + 1/4 teaspoon matcha powder (or use a 2:1 ratio of any blue and green food dye)
For the speckles: 1 teaspoon cocoa powder + 1 tablespoon water
These are everyday pantry items that come together in a friendly, forgiving way. The peanut butter should be runny and natural so the mix sets up with a gentle, not overly sweet, profile. If you only have thicker peanut butter, stir in a teaspoon of neutral oil or a splash of warm water until it loosens.
Almond flour gives the center a tender, slightly nutty crumb without being dry. The powdered sugar balances the maple syrup and helps the filling hold its shape. The white chocolate coating makes everything feel like a small gift, and the spirulina and matcha create the green-blue tint I love for springtime treats.
Step-by-Step Directions
-
In a mixing bowl, beat together the peanut butter, maple syrup, powdered sugar, almond flour, vanilla extract and salt until well combined. Stir until glossy and smooth, scraping the sides so nothing hides below the bowl. Breathe in the gentle aroma of toasted nut and maple as it comes together.
-
Portion the peanut butter filling into 2-tablespoon portions. Roll each one into a ball using your hands, then use your hands to shape the ball into an oval (egg-shaped). Work quickly so the warmth of your hands does not soften the filling too much, and try to make them roughly the same size for even coating.
-
Place on a parchment paper-lined baking sheet and freeze while you prepare the coating. Let them rest in the freezer for at least 15 to 20 minutes so the centers are firm but not rock solid. This step keeps the chocolate from pooling when you dip.
-
In a small bowl, whisk together the cocoa powder and water and set aside. You want a thin, paint-like mix that will flake nicely when flicked. Test a little on a spare paper towel so you get comfortable with the speckling motion.
-
Add the white chocolate and coconut oil to a microwave-safe bowl. Microwave in 15-20 second intervals, stirring well between each interval, until fully melted. Whisk in the spirulina and matcha (or food coloring) and adjust colors as desired. Pour into a short drinking glass or a similar vessel for easier dipping. Aim for a smooth, glossy pour that coats without being too thin.
-
Coating the eggs works best when they are semi-frozen. This helps the white chocolate coating firm up quickly so it does not pool when you set it down on the baking sheet. Stick a toothpick in the bottom of an egg, then dip in the white chocolate. Let the excess chocolate drip off. Wait until the white chocolate is mostly hardened, then return to the parchment paper and immediately remove the toothpick. If you wait too long to remove the toothpick, the chocolate coating may crack. Listen for the hush as the chocolate settles and begins to firm.
-
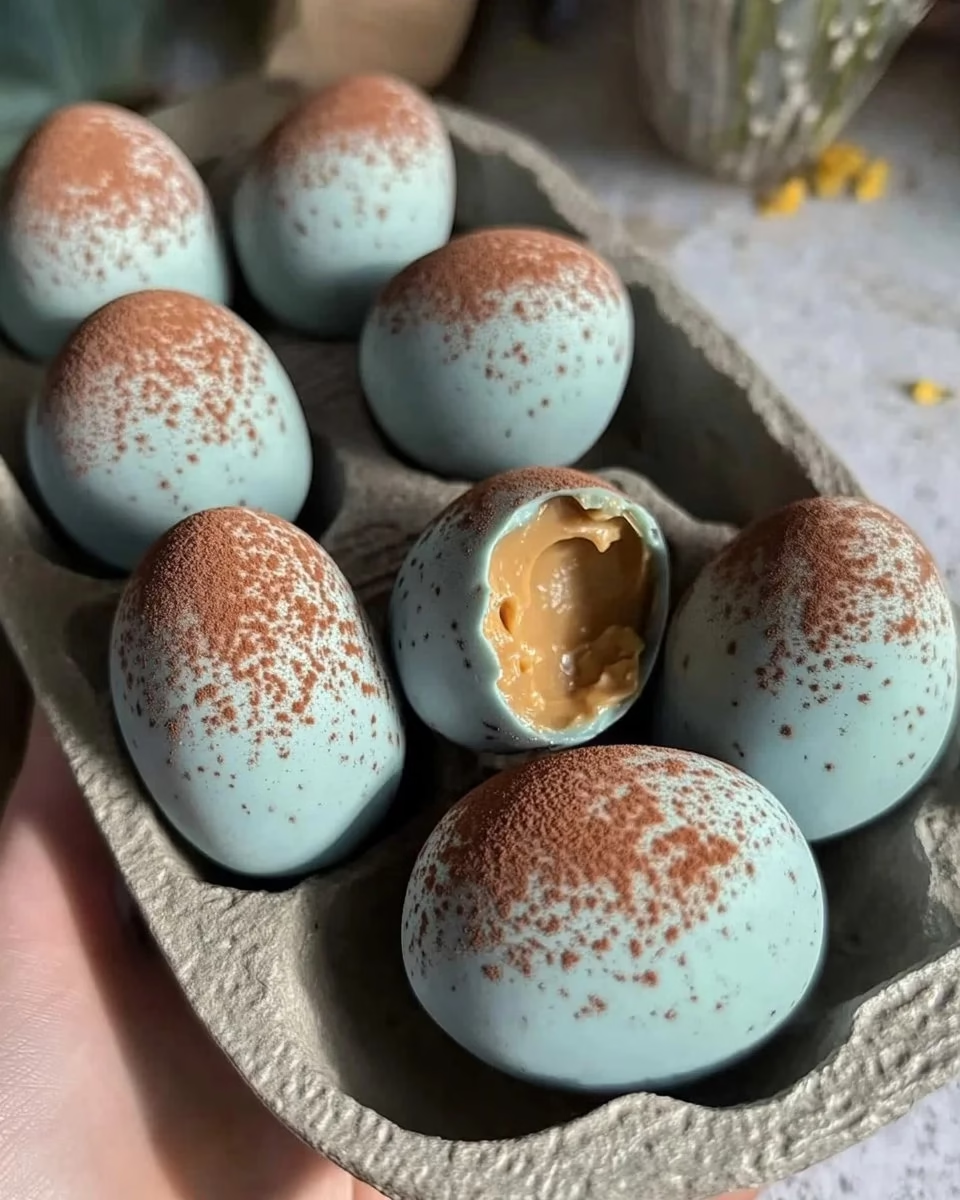
To make the speckles, dip a pastry brush in the cocoa powder/water mixture. Holding it about 8 inches above the baking sheet, flick the tip of the pastry brush over the eggs to create speckles. Note: this can get messy, so wear an apron. Refrigerate until the chocolate dries out (about 10 minutes). When the speckles settle and the shell is fully set, your eggs look like tiny painted treasures.
Serving Peanut Butter Easter Eggs With Family Warmth
I love how these eggs bring a little hush to a table already full of chatter. Serve them on a small platter alongside coffee cups, and let each person choose their favorite egg. Children tend to pick the ones with the heaviest speckling and adults often reach for the smoothest shells.
For a casual gathering, I arrange them on a wooden board with a sprinkle of chopped toasted peanuts or a few fresh berries. If it is a sit-down dessert after a Sunday dinner, I set one egg on each plate with a small napkin and tell a quick story about how this recipe came to be in our house.
They pair well with a simple scoop of vanilla ice cream or a mug of warm tea. If you want to make an Easter brunch feel extra indulgent, place a few eggs around a bowl of fruit and a stack of scones. These tiny treats move easily from hand to mouth, and people tend to savor each bite because the flavors are so balanced.
I sometimes bring a box of these to friends when we visit for a playdate. They travel well if kept cool, and their pretty shell makes them feel like a thoughtful gift. If you are looking for another nut-forward, no-fuss dessert to bring along, try my favorite no-bake peanut butter pie for a bigger sharing plate everyone can dig into.
Storing Peanut Butter Easter Eggs for Tomorrow
When you tuck these treats away, think of them like little seeds of flavor that open up overnight. Store them in a single layer in an airtight container, separating layers with parchment so they do not stick. Keep them in the refrigerator for up to two weeks, and allow them to come to room temperature for 10 to 15 minutes before serving so the filling becomes silky again.
If you want to freeze extras, pop them into a freezer-safe container with parchment between the layers. They will keep well for up to three months. Thaw them in the refrigerator overnight and then sit them out for a short bit before serving. The shell may lose a touch of its crispness, but the inside will remain comforting and true.
Leftovers are a treat at midnight when the house is quiet. I like to let one sit next to a small glass of cold milk and nibble slowly, letting the creamy center melt against the roof of my mouth. The texture shifts in a gentle, pleasing way when it cools and then warms again.
Amelia’s Kitchen Notes
-
Swap-ins that still feel like home: If you need a nut-free option, sunflower seed butter works well here. It has a slightly different flavor, but the texture and sweetness play the same role. Adjust salt and maple syrup to taste.
-
Shortcuts I use often: Make the filling the night before and refrigerate it. The next day it is easier to shape because it firms up. It also lets the flavors rest and become more rounded.
-
A little cleanup trick: Use a glass or shallow cup to melt the chocolate so you can dip without moving around too many bowls. Wipe the sides with a warm cloth between batches to keep the sheen. A small silicone spatula saves the last bit of filling and keeps your hands cleaner.
-
Flavor balance tip: If your peanut butter is very salty, reduce the pinch of salt in the recipe. If your peanut butter is bland, add a touch more vanilla or a splash more maple syrup. Taste as you go; this recipe forgives a little adjustment.
-
Tasting note: The almond flour adds a gentle crumb. If you prefer, replace it with finely ground oat flour for a softer bite. The key is to keep the filling cohesive and not too dry.
Family Variations on Peanut Butter Easter Eggs
We have a few traditions that change with the mood of the season. Sometimes I fold in a tablespoon of cocoa powder to the filling for a chocolatey center. The kids call those "double chocolate eggs" and they never last long.
For a toastier note, add a tablespoon of finely chopped toasted pecans to the filling. It gives a tiny crunch that surprises in a good way. Another favorite is to roll the shaped eggs in crushed freeze-dried strawberries before freezing for a bright, berry-kissed exterior.
If you like a little salt on top, sprinkle a few flakes of sea salt on the wet chocolate right after dipping. That quick contrast makes the sweetness feel more honest and grown up. For a vegan twist, use dairy-free white chocolate and a plant-based coconut oil substitute, and your eggs will still turn out tender and delicious.
We also sometimes make a tiny batch of dark chocolate-coated eggs in place of the white chocolate. The tang of the peanut butter against dark chocolate is familiar and satisfying. Let the kids help pick whether they want white, dark, or speckled for an extra bit of decision-making fun.
FAQs About Peanut Butter Easter Eggs
Q: Can I make these ahead of time?
A: Yes, and honestly, they might taste even better the next day once the flavors have settled. Store them in an airtight container in the refrigerator and bring them out a few minutes before serving so the filling softens slightly.
Q: My filling feels too sticky to shape. What can I do?
A: Chill the mixture for 10 minutes to firm it up. If it still clings, dust your hands with a touch of powdered sugar or almond flour. Work quickly so your hands do not warm it back up.
Q: The chocolate coating cracked when I removed the toothpick. How can I avoid that?
A: Make sure the white chocolate is mostly set before you remove the toothpick, but do not let it harden completely. Remove the toothpick while the coating still has a slight give so it heals around the hole without a crack.
Q: Can I color the coating with food dye instead of spirulina and matcha?
A: Yes, you can. Use oil-based candy color for chocolate to keep it smooth, or stick with natural powders like spirulina and matcha for a softer tone and subtle flavor.
Q: What is the best way to travel with these eggs?
A: Keep them cool and layered between sheets of parchment in a shallow container. If you expect a warm trip, pack them in a cooler with an ice pack to protect the shell.
A Final Thought
I hope this Peanut Butter Easter Eggs recipe gives you a little warm corner in your week, the kind that holds a laugh, a quiet smile, and a shared bite. When you make them, tune in to the small things: the way the peanut butter smells, the glossy ribbon of melted chocolate, and the tiny brown speckles that make each egg look hand-painted. These are the kitchen moments that sit in memory and return when you smell something sweet or see a child tilt their head with delight.
If you try the recipe, keep it simple and keep it shared. Let friends and family take part, and pass a plate around with a story about how you made your first batch. That is how recipes become family stories, and how a few ingredients can turn an ordinary afternoon into something quietly special.
Until next time, from my kitchen to yours, may your days have small comforts and plenty of good bites.
Peanut Butter Easter Eggs
Ingredients
For the Peanut Butter Filling
- 1 1/4 cups natural, runny peanut butter (no sugar added) Use runny peanut butter for better texture.
- 1/4 cup maple syrup Add a little extra for a stronger aroma.
- 1/4 cup powdered sugar Balances the syrup and helps filling hold its shape.
- 1/3 cup almond flour Can replace with finely ground oat flour for a softer bite.
- 1/2 teaspoon vanilla extract Increase for a more aromatic filling.
- 1 pinch salt Adjust based on the saltiness of peanut butter.
For the Chocolate Coating
- 8 ounces white chocolate melting wafers Ghirardelli brand recommended.
- 2 teaspoons coconut oil Helps the chocolate to shine.
- 1/2 teaspoon blue spirulina For color; can substitute with food dye.
- 1/4 teaspoon matcha powder For color; can substitute with food dye.
For the Speckles
- 1 teaspoon cocoa powder To create speckles.
- 1 tablespoon water To mix with cocoa powder for speckling.
Instructions
Prepare the Filling
- In a mixing bowl, beat together the peanut butter, maple syrup, powdered sugar, almond flour, vanilla extract, and salt until well combined and glossy.
- Portion the filling into 2-tablespoon portions. Roll each into an oval shape using your hands and place on a parchment-lined baking sheet.
- Freeze for 15-20 minutes to firm up the filling.
Prepare the Coating
- In a small bowl, whisk together cocoa powder and water for speckles and set aside.
- Melt the white chocolate and coconut oil in a microwave-safe bowl, stirring every 15-20 seconds until fully melted. Whisk in spirulina and matcha for color.
Coat the Eggs
- Using a toothpick, dip the semi-frozen eggs into the chocolate coating, letting excess chocolate drip off.
- Return to the parchment paper and remove toothpick before chocolate completely hardens.
- Flick the cocoa powder mixture over the eggs to create speckles. Refrigerate until the chocolate sets.