The kitchen smelled like a late-night experiment when I pulled the springform pan from the fridge and brushed my finger across the glossy ganache edge. That soft, peanut-scented hush that comes from a bowl of cream cheese meeting peanut butter always makes me lean closer, tip my head, and listen for tiny clues. If you like playful, small-batch sweets, you might enjoy the same kind of focused testing that led me here, and you may also be curious about my little sister recipe for chocolate-covered peanut buttercream truffles which shares that same slow, satisfying melt.
Why This Peanut Butter Cheesecake Became a Favorite
This dessert began as one of those curious nights where I wanted something richer than a pie but lighter than a full-baked cheesecake. I tested different crusts, tinkerings with sugar, and ways to fold creaminess without losing air. The moment it finally felt right was when the filling held a gentle mound and the surface kept a soft sheen under the ganache.
I made this small batch so that I could actually taste the changes I made, one bite at a time. That hands-on testing meant swapping textures and paying attention to the quieter cues: a faint peanut butter aroma that tells you the flavor is balanced, or the whisper of a crust that holds but does not crack. This recipe became a favorite because it trusted those cues and rewarded patience.
What mattered most was a balance between confident technique and playful curiosity. I wanted something approachable for a newcomer and flexible enough for someone who enjoys tweaking details. Making a dessert that is both dependable and a little adventurous was the goal, and this cheesecake reached that sweet middle ground.
The Rhythm of Making Peanut Butter Cheesecake
“The moment the texture shifts, you know it’s ready.”
There is a rhythm to this recipe. Start strong with the crust, move gently through the filling, and finish with the calm of a chilling step. Watching it transform is almost meditative. You watch the cookie crumbs go from gritty to a compact base, then feel the filling move from lumpy to silky, and finally listen as the ganache settles into a glossy blanket.
I pay attention to little visual cues. The crust will darken slightly as it bakes and let off a roasted cocoa whisper. The peanut butter filling will gloss over just before you fold in the whipped cream. When you whip cream to soft peaks, it should hold a gentle curl without looking overworked. Those small signals let you know that each stage is aligned.
The slow finish in the fridge ties it all together. After that resting time, the filling firms to a texture that slices nicely but still gives a soft, creamy mouthfeel. That moment when the fork slides through and the ganache cracks under a light press is always worth the wait. These are the sensory notes I love to look for and share.
Ingredients You’ll Need
1 1/2 cups OREO cookie crumbs (this gives the crust a sturdy, chocolatey base)
1/4 cup unsalted butter, melted (this helps the crumbs bind without adding salt)
2 cups cream cheese, softened (this adds richness and structure)
1 cup peanut butter (use a smooth, flavorful peanut butter for the cleanest texture)
1 cup powdered sugar (this sweetens smoothly and keeps the filling silky)
1 teaspoon vanilla extract (this brightens the whole filling)
1 cup heavy cream (this adds lightness when whipped and folded in)
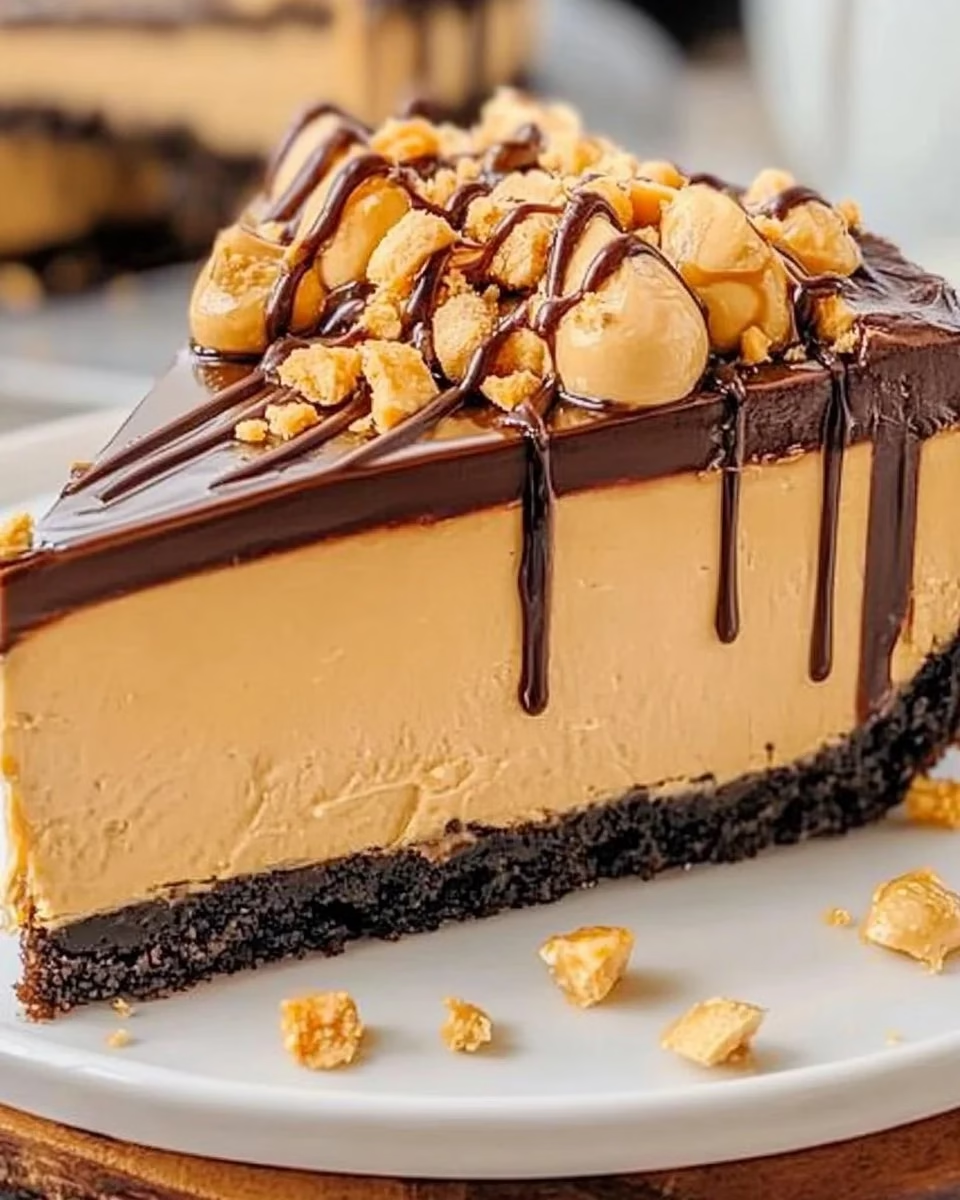
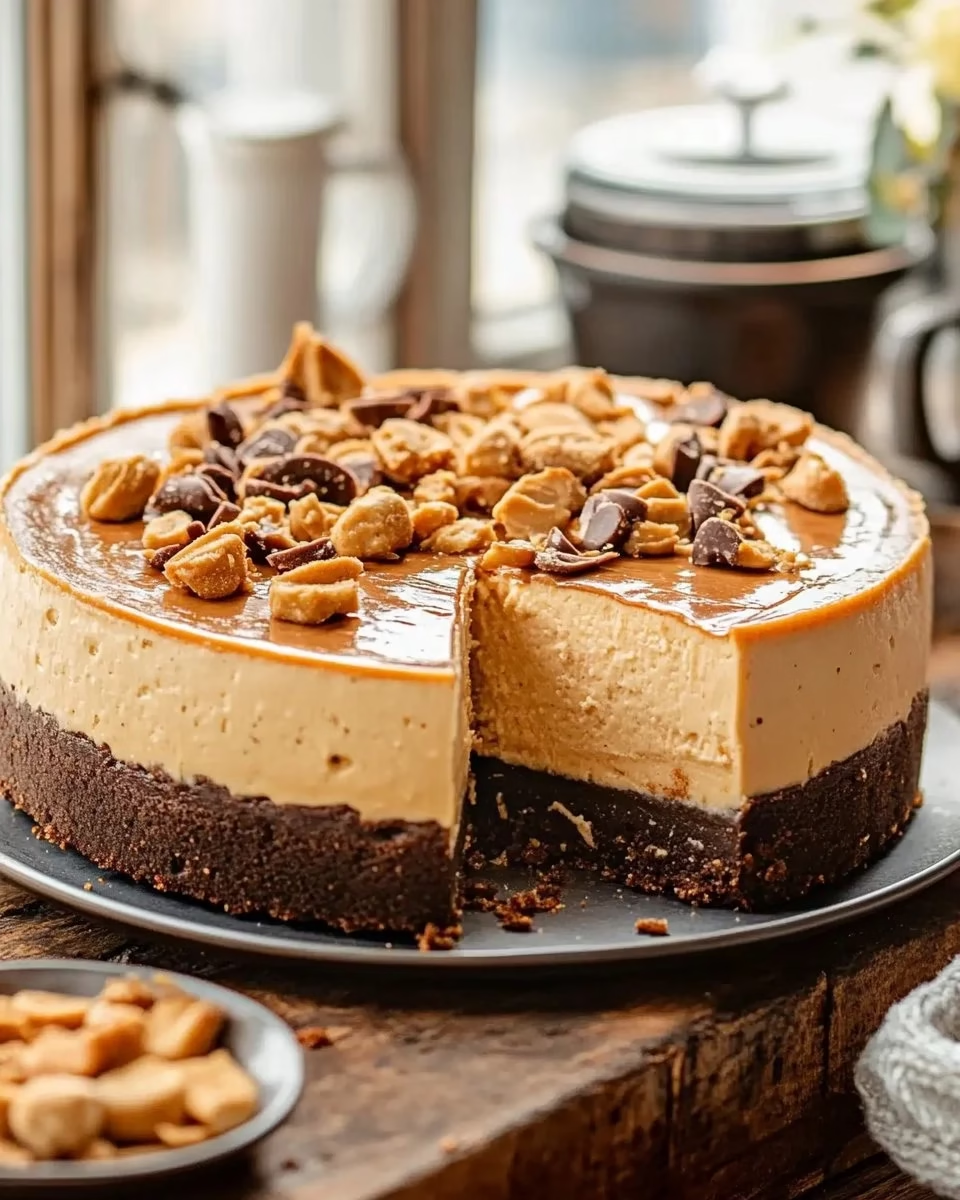
1 cup chocolate chips (this makes a shiny ganache and a satisfying finish)
Each ingredient plays a clear role in the final dessert. The cookie crumbs make a firm base that contrasts with the lush filling. The butter binds and browns slightly. Cream cheese and peanut butter give the body and flavor, while powdered sugar mellows the peanut butter’s intensity and keeps the mix velvety. Vanilla lifts background notes and heavy cream adds airy softness. Chocolate chips finish with a chocolate blanket that balances everything.
Step-by-Step Directions
- Preheat the oven to 350°F (175°C). Prepare a springform pan by greasing it lightly or lining the bottom with parchment for easy removal. A warm oven helps set the crust without overbaking the filling later on.
- In a bowl, mix OREO cookie crumbs and melted butter until combined. Press the mixture into the bottom of a springform pan to form the crust. Bake for 10 minutes, then let it cool. Watch for a slight darkening at the edges and a compact surface that holds when you press with a spoon.
- In another bowl, beat cream cheese, peanut butter, powdered sugar, and vanilla extract until smooth. Stop once there are no lumps and the mixture looks glossy rather than grainy. The aroma should lean peanut-forward but not cloying.
- In a separate bowl, whip the heavy cream until soft peaks form, then fold it into the peanut butter mixture until combined. Fold gently so you keep air in the cream but still achieve an even texture. You want a soft, slightly billowy filling with a uniform color.
- Pour the peanut butter filling into the cooled crust and smooth the top. Smooth with a spatula and tap the pan lightly on the counter to release any trapped air pockets. The surface should look satiny and even before the ganache.
- In a small saucepan, heat chocolate chips over low heat, stirring until melted and smooth. Pour the chocolate ganache over the cheesecake. Pour slowly and guide the ganache to the edges so it drapes evenly and shines when it cools.
- Refrigerate for at least 4 hours or until set. Give it time. The texture deepens and the flavors settle as it chills. A longer rest often improves the sliceability and melds the peanut and chocolate notes.
- Serve chilled, and enjoy your decadent Peanut Butter Cheesecake! Slice with a warm knife for clean edges and wipe between cuts. Garnish if you like with cookie crumbs or a sliver of peanut butter.
When I Serve Peanut Butter Cheesecake
This dessert loves relaxed occasions. I reach for it on weekends when the kitchen slows down and there is time to notice the details that make a slice special. It is also a good small-batch option for an intimate dinner or a friendly potluck where something comforting and a little decadent will stand out.
Serve it after a simple meal so the richness has room to shine. The cheesecake pairs nicely with a strong coffee or a cup of tea that can cut through the sweetness. If I am sharing it with friends, I sometimes add a scatter of chopped nuts or a few extra cookie crumbs for texture on the plate.
For holiday tables, this recipe sits well alongside lighter fruit desserts and more classic items. If you are thinking about holiday baking pairings, I have found that more dramatic chocolate-and-mint options can be a fun counterpoint, much like the chocolate peppermint cheesecake that offers a cool contrast to peanut butter warmth.
Keeping Peanut Butter Cheesecake Fresh
Store the cheesecake in the refrigerator, covered loosely with plastic wrap or in an airtight container. It keeps best for up to four days, although I have found that the texture is most tender on day one and two. The crust can soften a little over time as it absorbs moisture from the filling, which is perfectly fine if you like a denser bite.
If you want to freeze slices, wrap each piece tightly in plastic and then in foil or a freezer-safe container. Thaw overnight in the fridge. The texture will be slightly creamier after a freeze and thaw cycle, so expect a small change in mouthfeel but the flavor remains true.
If your ganache develops a thin bloom or dulls slightly in the fridge, take it out for 20 minutes before serving so the chocolate regains a little sheen. The smell and flavor will come alive when it warms just enough to release the aromas.
Carol’s Baking Notes
- Use room temperature cream cheese. Cold cream cheese creates lumps and forces overmixing. Softer cream cheese gives a silkier filling and less risk of graininess.
- Choose a smooth peanut butter for a cleaner texture. Chunky will add crunch, which some people enjoy, but it changes the mouthfeel. If you love crunch, add a small handful of chopped roasted peanuts instead.
- Watch the whipped cream closely. Aim for soft peaks. Overwhipping will create grainy pockets and deflate your filling when folded in. The sign of correct whipping is a glossy curl on the whisk that holds its shape.
- Heat chocolate gently. Low and slow is kinder to chocolate. Stir constantly and remove from heat while a few unmelted bits remain, then stir until smooth. This prevents scorching and keeps the ganache shiny.
- Give the cheesecake time. The texture and flavors deepen with chill time. Overnight is often best if you can plan ahead. It slices cleaner and tastes more cohesive after resting.
These little things made the biggest difference in testing. I learned to respect patience as much as technique. A calm process yields a calm result, and your kitchen will thank you for it.
Variations I’ve Tried
- Swirl in a ribbon of caramel. I spooned warm caramel over the filling before chilling and used a skewer to make soft swirls. It adds a salty-sweet note that pairs beautifully with peanut butter.
- Add a thin layer of crushed peanuts between crust and filling. That creates a satisfying crunch that contrasts with the creamy center. Toast the peanuts first for deeper flavor.
- Substitute a dark chocolate ganache. Using 60 to 70 percent chocolate gives a slightly bitter edge that balances the sweetness. It makes the dessert feel more grown-up without changing the core technique.
- Make a no-bake version. Skip the baking step for the crust and press the crumbs in cold, then assemble and chill. The texture will be a touch softer, but it is a good shortcut for warmer days or when your oven is busy.
- Mini cheesecakes. I have made this in muffin tins lined with paper cups for single-serve treats. Adjust chilling time but keep the same proportions. They are great for sampling variations without committing to a whole cake.
These twists keep the recipe flexible. Try one at a time so you notice how each change affects texture and flavor. That way your curiosity stays in charge and your final dessert stays reliably delicious.
FAQs About Peanut Butter Cheesecake
Can I make this ahead of time?
Yes, making it a day ahead is ideal. The flavors settle and the filling firms into a texture that slices cleanly, so planning one day in advance often improves the result.
What if my filling looks grainy after mixing?
Graininess can come from cold ingredients or overworked sugar. Bring cream cheese to room temperature and sift powdered sugar if needed. Mix gently and stop once the mixture looks smooth and glossy.
Can I use natural peanut butter?
Natural peanut butter has more oil and may make the filling looser. If you use it, stir it well and consider chilling the filling a bit longer before adding the whipped cream. You may also reduce added liquid elsewhere.
How do I get a clean slice?
Warm your knife under hot water, wipe it dry, and slice in one clean motion. Wiping the knife between cuts helps maintain neat edges and keeps layers defined.
Can I make this gluten free?
Yes, use gluten-free chocolate sandwich cookies for the crust and check that your other ingredients are certified gluten free. The technique remains the same.
What I Learned While Testing
Testing taught me that small changes ripple through a recipe. A half teaspoon of extra salt shifts the whole balance. The temperature of each component affects the texture in ways that are not always obvious until you taste it. Little patience pays off at every stage.
I learned that the simplest versions are often the most reliable. When I pared back the number of add-ins, the core flavors shone and the texture performed consistently. Complexity can be beautiful, but simplicity is forgiving when you are experimenting.
Another lesson was to trust subtle sensory cues. The way the filling glows under the kitchen light or how the crust sounds when tapped are practical signals. They tell you when to stop and when to push a little further. Trusting them made testing more fun and less stressful.
Plating and Serving Ideas
Keep plating simple so the cheesecake itself remains the star. A small smear of ganache on the plate, a dusting of cookie crumbs, and a few chopped nuts or a tiny spoon of caramel can make a slice look finished without clutter.
If you like contrast, serve a bright fruit compote alongside. Tangy berries or a citrus drizzle cut through the richness and create a lively bite. For a rustic touch, I sometimes top with a few whole OREO crumbs and a light sprinkle of flaky salt.
Present single slices on small dessert plates for a cozy dinner, or set the whole cheesecake on a cake stand for a more formal table. Either way, keep a warm knife on hand for neat serving and a small bowl of extra ganache for anyone who wants a little more chocolate.
Helpful Extras Before You Start
Measure ingredients at room temperature when possible. Softened cream cheese and room-temperature peanut butter blend more easily and create a smoother filling. Cold ingredients force overmixing which can create texture issues.
If using a springform pan, wrap the outside in foil if you plan on using a water bath, though this recipe does not require one. The foil prevents leaks and gives peace of mind if you want to experiment with a gentler bake.
Label your steps in the kitchen as you go. I write short notes on a sticky pad for stages where timing matters, like when to chill or when to melt chocolate. It makes testing variations easier to compare later.
A Final Thought
I hope this Peanut Butter Cheesecake encourages you to try something new in your kitchen, to follow a few trusted steps and then let curiosity lead the rest. Baking can be structured and playful at once, and that is exactly how I like to work. Trust your senses, give yourself time, and enjoy the small discoveries that come with each slice. From my kitchen to yours, happy baking.
Peanut Butter Cheesecake
Ingredients
For the Crust
- 1.5 cups OREO cookie crumbs This gives the crust a sturdy, chocolatey base.
- 0.25 cups unsalted butter, melted This helps the crumbs bind without adding salt.
For the Filling
- 2 cups cream cheese, softened This adds richness and structure.
- 1 cup peanut butter Use a smooth, flavorful peanut butter for the cleanest texture.
- 1 cup powdered sugar Sweetens smoothly and keeps the filling silky.
- 1 teaspoon vanilla extract Brightens the whole filling.
- 1 cup heavy cream Adds lightness when whipped and folded in.
For the Ganache
- 1 cup chocolate chips Makes a shiny ganache and a satisfying finish.
Instructions
Preparation
- Preheat the oven to 350°F (175°C). Prepare a springform pan by greasing it lightly or lining the bottom with parchment for easy removal.
- In a bowl, mix OREO cookie crumbs and melted butter until combined. Press the mixture into the bottom of a springform pan to form the crust.
- Bake for 10 minutes, then let it cool. Watch for a slight darkening at the edges.
Making the Filling
- In another bowl, beat cream cheese, peanut butter, powdered sugar, and vanilla extract until smooth and glossy.
- In a separate bowl, whip the heavy cream until soft peaks form, then fold it into the peanut butter mixture gently.
Assembly
- Pour the peanut butter filling into the cooled crust and smooth the top.
- In a small saucepan, heat chocolate chips over low heat until melted and smooth, then pour ganache over the cheesecake.
Chilling
- Refrigerate for at least 4 hours or until set.
- Slice with a warm knife for clean edges and serve chilled.
