I remember the first time I made these No Bake Peanut Butter Oat Cups, the kitchen smelled warm and nutty in that way that makes you slow down and breathe a little deeper. My daughter sat on the counter, swinging her legs, watching me press the mixture into liners while the record player whispered old songs in the background. It felt like something small and perfect we could hold in our hands, and it quickly joined the line of favorite treats that sits beside my go-to no-bake peanut butter pie for family gatherings. Every time I set a tray on the table, someone will close their eyes for a second before smiling, and that little pause is part of why these cups mean so much.
No Bake Peanut Butter Oat Cups
Ingredients
Main Ingredients
- 1.5 cups peanut butter Use creamy for a smooth texture or crunchy for a rustic feel.
- 1.5 cups rolled oats (processed to oat flour) Blend until fine but don’t over-process to avoid gumminess.
- 1/4 cup maple syrup Adjust for sweetness preference.
- 1 cup chocolate chips Use a mix of milk and dark chocolate for a layered effect.
- 1 tsp coconut oil (optional) Helps to achieve a glossy chocolate finish.
Instructions
Preparation
- Blend oats in a high-speed blender or food processor to make oat flour, until fine.
- Add peanut butter and maple syrup to a microwave-safe bowl and microwave for 40-60 seconds, stirring until glossy and combined.
- Slowly add the blended oats to the bowl and mix well until thick and moldable. Add more maple syrup or peanut butter if too dry.
- Prepare a muffin pan with cupcake liners or use a silicone muffin pan for easy removal.
- Scoop the peanut butter oat mixture into the muffin pan and press firmly to make compact cups.
Chocolate Layering
- In a microwave-safe bowl, combine chocolate chips and coconut oil. Heat in increments until melted and smooth.
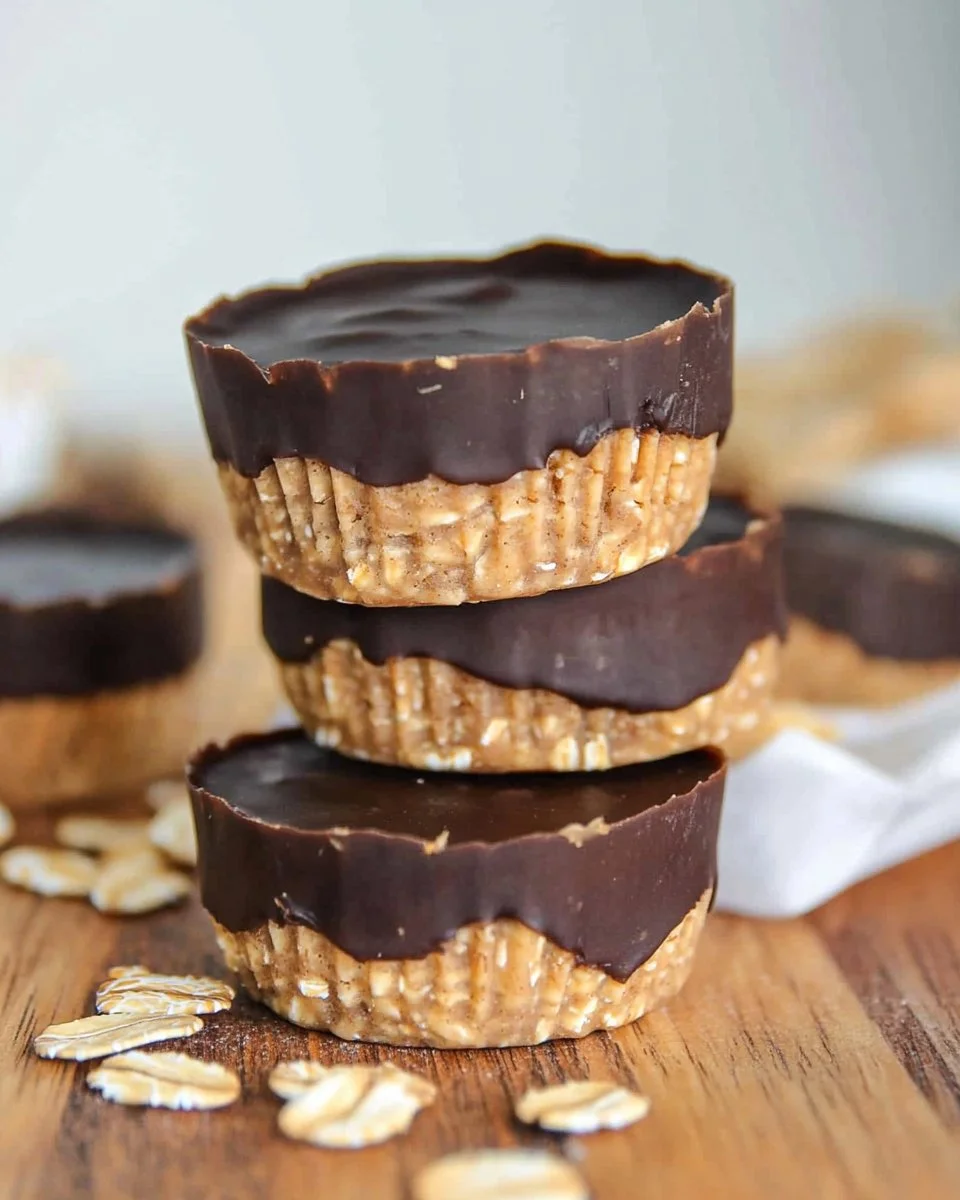
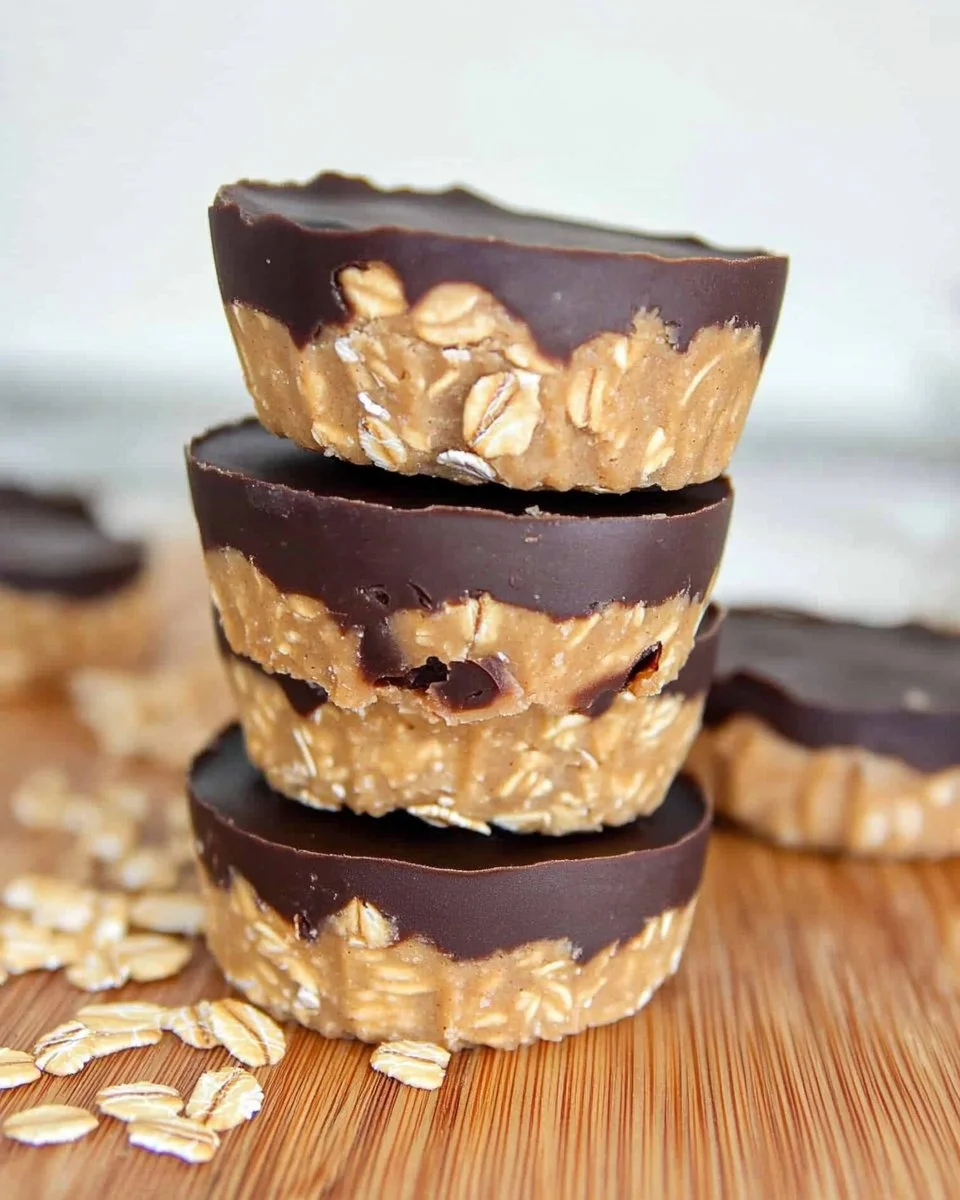
- Pour melted chocolate over each oat cup and smooth the top with the back of a spoon. Optionally, sprinkle with flaky salt.
- Refrigerate for 2-3 hours to set completely, then remove carefully from the pan.
Notes
Nutrition
The Story Behind Our Favorite No Bake Peanut Butter Oat Cups
These cups came from a weekend when the pantry was doing the talking and the oven was taking a nap. I wanted something honest and quick, something that could travel to a soccer game or sit quietly on the counter for an afternoon nibble. They were born out of a Monday where I promised myself I would keep things simple and sweet for the week ahead.
What stuck with me was how quickly the kids learned to help. They measured oats and scraped the bowl, and in those small moments I learned how food can be both teaching and celebration. From that first batch, the recipe became our weekend ritual. We mix, press, and drizzle, and while the chocolate sets we talk about little plans for the day or remember a picnic from a year ago.
This recipe is not fancy. It isn’t meant to impress anyone at a culinary show. It is meant to be warm and kind, the kind of thing you make with a song in the background and a child asking to lick the spoon. It feels like home because it brings people close and makes a little ordinary day feel cozy.
Bringing No Bake Peanut Butter Oat Cups Together
“Every time I stir this pot, it smells just like Sunday at home.”
Making these cups is a kind of rhythm. It starts with the soft scrape of a spoon against a bowl and moves to the gentle hum of a microwave. The oats, once blended, take on a fine, comforting texture like the dust from a warm kitchen floor. The peanut butter stretches and sighs as you stir, and the maple syrup gives the mixture a glossy, warm sheen.
Colors are simple and honest. Pale tan oats hold the deeper tan of peanut butter, and the chocolate crowns each cup like a little dark sky. The sounds are small: a blender whooshing, a bowl clinking, a child chuckling. Everything happens in steps you can count on, and the result is a tray of treats that invites people to gather and share.
When I make them, I like to move slowly and notice the way the aroma deepens as the chocolate softens. These moments are small acts of care, and they stitch the day into something sweeter.
Ingredients You’ll Need
1.5 cups peanut butter
1.5 cups rolled oats (processed finely in a food processor to make oat flour)
1/4 cup maple syrup
1 cup chocolate chips
1 tsp coconut oil (optional)
A few warm notes as you gather your ingredients: use creamy peanut butter if you love that smooth, melt-in-your-mouth feeling. If you prefer a little bite, a natural jar with tiny bits of crunch will make each cup feel more rustic. A little extra vanilla will give a cozy aroma, and fresh butter does wonders in other recipes, though these cups do not need it. If you keep a small jar of maple syrup on hand for pancakes, it will make this recipe feel like waking up to a slow morning.
If you enjoy mixing textures, you might like to try a similar approach with fruit-forward breakfasts like my baked peach cottage cheese oatmeal cups, which bring a different kind of comfort to the table. That kind of swap reminds me that small changes can make a recipe feel new and familiar at the same time.
Step-by-Step Directions
Blend oats in a high-speed blender or food processor to make oat flour.
Work in short pulses until the oats are as fine as flour and smell a little warm.
You should be able to see a soft, powdery texture that will help bind the mixture.Add your peanut butter and maple syrup to a medium sized microwave-safe bowl and microwave for 40-60 seconds. Stir thoroughly until peanut butter and maple syrup is completely combined.
Stir until glossy and smooth, watching the color deepen as they join.
The mixture should shine and loosen a little when it is ready to mix with the oats.Next, slowly add the blended oats to the bowl and mix well (it should take some effort to mix!). You can also use a food processor to do this. The mixture should be very thick, but easily moldable. If the mixture looks way too dry and crumbly, add more maple syrup or PB (about a teaspoon extra at a time). You can also add 1/4-1/3 cup of pumpkin puree for a moister cup.
Press and fold until the texture feels like a dough that holds together in your hand.
Take a moment to breathe in the nutty smell and notice the way the mixture holds its shape.Prepare a muffin pan by lining with cupcake liners. Or, use a silicone muffin pan as shown here for the easiest method. Note: These will be difficult to remove from your muffin pan without liners. You can also make them in a mini muffin silicone pan or mini muffin tin with paper liners.
I like silicone for how gently the cups pop out, but liners mean less fuss later.
Arrange your pan on a flat surface so every cup is even and tidy.Scoop the peanut butter oat mixture evenly into the muffin pan and press down with your fingers.
Press firmly so each cup is compact and the top is smooth and even.
The action is a little like making a small, nutty tart crust; you want it to hold when you pour the chocolate.In a microwave-safe small bowl, add chocolate chips and coconut oil. Heat in 30 second increments until chocolate is completely melted and smooth. Stir with a spoon in between microwave sessions.
Stir until the chocolate is silky and warm, watching it transform from pearls to a shiny liquid.
The coconut oil helps the chocolate spread easily and harden with a glossy finish.Pour a layer of chocolate into each muffin hole and smooth the top with the back of a spoon. Optional: Sprinkle flaky salt, sprinkles, or mini chocolate chips on top of the chocolate layer before the chocolate hardens.
Work gently so each top looks like a little dark mirror.
A tiny pinch of salt on top makes the chocolate sing and balances the sweetness.Refrigerate for 2-3 hours to let set completely. Carefully remove them from the muffin pan, liner, or silicone pan. Store in an airtight container for up to 5 days for best freshness. Since they’re not baked and use fresh ingredients like maple syrup, store them in the refrigerator over room temperature.
Wait until the chocolate snaps when you press it; that’s the sign they are fully set.
When they are ready, arrange them on a plate and watch how quickly hands reach for them.
Serving No Bake Peanut Butter Oat Cups With Family Warmth
I like to place a small stack of these cups on a low wooden board and set it in the middle of the table. A simple cloth napkin gives them a soft edge and makes them feel planned instead of thrown together. They are the kind of thing that invites conversation: someone will ask about the recipe, another will tell a small story about a similar treat from their childhood.
We serve them at after-school snack time on rainy days and as a little dessert after a casual family dinner. For brunch, I set them beside bowls of fruit and warm tea so everyone can take a moment for something sweet and small. If guests come over, I like to offer them on a small plate with a few extra chocolate chips or a sprinkle of flaky salt on top.
For child-sized hands, I sometimes cut the portions in half and place them on little plates. For grown-ups, the full cup with a strong cup of coffee feels just right. The cups are portable too, so they travel well to a park or a picnic when you need a treat that keeps its shape.
Storing No Bake Peanut Butter Oat Cups for Tomorrow
These cups are happiest in the refrigerator. When you store them in an airtight container, the flavors settle and the texture becomes firmer and more harmonious. I use parchment between layers if I stack them, and a tight lid keeps the peanut butter from picking up too many scents in the fridge.
If you leave them out at room temperature for a few hours, that is fine for immediate serving, but refrigeration will keep them fresher longer and preserve the chocolate top. They keep well for up to five days this way, and sometimes they taste even better on day two when the oats have softened slightly and the peanut butter has relaxed.
If you want to take them on the road, pack them in a small cooler or insulated bag with an ice pack. They are easy to portion out for lunchboxes or an afternoon snack. When you pull one from the fridge, let it sit for five minutes so the chocolate loses its chill and the texture softens just a touch.
Amelia’s Kitchen Notes
- Oat texture matters. If you blend the oats too long, the mixture can become gummy. Pulse until they are just fine but still light. A quick pulse keeps them airy yet bindable.
- Sweetness is personal. If you prefer a less sweet cup, reduce the maple syrup to 3 tablespoons and add a teaspoon of vanilla for depth. Small changes like this make the recipe yours.
- Swap-ins that work. Almond butter or cashew butter will work in the same proportions and give a different flavor profile. If you use natural peanut butter that separates, give it a quick stir before measuring.
- Small cleanup tip. Line a small bowl with plastic wrap when mixing ingredients if you hate scraping bowls. Peel the wrap away and toss for a nearly perfect cleanup.
- Chocolate finish tricks. If your chocolate looks dull after setting, let it rest for an extra hour in the refrigerator. A light brush of coconut oil before it sets gives a shiny finish if you like that look.
These are little tricks I picked up over many batches. They help the process move easily and give you consistent results, even if the kitchen is lively and the kids are asking for popsicles.
Family Variations on No Bake Peanut Butter Oat Cups
We love changing these up depending on mood and season. In the fall I stir in a quarter cup of pumpkin puree and a half teaspoon of cinnamon. It makes the cups taste like pie without the fuss of baking. For summer, fold in a tablespoon of finely chopped dried apricot for a bright chew.
If someone in the family prefers a crunch, press a few pretzel pieces or toasted chopped nuts into the base before you pour the chocolate. The contrast between salty crunch and sweet chocolate makes the cups feel a little grown up. For a more decadent version, melt a mix of milk and dark chocolate and layer them for a striped top.
For holidays, use small festive sprinkles or a dusting of cocoa on top. For my husband’s birthday this year, I added a sprinkle of toasted coconut after the chocolate set. The toasted coconut gave an island note that turned an ordinary midweek treat into something a little celebratory.
If you want to make smaller treats, use a mini muffin tin and cut down chilling time. They become little bite-sized comforts that disappear in a single round of afternoon coffee.
FAQs About No Bake Peanut Butter Oat Cups
Q: Can I make this ahead of time?
A: Yes, and honestly, it might taste even better the next day once the flavors have settled and come together. Store them in the refrigerator in an airtight container and pull them out a few minutes before serving so the chocolate softens slightly.
Q: My mixture seems too dry. What can I do?
A: Add a teaspoon of maple syrup or peanut butter at a time until the mixture holds together when pressed. You can also add a small spoon of pumpkin puree to add moisture and a gentle flavor that keeps the cups soft.
Q: Can I use quick oats instead of rolled oats?
A: You can, but rolled oats give a more satisfying texture when blended. If you only have quick oats, they will work in a pinch, though the flavor and mouthfeel will be slightly different.
Q: How can I make them nut-free?
A: Substitute sunflower seed butter for peanut butter and use a seed-based spread you like. Taste as you go because some seed butters have a stronger flavor than peanut butter and may need a touch more sweetener.
Q: Will these melt easily on a warm day?
A: The chocolate top will soften if left in heat, so keep them chilled or serve from a cool bag if you plan to be outdoors. A small cooler or insulated bag with an ice pack will keep them firm for several hours.
A Final Thought
I hope these No Bake Peanut Butter Oat Cups find a cozy corner in your kitchen and a spot on your family table. They are simple to make, gentle on busy days, and full of the kind of small comforts that linger in memory. Make a batch and let someone help; the little hands that press and sprinkle will carry that moment forward. I love hearing about the tiny ways recipes like this fit into your life, so when you make them, remember to pause and notice the small warmth they bring. Until next time, may your kitchen feel like a place of welcome and quiet joy.
More Sweet, Seasonal Treats You’ll Love
When you’re craving something soft and nostalgic, Marshmallow Fluff Fudge is a simple, old-fashioned sweet that melts just as easily into family moments. For playful comfort, Banana Pudding Rice Krispie Treats carry that familiar pudding flavor in a no-bake form everyone loves.you can always find me sharing from my kitchen on Pinterest and over on Facebook.
