
I still remember the way the kitchen smelled the first time I made this Layered Celebration Cake for a small fmily meal. The sponge warmed the room with a gentle, sweet note while the cherry ice cream hummed with bright, familiar fruitiness from the freezer. I worked slowly, smoothing the cream cheese mixture as my husband set the table, and the small ritual of layering felt like a quiet act of care. If you like simple desserts that remind you of slow afternoons and warm kitchens, you might also enjoy a soft cookie that shares the same calm spirit, like these apple cider cheesecake cookies.
Layered Celebration Cake
Ingredients
Sponge Cake Layers
- 1 each sponge cake Room temperature helps with texture
Cheesecake Layer
- 8 ounces cream cheese Adds a classic richness
- 1 cup cookie crumbs Gives a simple crunch and depth of flavor
Ice Cream Layer
- 1 quart cherry-flavored ice cream Bright and nostalgic, a nod to summer treats
Toppings (Optional)
- 1 cup whipped cream Makes a soft, airy topping for serving
- a handful each fresh cherries For garnish, adds a fresh, jewel-like note
Instructions
Preparation
- Prepare the sponge cake layers and let them cool.
- In a mixing bowl, combine cream cheese and cookie crumbs until well blended.
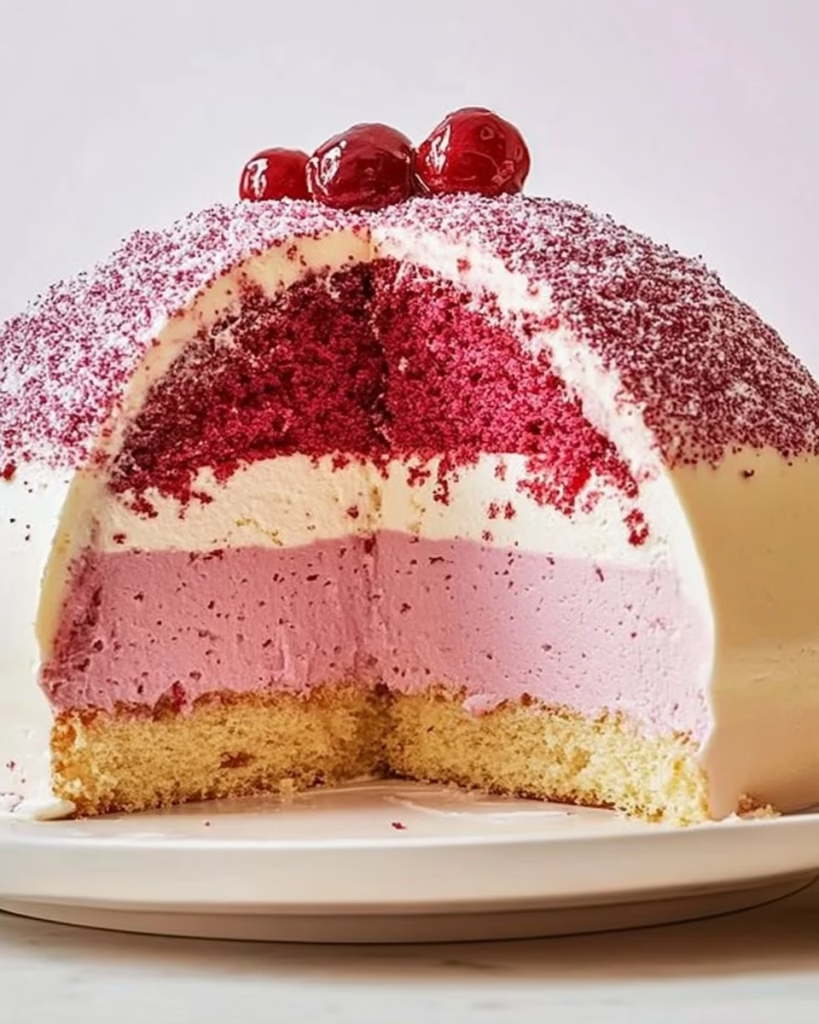
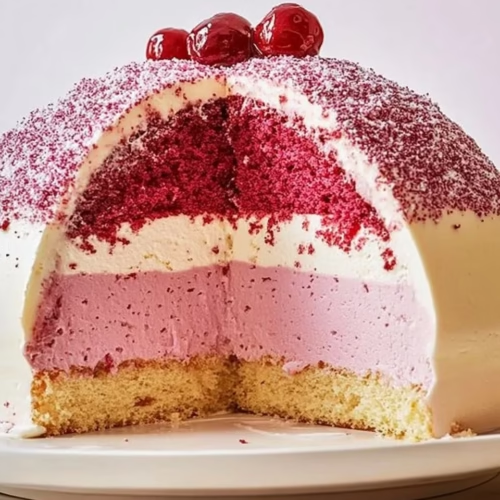
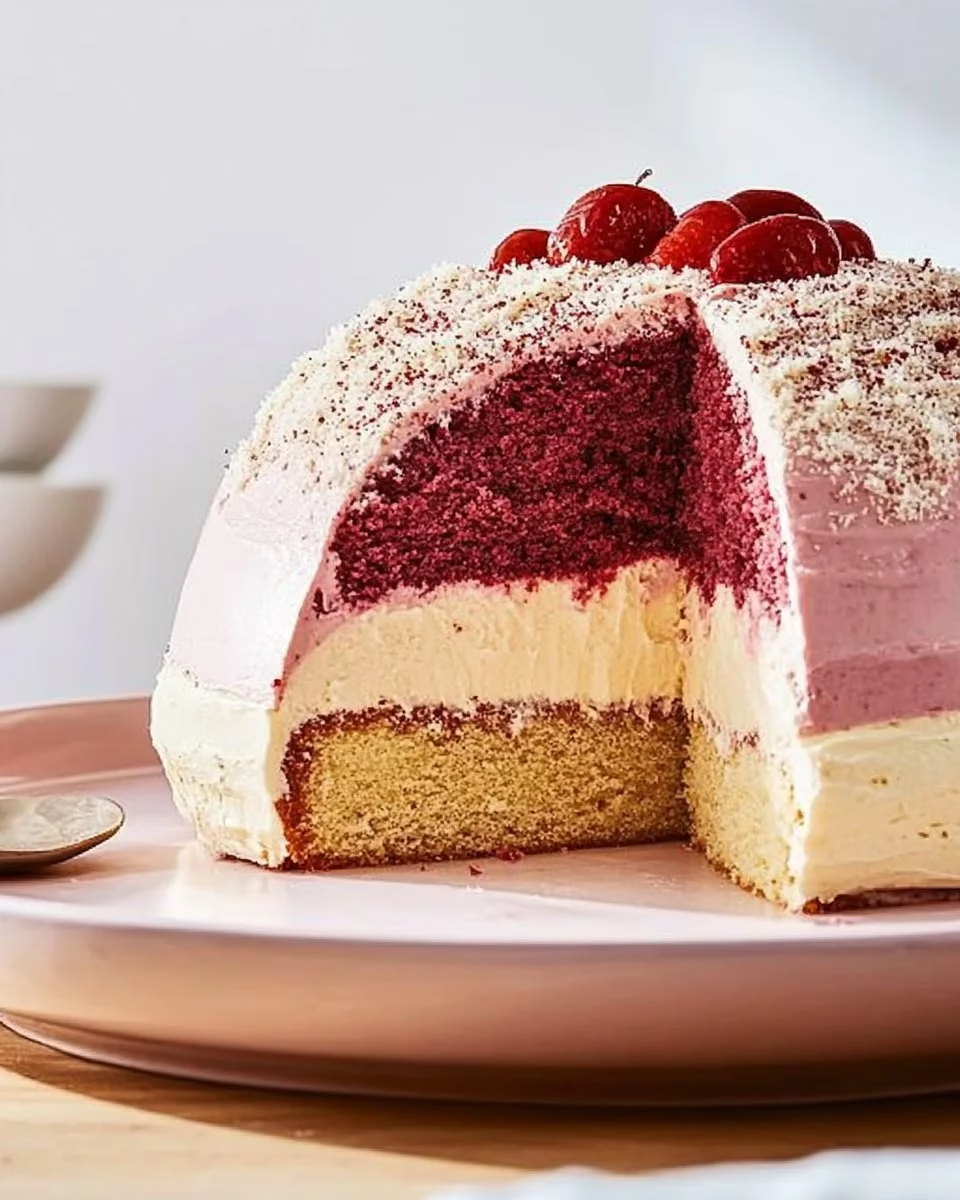
- Layer a sponge cake slice, followed by the cheesecake mixture, and then a layer of cherry-flavored ice cream in a cake pan.
- Repeat the layering process until all ingredients are used, finishing with ice cream on top.
- Cover the cake with plastic wrap and freeze until solid, at least 4 hours.
- Once frozen, remove from the pan, and decorate with whipped cream and fresh cherries if desired.
- Slice and serve.
Notes
Nutrition
Why This Layered Celebration Cake Has Always Been a Favorite
This cake has lived on our table for years because it is gentle and honest in its flavors. It marries light sponge with a creamy cheesecake layer and a bright cherry ice cream finish. Each element carries memories: a childhood slice, a neighbor’s birthday, a quiet Sunday when someone needed comfort. The cake is not loud or flashy. It is dependable and full of warmth.
I first put this cake together for a small anniversary when the kids were young and loud. I wanted something that could be made ahead and would feel like a small gift on a busy day. From that first time, the family noticed how the textures settled together after a night in the freezer. The sponge softened just enough and the cookie crumbs added a familiar, slightly crunchy counterpoint. It became a steady favorite for us because it asks little and gives much.
This recipe holds up in real kitchens with real rhythms. You will not need special tools or rare ingredients. It asks for patience more than perfection. When guests arrive, the cake stands quietly on the table and invites a soft conversation. It is the kind of dessert that says I cared enough to plan ahead, to freeze, and to let the flavors settle.
The Story Behind This Layered Celebration Cake
There is a small domestic story tied to every slice I serve. The idea of layering soft cake, a tangy cream cheese mix, and a bright ice cream came from watching how flavors work together. My mother used to combine fresh fruit with cream cheese on toast for a lazy breakfast. I thought the same logic could comfort a dessert: familiar textures, steady sweetness, and a cooling finish.
Over the years, I have adapted the ratio of cream cheese to crumbs, learned that room temperature ingredients make a smoother mixture, and seen how a simple plastic wrap seal helps avoid ice crystals. These small changes taught me that a recipe grows gentle with experience. It is not so much a secret as a conversation of small improvements. Every kitchen has its own rhythm, and this cake listens well.
Bringing Layered Celebration Cake Together
“Some recipes just feel right the moment they come together.”
Begin with calm and a clear plan. Make the sponge layers first and cool them fully so they will hold their shape. In another bowl, blend the cream cheese and cookie crumbs until they feel like a soft, spreadable filling. Scoop softened cherry ice cream in even layers and press gently so each layer rests without gaps. From there, cover and freeze the whole cake until it is set solid, and you will see how the layers knit together into a single, comforting dessert.
Watch for small cues along the way. The sponge is done when it springs back and has a light, golden edge. Mix the cheesecake layer until smooth but not thin. When you place the ice cream, let it set briefly at room temperature if it is very hard so it will spread without tearing the sponge. These moments of gentle attention make the difference between a hurried cake and one that feels made with care.
Ingredients You’ll Need
- Sponge cake layers
- room temperature helps with texture
- Cream cheese
- this adds a classic richness
- Cookie crumbs
- gives a simple crunch and depth of flavor
- Cherry-flavored ice cream
- bright and nostalgic, a nod to summer treats
- Whipped cream (optional)
- makes a soft, airy topping for serving
- Fresh cherries (for garnish, optional)
- adds a fresh, jewel-like note for the table
Gathering these simple staples will keep the process calm and enjoyable. You can buy a ready sponge or bake one at home; both give the same friendly result. If you like little variations, consider using a different cookie crumb for the cheesecake layer. A plain sweet cracker or graham crumb will feel classic. If fresh cherries are in season, they add a quiet elegance when placed on top.
If you ever want a calm breakfast to pair with a slice of this cake, try the gentle fold of fruit and yogurt in these apple yogurt pancakes. They share the same sense of home cooking and comfort.
Step-by-Step Directions
Prepare the sponge cake layers and let them cool.
- Bake or use a store-bought sponge, then let it cool until it reaches room temperature.
- Watch for lightly golden edges and a springy top before you slice or layer.
In a mixing bowl, combine cream cheese and cookie crumbs until well blended.
- Beat at low speed until the cream cheese is smooth and crumbs are evenly mixed.
- Mix until smooth but still thick enough to hold a layer.
Layer a sponge cake slice, followed by the cheesecake mixture, and then a layer of cherry-flavored ice cream in a cake pan.
- Place a sponge on the bottom of the pan, spread an even layer of the cream cheese mixture, then add softened ice cream.
- Smooth each layer gently with a spatula and watch how the textures nest together.
Repeat the layering process until all ingredients are used, finishing with ice cream on top.
- Continue to stack sponge, cheesecake, and ice cream until the pan is filled.
- Finish with a final, neat layer of ice cream and smooth the surface.
Cover the cake with plastic wrap and freeze until solid, at least 4 hours.
- Tuck the plastic wrap tightly so the cake will not pick up freezer odors.
- Let it rest in the freezer until it feels firm and fully set.
Once frozen, remove from the pan, and decorate with whipped cream and fresh cherries if desired.
- Run a warm knife around the pan if it is stubborn, then gently invert onto a platter.
- Pipe or spoon whipped cream and add cherries for a classic touch.
Slice and serve.
- Use a warm, dry knife for clean slices, wiping between cuts.
- Let slices rest a few minutes at room temperature so the ice cream softens slightly before serving.
Serving Layered Celebration Cake With Care
Serve the cake in a calm way, with small plates and a simple fork. A cup of tea or a pot of coffee rounds out the moment. I like to cut the cake while it is still firm, then let each slice sit five minutes before serving so the ice cream yields softly to the fork. This little pause brings out the flavors and makes the texture comfortable on the tongue.
If you want to present it for a small celebration, finish with a soft dollop of whipped cream on each slice and a fresh cherry placed with the stem. It gives a handmade charm without fuss. A few crumbs scattered on the plate look homey and deliberate. Serve the cake with kind words and the room will warm naturally.
For an everyday treat, a simple slice with warm milk or a mug of warm cider is enough. The cake feels like a day made gentle. Cut slices not too large; the ice cream is rich and the cream cheese has presence. This way, each piece tastes balanced and leaves space for conversation.
How We Enjoy Layered Celebration Cake at Home
At home, this cake often appears on slow Sundays or quiet anniversaries. The children liked it best when it was still very cold, while my husband’s preference was a slightly softer slice. We learned to offer plates and let each person decide their moment. Sometimes we serve it after a simple roast dinner, and other times it is the highlight of a picnic on the back porch.
There is comfort in knowing a dessert can be both prepared ahead and served with notice. When company comes late, it is a relief to reach into the freezer and bring out a cake that already tells a story. The family has a small ritual now: the youngest always takes the corner slice first. These small habits stitch the cake into our home life.
Storing Layered Celebration Cake for Later
To keep this cake fresh, wrap it tightly in plastic and place it in a solid container. This prevents freezer burn and protects the layers from picking up other smells. When you want to serve another slice, let it sit on the counter for several minutes so the ice cream loosens up a little.
If you plan to keep it longer than a week, check the ice cream label for storage instructions. Over time, the texture may shift slightly and the cream cheese layer can firm more. Those shifts are not bad; they simply change the mouthfeel. I find the cake often tastes best after a day or two, when the flavors have had a chance to mingle.
If you thaw a whole cake to serve and have leftovers, cut the remaining slices and return them to the freezer in an airtight container. Put small pieces of waxed paper between layers to keep them neat. Slices will hold up well for a few weeks in proper conditions.
Mary’s Baking Notes
- Room temperature matters. Let the cream cheese sit out until soft, and let the sponge cool fully before you layer.
- This helps everything come together without tearing or lumps.
- A gentle touch goes far. When spreading the cheesecake mixture and the ice cream, smooth with light hands.
- Pressing too hard can push the ice cream into the sponge and make the layers uneven.
- Keep tools simple. A spatula, a warm knife, and a tight piece of plastic wrap do more than fancy gadgets.
- The familiar tools help you feel more at home in the process.
- Choose a cookie crumb you love. Graham crumbs are classic, but a plain shortbread makes a softer, butterier note.
- Try a small test bowl before committing the whole batch if you are curious.
- Chill between steps when needed. If your ice cream melts too fast, return it to the freezer for a few minutes before finishing the top layer.
- Small pauses keep things tidy and reduce stress.
These notes come from years of baking in a small kitchen that measures time by the oven light. They are not rules so much as friendly reminders to work calmly and with attention.
Family Variations on Layered Celebration Cake
We like small variations that keep the feel of the cake but tweak the flavors slightly. A vanilla or chocolate ice cream will read differently but still feel familiar. A thin spread of jam between the sponge and cream cheese brings a subtle fruit lift without overt sweetness. In summer, try fresh cooked cherries folded into the ice cream layer for added texture.
For a lighter take, use a lower fat cream cheese and a sorbet instead of ice cream. The structure will be a little different, but the cake remains approachable. If you prefer a nutty note, fold a few finely chopped toasted almonds into the cookie crumbs. These small swaps let you adapt the dessert to the season and to what the family likes.
If you want to keep the cake dairy-free, consider a plant-based cream cheese and a sorbet that mimics the cherry flavor. The cake will be less creamy but still comforting. The key is to keep the layers balanced in texture so no one element overwhelms the others.
FAQs About Layered Celebration Cake
Can I make this ahead of time?
Yes, and it often holds up beautifully. Freeze it as directed and it will be ready when you need it, making it a helpful recipe for planning ahead.
How do I get clean slices each time?
Use a warm, dry knife and wipe it between cuts. Let slices stand for a few minutes after cutting so the ice cream softens just enough for a neat forkful.
Can I use a different cookie crumb?
Absolutely. Graham, shortbread, or even lightly crushed digestive biscuits all work. Choose a crumb with a flavor you enjoy and that will not overpower the cream cheese.
What if my sponge is homemade and slightly thicker?
Trim the sponge to fit the pan and use the extra as a top layer or serve on the side. A slightly thicker sponge is fine as long as the layers feel balanced.
Is there a good way to prevent freezer burn?
Wrap the cake well with plastic wrap, pressing it gently to the surface to avoid air pockets. An additional layer of foil or a tight container adds extra protection.
More Sweet, Seasonal Treats You’ll Love
If baking these Homemade Rolls brings that quiet joy of flour-dusted counters and warm ovens, there are plenty of other gentle recipes waiting for you. When you’re craving something soft and nostalgic, Marshmallow Fluff Fudge is a simple, old-fashioned sweet that melts just as easily into family moments. For playful comfort, Banana Pudding Rice Krispie Treats carry that familiar pudding flavor in a no-bake form everyone loves.
you can always find me sharing from my kitchen on Pinterest and over on Facebook.
