I lifted the heart-shaped pan from the oven and the warm smell of butter and brown sugar curled toward me like a small, sweet invitation. The top had a soft, golden edge and the center still had that reassuring give that tells you the crumb will be tender. I remember how a friend laughed when I tucked colorful candy into the batter and said it was a cookie that wanted to be a cake, and that mix of surprise and comfort is exactly why I keep returning to this little experiment, the same way I returned to perfecting my apple cider cheesecake cookies when I wanted a new way to gift a slice of the season.
Heart-Shaped Cookie Cake
Ingredients
Dry Ingredients
- 2 cups all-purpose flour This gives structure to the cake.
- 1 teaspoon baking soda This acts as a leavening agent.
- 1/2 teaspoon salt Enhances flavor.
Wet Ingredients
- 1 cup unsalted butter, softened Gives richness and tenderness.
- 1 cup granulated sugar Adds sweetness and slight crispiness.
- 1 cup brown sugar, packed Brings moisture and caramel flavor.
- 2 large eggs Binds the mixture and adds lift.
- 1 teaspoon vanilla extract Enhances flavors.
Mix-ins
- 1 cup candy (such as M&M’s or chocolate chips) Adds color and bursts of chocolate.
Frosting
- 1 cup pink buttercream frosting Adds sweetness and visual appeal.
Instructions
Preparation
- Preheat the oven to 350°F (175°C). Grease a heart-shaped cake pan with butter or nonstick spray and line with parchment if desired.
- In a bowl, whisk together flour, baking soda, and salt. In another bowl, cream butter, granulated sugar, and brown sugar until smooth, about 2 to 3 minutes.
Mixing
- Beat in the eggs and vanilla extract one at a time, mixing until just combined.
- Gradually mix in the dry ingredients until just incorporated. Fold in the candy with a spatula.
Baking
- Pour the batter into the prepared pan, smoothing the top. Bake for 25 to 30 minutes, or until a toothpick comes out clean.
- Allow to cool completely in the pan on a wire rack before removing.
Serving
- Frost with pink buttercream frosting before serving.
Notes
Nutrition
Table of Contents
Table of Contents
Why This Heart-Shaped Cookie Cake Became a Favorite
I fell for this dessert because it balances two happy things: the chewy, cozy feel of a cookie and the shareable size of a small cake. It started as a late-night test, when I wanted a treat big enough to split but small enough to bake quickly. That first pull from the pan, when the edges were set and the center still smelled slightly of caramel, felt like a tiny victory.
I ran a few small-batch trials to find the right texture. I nudged the butter temperature, watched how the sugars browned, and tasted how the candy added both color and a quick burst of chocolate without stealing the show. Each change taught me something about patience and timing, and the recipe finally felt like a little ritual rather than a one-off experiment.
This Heart-Shaped Cookie Cake is the kind of recipe I turn to when I want to offer a friendly, handmade sweet. It is forgiving, honest, and it rewards small, careful touches. It also gives room to play, and I like how a simple swap or a tiny extra beat of the mixer can change the experience without risking a disaster.
The Rhythm of Making Heart-Shaped Cookie Cake
“The moment the texture shifts, you know it’s ready.”
There is a rhythm to this cake. You feel it in your hands when you cream the butter and sugars, when the mixer leaves soft peaks that shine. The batter will move from glossy and loose to slightly thicker and smooth, and that change tells you you are on the right track.
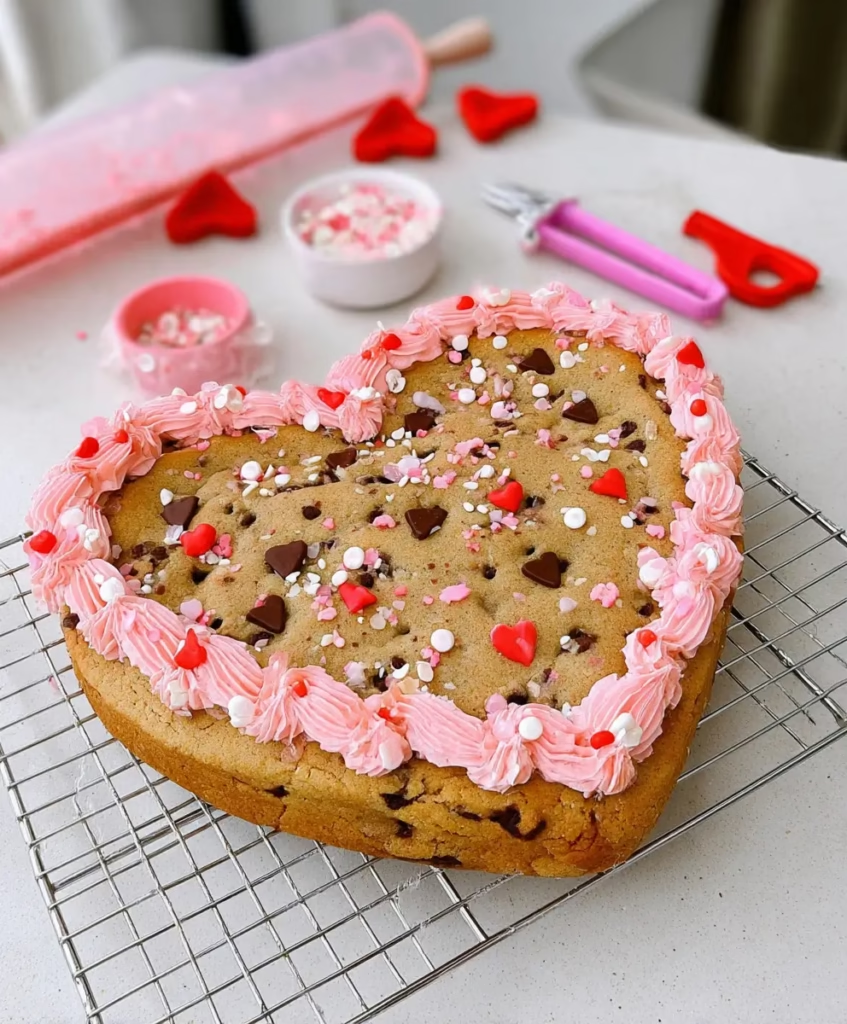
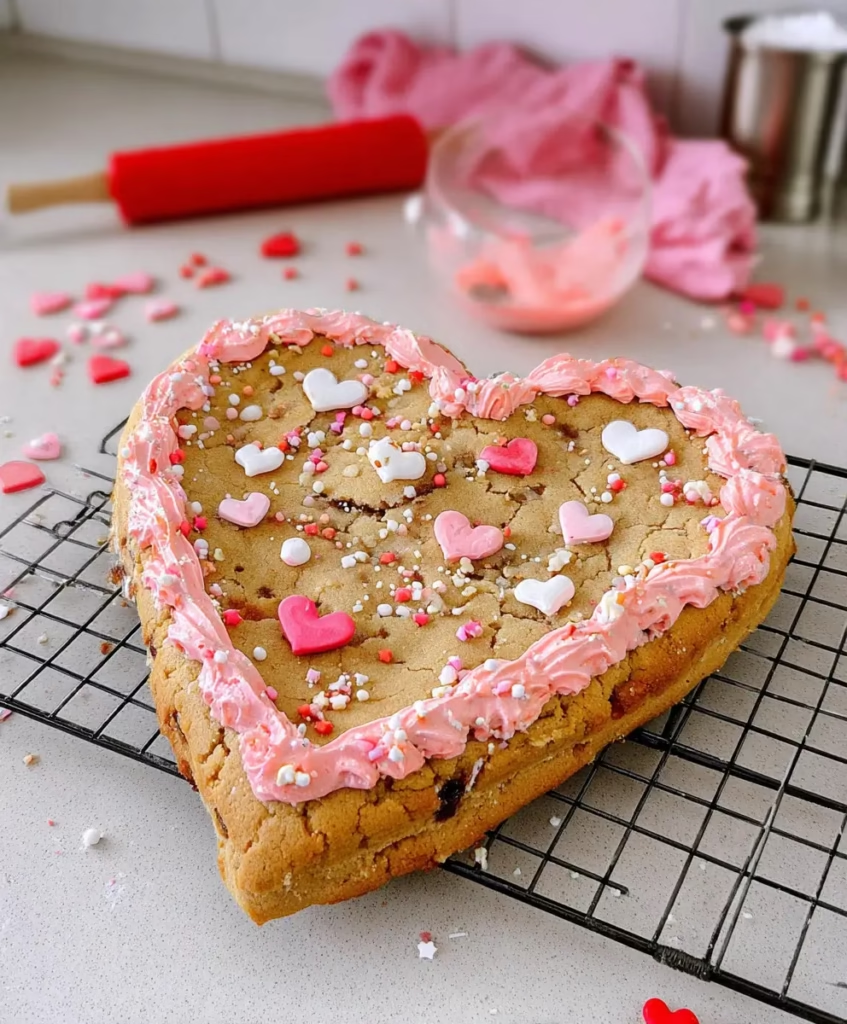
As you fold in the candy, watch how it scatters through the mix and adds little pops of color or gloss. When you pour the batter into the pan, it will settle with a calm surface and a few air bubbles. In the oven it will rise gently and the top will change from pale to a tender golden hue. That color, together with a clean toothpick, is your cue to pull it out and let the scent finish the telling.
Ingredients You’ll Need
2 cups all-purpose flour
1 teaspoon baking soda
1/2 teaspoon salt
1 cup unsalted butter, softened (this gives richness and helps the cake stay tender)
1 cup granulated sugar (this adds sweetness and helps create a slight crisp at the edge)
1 cup brown sugar, packed (this brings moisture and a caramel note)
2 large eggs (these bind and add lift)
1 teaspoon vanilla extract (this lifts flavors without overpowering)
1 cup candy (such as M&M’s or chocolate chips) (this adds color or chocolate pops)
1 cup pink buttercream frosting (this finishes with creamy sweetness and a playful color)
Treat this list like a friendly map. Each ingredient plays a clear role, and small adjustments will change texture more than taste. For a tender crumb keep the butter at room temperature. For clear flavors use a simple vanilla and a trusted brand of candy that melts well when you bite.
Step-by-Step Directions
Directions
Preheat the oven to 350°F (175°C). Grease a heart-shaped cake pan with butter or nonstick spray and press a piece of parchment inside if you like a clean release. The pan should feel warm when you slide it into the oven so it bakes evenly.
In a bowl, whisk together the flour, baking soda, and salt. Give it a good stir so the rising agent distributes evenly and there are no lumps. This dry mix helps structure the cake and keeps the crumb even.
In another bowl, cream the butter, granulated sugar, and brown sugar until smooth. Beat for about 2 to 3 minutes until the mixture looks light and slightly glossy. Watch for a smooth sheen that indicates the sugars have dissolved into the butter.
Beat in the eggs and vanilla extract, one at a time, mixing until just combined. Stop once the batter looks uniform and continues to have a soft, pillowy look. Overmixing here will make the cake tougher, so be gentle.
Gradually mix in the dry ingredients, scraping the bowl as you go to keep everything even. Add the flour mixture in two or three additions and fold until just incorporated. The batter should be thick but still pourable, with a soft mound that smooths down slowly.
Fold in the candy with a spatula until it is evenly distributed. Watch the candies as they nestle into the batter and scatter color and texture. If you use chocolate that melts easily, fold with care so you keep those bright bits.
Pour the batter into the prepared pan and smooth the top with a spatula, creating a gentle, even surface. Tap the pan lightly on the counter to release large air pockets and let the batter settle. Check that the batter sits level so the bake will be uniform.
Bake for about 25 to 30 minutes, or until a toothpick inserted in the center comes out clean or with a few moist crumbs. Look for a golden edge and a slightly domed center that springs back when you touch it lightly. Stop baking once it feels soft but set, because it will continue to firm up as it cools.
Allow to cool completely in the pan on a wire rack before removing. Let it rest until it feels room temperature and no longer warm to the touch. This rest makes slicing neater and lets the crumbs finish settling.
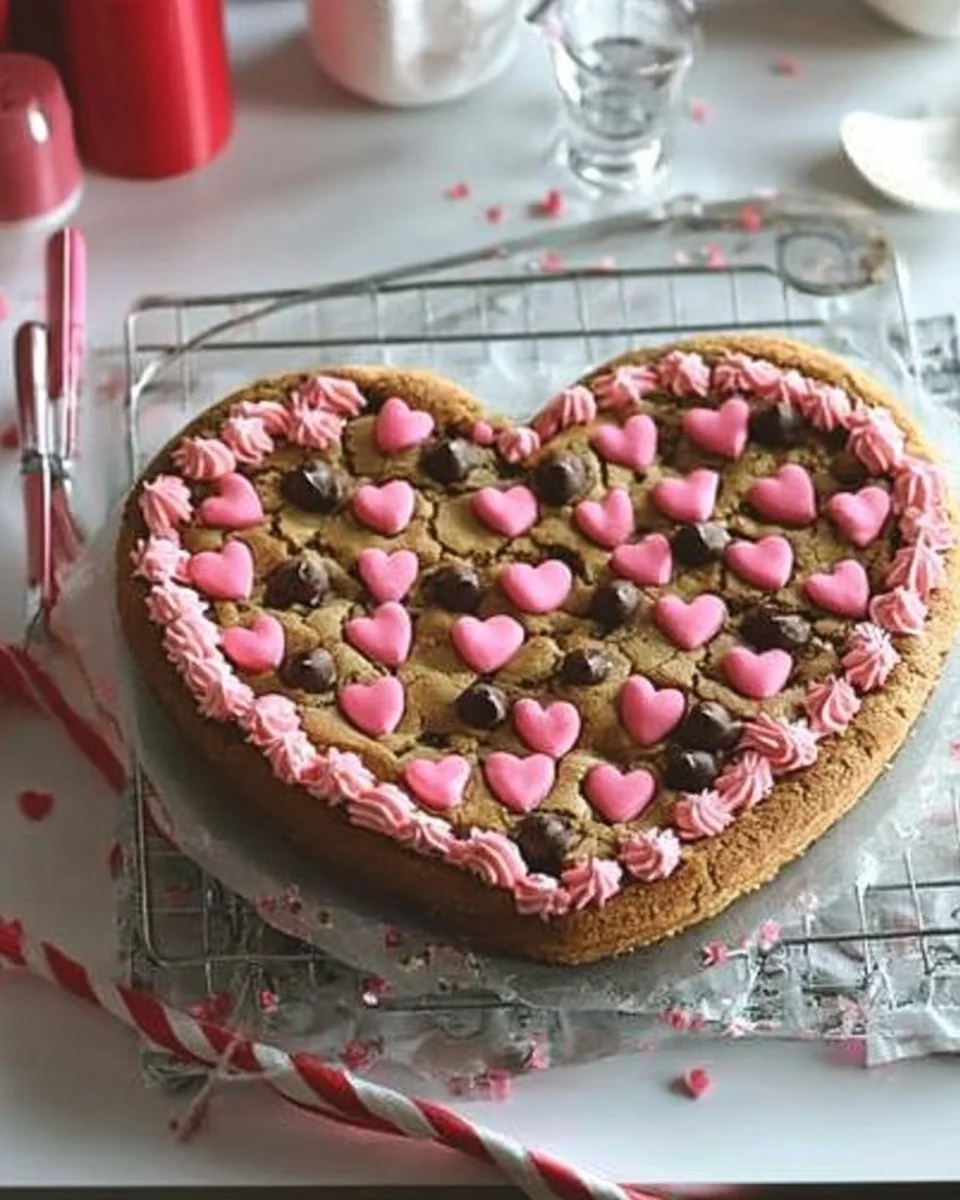
Frost the top with pink buttercream frosting before serving, spreading with a spatula or piping a simple pattern. Start with a thin crumb coat if you want a smooth finish, then add more frosting for a fluffy top. The pink frosting adds charm and a little extra sweetness.
Sharing Heart-Shaped Cookie Cake
This cake feels right for slow weekends, for sharing with a neighbor, or for a small celebration that does not need fanfare. I slice it into wedges and serve it on plain white plates so the pink frosting and speckled candy can speak for themselves. It is perfect with a cup of black tea or a small scoop of vanilla ice cream for contrast.
When I bring this cake to a friend’s house I tuck it into a simple box or wrap it with a ribbon and a note. The heart shape already does a lot of the giving, and the bright frosting keeps it light and playful. If you like contrasts, serve a thin ribbon of salted caramel or a small spoon of berry compote alongside to add a fresh pop.
Pairing the cake with a denser, richer dessert can be fun at a gathering. For a winter event I once set a slice beside a deep chocolate cheesecake and the contrast delighted everyone. If you want a similar pairing at home, consider looking at a rich, minty chocolate option like the chocolate peppermint cheesecake feature I tested, which offers a bold foil to the cookie cake’s sweetness by the side of the plate chocolate peppermint cheesecake.
Keeping Heart-Shaped Cookie Cake Fresh
Store the cake covered at room temperature for up to two days if your kitchen is cool. Use a cake dome or a tight container that keeps the frosting from drying. The crumb stays tender and the frosting remains soft for those first two days.
If you need to keep it longer, refrigerate the cake for up to five days, wrapped well to prevent it from absorbing other flavors. Bring it back to room temperature before serving so the butter and sugar relax and the texture becomes tender again. The frosting will firm slightly when cold, so plan for a short rest before slicing.
You can also freeze slices for a quick treat. Wrap each piece in plastic and then in foil for up to one month. Thaw them overnight in the fridge or at room temperature for a few hours before eating. The texture will be slightly different from fresh, but the flavor stays honest and the candy keeps a pleasant pop.
Carol’s Baking Notes
Butter temperature matters. I learned that room-temperature butter that still feels slightly cool gives the best creaming. It traps air without turning greasy and helps the batter rise evenly.
Sugars play different roles. The granulated sugar gives a light edge while brown sugar keeps the crumb moist. If you swap one for the other, expect a denser or drier finish.
Watch the bake early. Ovens vary, so check the cake at 20 minutes and again at 25. Look for a golden rim and a center that bounces back gently. It is better to err on slightly underbaked than overbaked for this recipe.
Candy choice changes the mood. Small candies like M&M’s add color and a small crunch, while chocolate chips melt into pockets. Use both if you want textural variety, but toss them in a tablespoon of flour first to keep them from sinking.
Pink frosting is optional. A simple vanilla buttercream tinted pink makes this cake feel celebratory, but a plain buttercream or a thin glaze will keep the bake lighter. Taste the frosting and adjust the sugar or salt to match the cake’s sweetness.
Variations I’ve Tried
Chocolate streak: Swap 1/3 cup of the flour for cocoa powder and fold in dark chips for an extra chocolate mood. The crumb turns slightly denser but remains tender, and the frost color contrasts nicely.
Nutty twist: Fold in 3/4 cup of chopped toasted pecans or walnuts and reduce the candies slightly. The nuts add a gentle savory angle and a pleasant bite against the soft texture.
Fruit and glaze: Mix in 1/2 cup finely chopped dried cherries or cranberries and top with a thin lemon glaze. The fruit adds chew and tang and the glaze cuts sweet richness with brightness.
Mini cookie tops: After you fill the pan, press a few small cookie dough balls on top so they bake slightly into the surface. You get pockets of cookie texture and a playful look.
Smaller shapes: Use a square or round pan and adjust bake time by a few minutes. A thicker cake may need a little extra time, while a thinner one will finish sooner. Keep a close eye and use the toothpick test.
FAQs About Heart-Shaped Cookie Cake
Can I make this ahead of time?
Yes. You can bake the cake a day ahead and keep it covered at room temperature. If you plan to frost it much later, store it unfrosted overnight and apply the frosting on the day you serve for the freshest look.
Can I use dark brown sugar instead of light brown sugar?
Yes, the flavor will be deeper and more caramel-like with dark brown sugar. Texturally it will be similar, but expect a richer taste and a slightly darker crumb.
What if I do not have a heart-shaped pan?
Use any pan you have and adapt the bake time. A round or square pan will work fine; a 9-inch pan will give a similar thickness. Check at the 20-minute mark for doneness and adjust as needed.
How can I avoid candy bleeding color into the batter?
Toss small candies with a teaspoon of flour before folding them in. If you use delicate or very colorful candies, fold gently and do not mash them into the batter. Larger chips tend to melt into pockets rather than bleed.
Can I make this gluten-free?
I have tried a 1:1 gluten-free flour blend and it worked well, though the crumb was slightly more delicate. Add a teaspoon of xanthan gum if your mix does not include it and watch the bake carefully, as GF flours can brown differently.
A Final Thought
If you’re planning a full Valentine’s dessert spread, this heart-shaped cookie cake pairs beautifully with other festive treats from my kitchen. Add a bowl of crunchy Valentine’s Day Muddy Buddies for easy snacking, or balance the softness with Chocolate-Dipped Rice Krispie Treats for a classic no-bake favorite. For decorating fun, Valentine’s Day Sugar Cookies are always a hit, while a Valentine’s Day Layer Cake makes a beautiful centerpiece. Round things out with simple, giftable sweets like Valentine’s Day Chocolate Bark or sweet-and-salty Valentine’s Pretzels to share the love one treat at a time. 💕
you can always find me sharing from my kitchen on Pinterest and over on Facebook..