The warm butter scent filled the kitchen as I peeled back a pan of glossy, soft marshmallow ribbon and watched it catch the light like spun sugar. I was up late testing a small batch of Easter Egg Rice Krispies Treats, thinking about how a few drops of color change the whole mood of a dessert. I even compared my notes to a similar idea from my Rice Krispie Easter egg recipe when I wanted a visual nudge, and that gentle comparison helped me trust my instincts and keep experimenting.
Why This Easter Egg Rice Krispies Treats Became a Favorite
This treat is one of those recipes that felt right from the first try but got better with small, careful changes. I love it because it balances the crisp snap of cereal with a soft, chewy center. The colors make it playful, and the egg shapes make the treat feel seasonal without being fussy.
I tested several batches in a small counter-top marathon, adjusting the heat, the stirring rhythm, and how much butter I used. Each attempt taught me about texture. When the marshmallow meets the cereal at the right moment, the bars hold their shape without becoming brick hard. That sweet spot is what made me call this a favorite.
What drew me in was how easy it is to make something that looks special with little effort. You can be careful and exact or you can be free and a little messy. Either way, the result is comforting and bright. It brings me back to childhood kitchen experiments and to the joy of handing a colorful egg to someone who smiles at the surprise.
The Story Behind This Small-Batch Easter Egg Rice Krispies Treats
I began making these because I wanted an Easter treat that felt handmade and honest. I did not want anything that required fancy tools or long chill times. I wanted to fold color into toasted cereal and still feel the pull of the marshmallow when shaping the eggs by hand.
Over three weekends, I made tweaks. I learned that a little extra butter gives a silkier sheen to the marshmallow and a gentler mouthfeel. I learned to press the mixture gently into molds so the surface keeps a slight gloss. Those little steps turned a simple rice cereal bar into something that feels like a treat you would wrap for a neighbor.
Testing in small batches kept everything calm. I could take my time, notice how the texture behaved, and repeat the parts that worked. That steady curiosity is what this recipe celebrates.
Watching It Transform
“The moment the texture shifts, you know it’s ready.”
When you melt the butter and marshmallows, watch how the mass goes from dull to glossy. At first the marshmallow clings in ribbons, and then it smooths out into a warm, shiny pool. That shine is a great sign that the mixture is hot enough to coat the cereal well.
As you stir the cereal in, listen for a soft crackle as the puffed rice scatters and the marshmallow folds around each piece. The mixture should feel sticky but not syrupy. Once you divide it and add color, you will notice the cereal takes on a pastel glow. Pressing it into molds brings everything together into a compact, cohesive shape.
Take time to feel and look for cues. The edges should compress but still hold a slight spring. When cooled, the eggs should lift cleanly from the mold with a faint sheen and a tender chew. Those are the signs of success I look for when I make these.
Ingredients You’ll Need
3 tablespoons butter 1 package (10 oz) marshmallows 6 cups Rice Krispies cereal Food coloring (assorted colors) Candy eggs or chocolate eggs for decoration
3 tablespoons butter — this helps with structure and adds richness without overpowering. 1 package (10 oz) marshmallows — marshmallows are the glue that gives the treats their marshmallow chew. 6 cups Rice Krispies cereal — the cereal provides the crisp texture and the classic chew. Food coloring (assorted colors) — a few drops make the eggs playful and seasonal. Candy eggs or chocolate eggs for decoration — these add a crunchy or creamy contrast on top.
I find that keeping the ingredient list short helps me focus on the feel of the mixture as I work. Each component plays a clear role, and small changes make a noticeable difference.
Step-by-Step Directions
- In a large pot, melt the butter over low heat. Gently warm the butter until it becomes liquid and shines. Watch for a light foam that fades, which tells you the fat is warm and ready.
- Add the marshmallows and stir until completely melted. Add the marshmallows slowly and stir in steady circles until the lumps disappear. Look for a smooth, glossy mix that flows slowly from the spoon.
- Remove from heat and add the Rice Krispies cereal, mixing until well coated. Fold the cereal into the marshmallow while the mixture is warm so each piece gets a soft sheen. Stop folding once the cereal is evenly coated and still has some air between the pieces.
- Divide the mixture into separate bowls and add a few drops of food coloring to each, then mix until the rice cereal is evenly colored. Work quickly but gently as you stir in the color so the marshmallow does not stiffen too much. Aim for even color without overmixing, and taste a small piece to check the sweetness balance.
- Press the colored mixture into greased egg-shaped molds or shape them by hand into egg shapes. Use a light, even pressure so the eggs hold together but do not become too dense. If you press too hard you lose the crisp pockets, so stop once the surface looks smooth and slightly glossy.
- Let them cool completely. Place molds on a rack and leave the eggs to set at room temperature until they feel firm to the touch. Cooling gives the marshmallow time to settle and taste milder.
- Decorate with candy eggs or chocolate eggs. Press candies gently into the top before the treat is fully set if you want them to nestle in. Or wait until the surface is firm and glue them in place with a dab of melted chocolate.
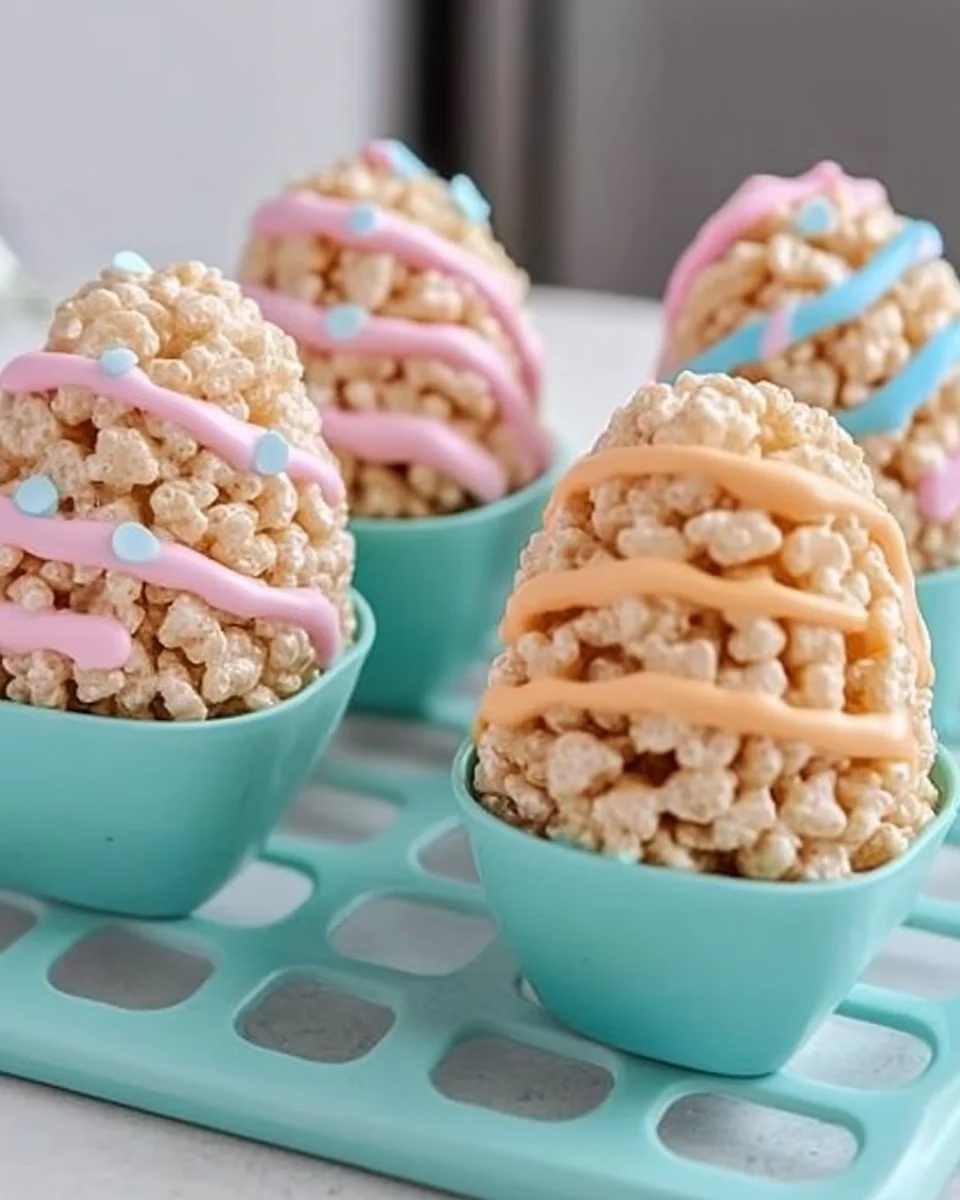
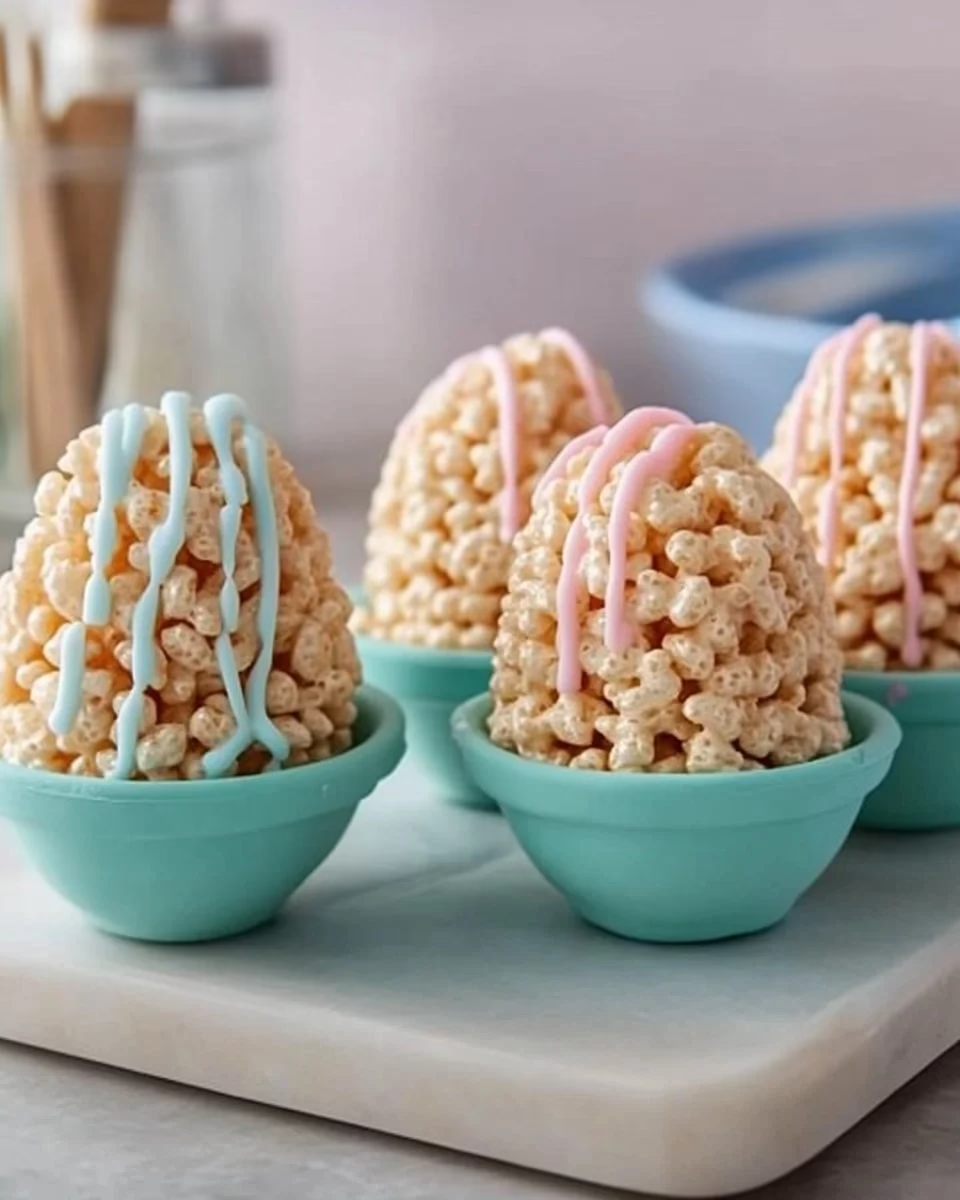
- Serve and enjoy your Easter treats! Arrange eggs on a simple platter or in paper cups and share them with family or friends. Watch for smiles when someone breaks into the tender center and finds the crunchy candy top.
How This Easter Egg Rice Krispies Treats Comes Together
The process is quick but sensory. Melting butter and marshmallows creates a glossy, sticky base and you know it is right when the mixture becomes smooth. Mixing in the cereal is where texture forms, so I pay attention to the way the cereal remains aerated while the marshmallow tucks around each piece.
Coloring is the playful part. A drop or two changes the personality of a batch without changing the texture. I usually keep colors soft and pastel for a classic Easter look. When I press the mixture into molds, I think about the balance between compactness and spring. If the eggs are too firm they become hard to bite, but if they are too loose they crumble.
Decorating is the finishing note. Candy eggs offer a different contrast than chocolate eggs, but both give a satisfying pop of texture. Sometimes I gently toast a few more cereal pieces and press them into the top for a golden edge. That small step adds a toasty scent and a hint of caramel flavor that plays well against the sweet marshmallow.
Watching It While It Cools
I like to watch as the glossy surface dulls slightly and the egg releases from the mold. That moment tells me that the structure is set but the inside keeps its soft chew. If the treat sticks, give it a few more minutes. If it cracks when you remove it, press it back together gently while still warm and it will mend.
Sharing Easter Egg Rice Krispies Treats
These eggs are made to be shared and to be small acts of surprise. I bring them to a weekend brunch, tuck them into baskets, or pass them around during a family game night. They travel well when kept in paper cups and a shallow box, so they make nice gifts for neighbors or classroom treats.
Plate them simply on a white dish so the colors stand out, or pile them in a rustic basket lined with parchment for a hands-on look. If you are serving a crowd, mix colors together in a bowl and let people pick their favorites. That casualness keeps the mood light and friendly.
If you want to make them a part of a larger dessert table, pair them with something tart like citrus cookies to cut through the sweetness. The simplicity of the rice cereal and marshmallow makes this dessert an easy counterpoint to richer flavors.
Keeping Easter Egg Rice Krispies Treats Fresh
Store the eggs in an airtight container at room temperature for up to three days. If you live somewhere humid, add a small sheet of wax paper between layers to keep them from sweating. Refrigeration can make the texture firmer and chewier, so I avoid it unless it is very warm where I live.
After a day, the exterior may lose a bit of gloss and feel slightly drier, but the flavor remains sweet and familiar. If they soften too much from high humidity, a gentle return to room temperature usually brings back some chew. For longer storage, freeze the eggs individually wrapped in plastic and then in a freezer bag for up to one month. Thaw at room temperature and press lightly to restore shape.
Carol’s Baking Notes
- Butter matters but less than technique. I used salted butter when I wanted a faint savory edge, and unsalted when I wanted the marshmallow to sing. Both work, but salted gives a little balance in sweetness.
- Work quickly when coloring. The marshmallow begins to firm as it cools, and a slow stir will make the texture clump. Divide and color in separate bowls to keep the warmth consistent.
- Press with a gentle hand. Overpacking the molds removes the pockets of air that keep the eggs light. Light, even pressure gives a surface sheen and a tender interior.
- Use a silicone mold if you can. It releases easier and is kinder on the edges. If you use metal or plastic molds, grease them lightly to help the eggs come out cleanly.
- Taste as you go. A small nibble after the marshmallow is melted helps you judge sweetness and texture. Small adjustments early on are easier than trying to fix a set egg.
These notes come from making small batches and learning by feel. I prefer to keep the lessons simple and repeatable.
Variations I’ve Tried
- Swirled colors. Add two colors to the same bowl and fold them gently to create marbled eggs. Press so the swirls show on the surface for a pretty, painterly look.
- Mix-in textures. Fold in a handful of mini pastel candies or chopped toasted nuts for an extra bite. Add them at the end so they stay whole.
- Coconut coating. Roll the finished eggs lightly in shredded coconut for a snowy finish. Toast the coconut slightly for a golden look and a nutty scent.
- Chocolate-dipped base. Dip one end of each egg into melted chocolate and let it set for a refined look. This also helps the eggs last a bit longer if you need to package them.
- Vanilla or almond extract. A half teaspoon of extract in the melted marshmallow brings a subtle warmth. Use sparingly to keep the flavor bright and familiar.
Each of these little twists keeps the basic method intact while giving you room to play. I encourage trying one small change at a time so you can notice its impact.
FAQs About Easter Egg Rice Krispies Treats
Can I make this ahead of time? Yes, and in some cases it actually sets better after resting, especially once the texture has fully settled. Wrap individual eggs and keep them at room temperature if you plan to use them within a few days.
Can I use different cereal? You can, but the texture will change. Puffier cereals create a lighter chew, and denser cereals will make the egg firmer. Taste and texture are what matter most, so choose based on the mouthfeel you prefer.
How do I keep the colors from bleeding? Avoid overmixing and do not add too much liquid color. Gel food coloring works best because it provides strong color with little extra moisture. Mix just until the color is even.
What if my marshmallow mixture gets too stiff? Warm it gently over very low heat and stir until it loosens. If you heat too high the marshmallow can scorch, so patience is key. Adding a small knob of butter can also help smooth it back.
Can kids help? Absolutely. They can press the mixture into molds, sprinkle decorations, and choose colors. Keep them at a safe distance from hot pots, but their hands make the shaping part joyful and a little imperfect in the best way.
Helpful Answers Before You Start
I often sit down with a timer and a tidy station so the process feels calm. Gather bowls, coloring, and molds before you start. That small bit of prep makes the whole experience more playful and less hurried.
If you are nervous about shaping, use a greased scoop to measure portions for each egg. This keeps sizes even and helps with consistent cooling. The consistency should be pliable, not dry, and that is the feel I aim for every time.
From My Kitchen to Yours
I hope this Easter Egg Rice Krispies Treats encourages you to experiment a little and trust your instincts the way I have learned to trust mine. Baking can be playful and precise at the same time, and small tests lead to steady confidence.
There is a special kind of joy in handing someone a pastel egg that you shaped yourself. It is a small, bright thing that says I made something for you. If you try a variation, I hope you come back to the basic method and notice what changed and why.
Keep notes, keep tasting, and keep the process gentle. These are the moments that turn recipes into memory.
Easter Egg Rice Krispies Treats
Ingredients
Main ingredients
- 3 tablespoons butter This helps with structure and adds richness without overpowering.
- 1 package (10 oz) marshmallows The glue that gives the treats their marshmallow chew.
- 6 cups Rice Krispies cereal Provides the crisp texture and classic chew.
- assorted food coloring A few drops make the eggs playful and seasonal.
- as needed candy eggs or chocolate eggs Adds crunchy or creamy contrast on top.
Instructions
Preparation
- In a large pot, melt the butter over low heat until it becomes liquid and shines, watching for a light foam that fades.
- Add the marshmallows and stir until completely melted, creating a smooth, glossy mixture.
- Remove from heat and add the Rice Krispies cereal, mixing until well coated, with each piece getting a soft sheen.
- Divide the mixture into separate bowls and add food coloring to each, mixing until evenly colored.
- Press the colored mixture into greased egg-shaped molds or shape them by hand, using light, even pressure.
- Let them cool completely at room temperature until they feel firm to the touch.
- Decorate with candy eggs or chocolate eggs, pressing them gently into the tops before they fully set.