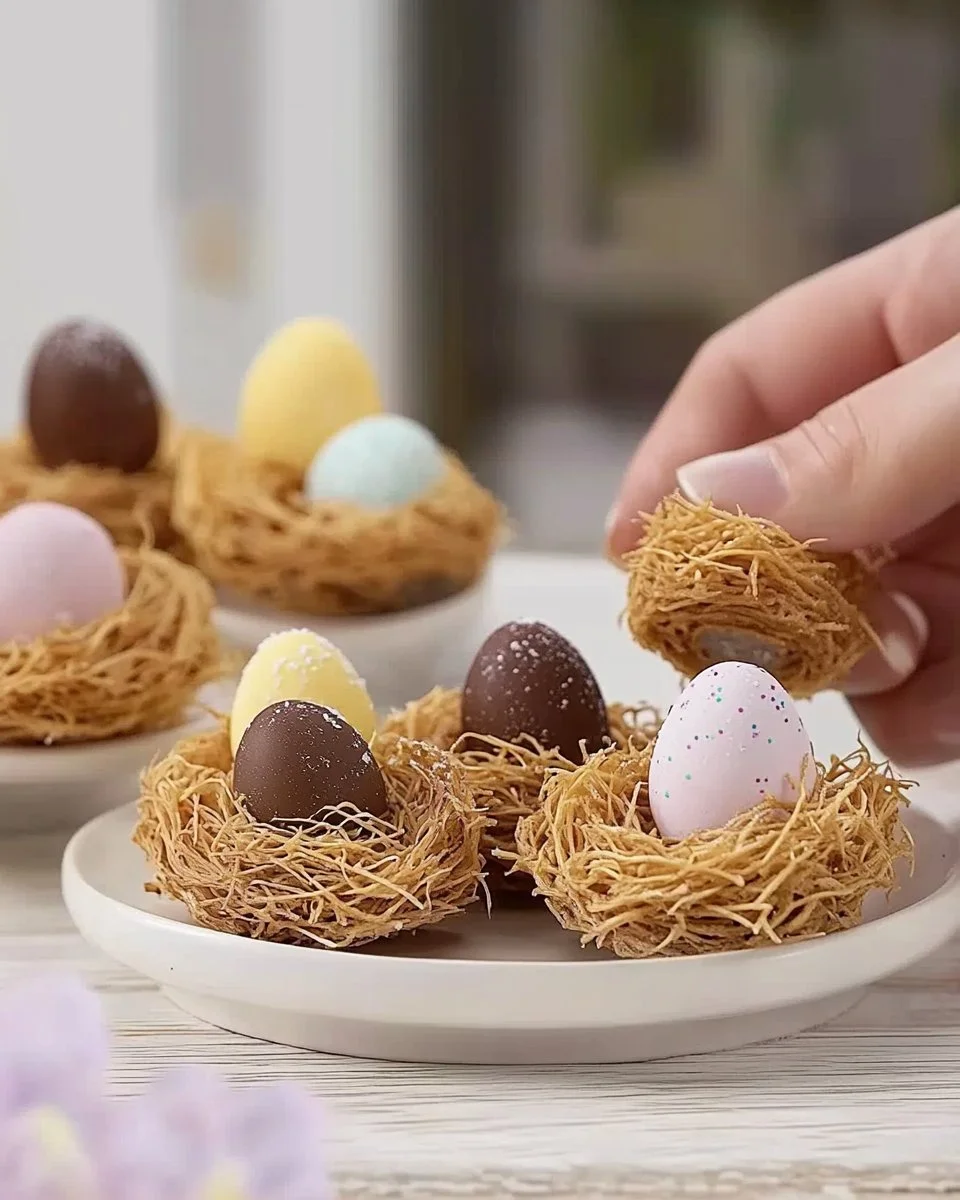
I pulled a small nest from the oven late one spring evening and the kitchen smelled like toasted butter and chocolate. The strands of Kataifi had turned a deep golden brown and made a soft crackle when I touched them, and the first smear of Nutella slid into a little glossy pool. That small, ridiculous pull of joy with a tiny speckled egg on top is why I keep making these little nests, and why I think you will love them too, even if you have never worked with Kataifi before or have only made simple tarts at home. For a playful pairing idea that inspired one of my early tests, I looked back at a crunchy, sweet sibling recipe like chocolate pretzel Easter nests and learned how contrasts of crunch and cream can make a dessert feel complete.
Why This Easter Egg Nest Tarts Became a Favorite
This recipe matters to me because it captures a small moment of kitchen joy without asking for a lot of fuss. I wanted something that felt seasonal, hands-on, and a little bit magical to tuck under a tree or leave on a neighbor’s doorstep. The idea of wrapping toasted threads around a creamy center and topping them with speckled eggs felt like a small ceremony for spring.
Small-batch testing taught me how forgiving this dessert can be. Over several tries I learned how the Kataifi responds to heat, how a thin smear of Nutella looks better than a heavy scoop, and how a few simple eggs on top turn a tart into an instant conversation starter. It kept coming back to texture and visual cues, and that is what made the recipe land for me.
I like that it reads like an experiment but finishes as a reliable little treat. It invites you to play without risking a big goof. If you like desserts that ask you to be a little curious, this will fit right into your kitchen rotation.
The Rhythm of Making Easter Egg Nest Tarts
“The moment the texture shifts, you know it’s ready.”
Start by listening to the oven and watching the color change. Kataifi moves from pale and limp to crisp and bronzed in a way that is audible and visible. The strands tighten and curl and then give up a faint nutty scent. That scent is your cue to check the color and feel for crispness.
When you spread Nutella, look for a smooth sheen that catches the light. A warmed knife will help the Nutella glide and keep the nest looking neat. The contrast between the dry, brittle nest and the glossy chocolate filling is part of the charm. Notice how the little eggs sit on top, sometimes nestling into a hollow and sometimes balancing delicately on the rim. Those tiny decisions make the finished tart feel alive.
From there, think of assembly as a gentle choreography. Separate the strands, form the nest, press carefully, and then let the oven do its work. When the crust leaves the pan cleanly and sounds crisp when tapped, you know you are on the right track. Once cooled, the filling and the eggs come together in a sweet, playful finish.
Ingredients You’ll Need
Kataifi pastry — this makes the delicate, thread-like crust and gives the nest its signature texture. Use fresh, thawed Kataifi and separate gently so the strands stay light.
Nutella — the rich, hazelnut chocolate spread fills the nest with glossy sweetness and balances the crisp crust. A thin layer adds richness without overwhelming the knot of pastry.
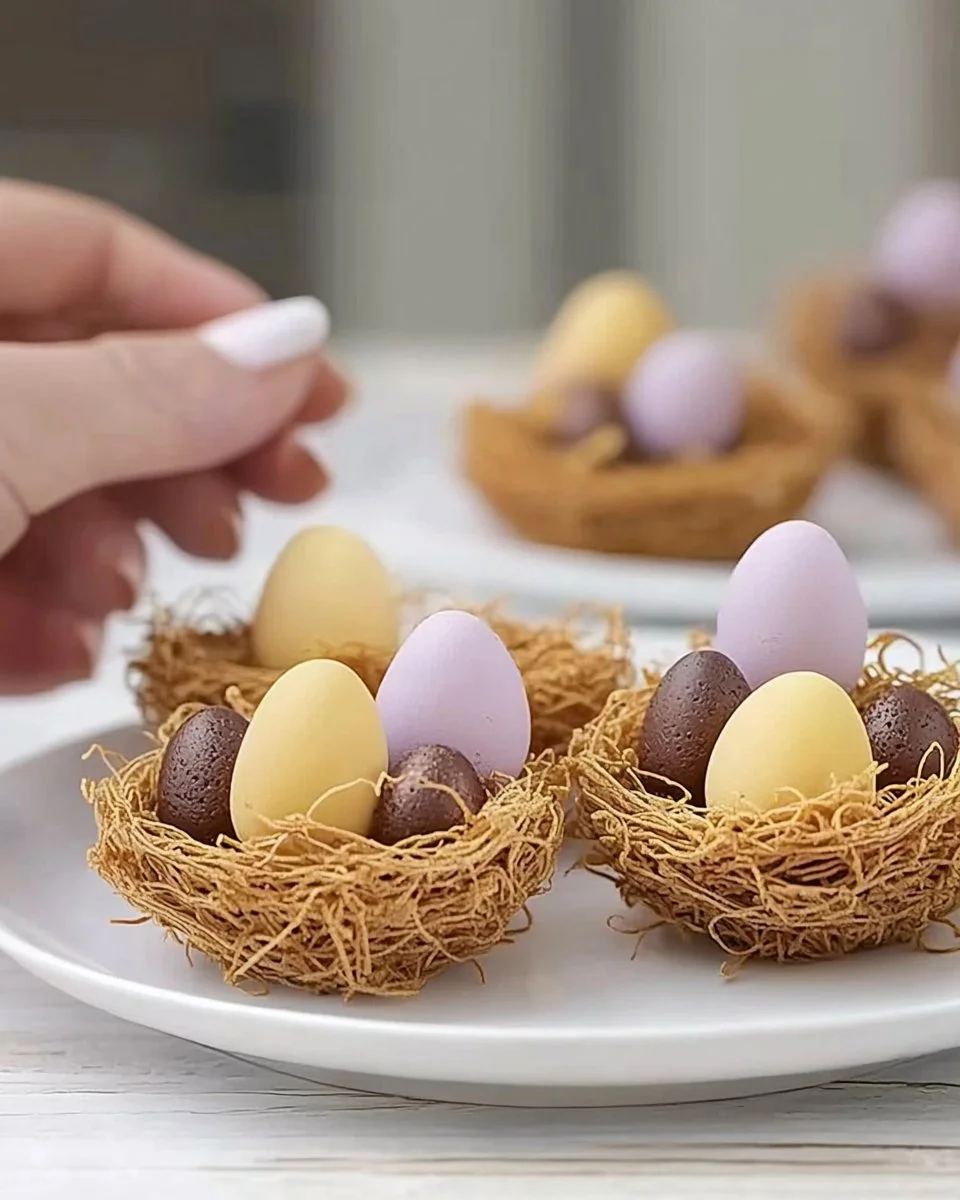
Mini speckled chocolate eggs — choose a small size so they sit prettily on top. These add a springtime look and a little extra chocolate crunch.
Butter (for greasing) — butter keeps the tart pan from sticking and adds a subtle flavor. A light brush is enough to help the crust release.
Step-by-Step Directions
-
Preheat your oven to 350°F (175°C). Make sure the oven rack sits in the center so the nests heat evenly. Preheating fully gives the Kataifi a steady start and helps it brown uniformly.
-
Grease a tart pan with butter. Use a pastry brush or a paper towel to coat the pan thinly. This helps the nests slip out easily once they are baked and keeps edges from clinging.
-
Take the Kataifi pastry and separate it into strands, then nest them into the tart pan to form a crust. Gently tease the threads apart so they are airy and light before you shape them. Build the nest with a small rim so the filling has a little well to sit in.
-
Bake the crust for about 10-15 minutes or until golden and crispy. Watch the edges and listen for a soft crackle as the pastry firms. Stop once the strands are a deep honey color and feel crisp to the touch.
-
Allow the crust to cool completely. Cooling gives the pastry time to firm up and makes spreading the filling cleaner. Touch the rim and tap the base lightly to check for a crisp sound before you move on.
-
Once cooled, spread a generous layer of Nutella inside the tart crust. Warm the Nutella slightly if it is thick so it spreads with a glossy sheen. Aim for a smooth surface rather than a mound so the eggs sit well.
-
Decorate the top with mini speckled chocolate Easter eggs. Arrange them in clusters or scatter them like a little flock. Press gently into the Nutella so they stay in place but do not sink.
-
Serve and enjoy your cute Easter egg nests! Present them on a simple plate to show off the nest texture and the speckled tops. Share warm smiles and a moment of spring in bite-sized form.
When I Serve Easter Egg Nest Tarts
I love bringing these to small gatherings where people linger over coffee and soft music. They work as a brunch treat, an after-dinner nibble, or a thoughtful gift wrapped in a cellophane bag. Because they are small and showy, they encourage people to pick one up and savor it slowly.
For a casual platter, I place a few nests on a wooden board with a small bowl of extra mini eggs and some fresh berries. The colors and textures feel alive together. If I am taking them to a neighbor, I stack them carefully in a box with parchment and include a note that says enjoy with a warm mug.
These nests are also cheerful on a dessert table where other small bites share the stage. A tiny fork or a napkin does the job, and the presentation is delightfully low-pressure. They invite conversation rather than demand a formal plate.
When I am serving kids, I set out a little decorating station, and they enjoy placing eggs and nibbling the toasted bits. The hands-on finish makes the treat feel like a small craft as well as a sweet bite.
Sharing and Pairing Ideas
These tarts are happiest when shared and when balanced by simple drinks. A bright, lively tea cuts through the richness and keeps the sweetness from feeling heavy. A light roast coffee brings out the hazelnut notes and offers a good contrast.
If you want a crunchy companion, sprinkle a few toasted nuts on the platter. Fresh fruit, like orange slices or strawberries, offers a bright foil to the toasted Kataifi and the chocolate filling. For a playful nod to other small easter sweets, try pairing with a crunchy salty treat inspired by recipes like a chocolate pretzel nest idea. The salt and sweet play well together and make each bite more interesting.
Serve with small plates so guests can admire the detail. Let people experiment with toppings if you are hosting a small group. The nests love a little creative energy.
Keeping Easter Egg Nest Tarts Fresh
Store the tarts at room temperature for up to a day if you expect them to be eaten quickly. Kept on a counter away from direct sunlight, they hold their crisp texture overnight. The pastry is at its best when it stays dry and cool.
If you need to keep them longer, pop them into an airtight container and refrigerate. Note that refrigeration softens the pastry slightly because of the moisture in the fridge, so you will lose a bit of that crisp crackle. Bring them back to room temperature before serving so the Nutella regains some gloss.
For a short freeze, place nests in a single layer with parchment between them and freeze up to two weeks. Thaw gently at room temperature. You will accept a small change in texture for the convenience of making them ahead.
When storing with toppings, place a layer of parchment over the nests so the eggs do not shift. If you plan to store them for more than a day, consider keeping the eggs separate and adding them just before serving.
Carol’s Baking Notes
Notice how the Kataifi changes color quickly. It may look nearly done and then brown in a few more minutes. I learned to watch the edges and to err on a slightly lighter gold for a tender crunch.
A warmed knife makes spreading Nutella much easier. If you let the Nutella sit in a warm bowl for a few minutes or microwave briefly, it smooths out and gives a lovely glossy layer that photographs and tastes better.
Don’t overpack the nest. Light, airy thread arrangements crisp more evenly than tightly packed bundles. Leave a small well in the center for the filling and you will see the difference in texture.
Choose small eggs for decoration. Big chocolates can overwhelm the delicate pastry. Tiny speckled eggs look charming and let the nest personality shine. If you want extra texture, add a dusting of powdered sugar right before serving.
Variations I’ve Tried
Swap the Nutella for a thin vanilla pastry cream if you want a less chocolate-forward version. The cream brings a soft, custardy mouthfeel that pairs beautifully with the crisp pastry. Add a hint of lemon zest to the cream for a bright twist.
Use melted dark chocolate mixed with a touch of cream for a ganache filling. It tightens as it cools and creates a different contrast with the Kataifi. This is a nice, slightly more formal variation when you want a refined finish.
Sprinkle toasted chopped hazelnuts or almonds on top for added crunch. A small scatter of toasted seeds gives a rustic look and adds another layer to the texture. I like this when I plan to serve the nests as part of a dessert board.
Try a nut-free option by swapping Nutella for a seed butter mixed with a touch of cocoa and honey. The flavor will be a little different but still satisfying for those with nut allergies. Keep the flavor balanced and add a tiny pinch of salt.
For a fruit-forward twist, spread a thin jam layer under the chocolate or cream. Raspberry or apricot adds a bright, tart note that plays well with the toasted pastry and the chocolate top.
FAQs About Easter Egg Nest Tarts
Can I make this ahead of time?
Yes, and in some cases the nests set better after a short rest. If you bake the Kataifi ahead and add the Nutella and eggs just before serving, you preserve the crunch best. If you must assemble earlier, store in an airtight container and accept a small loss of crispness.
What if I cannot find Kataifi pastry?
You can try a substitute, like shredded phyllo where available, but expect a slightly different texture. Another option is a shredded filo or even thinly shredded coconut mixed with a little melted butter for a different but still lovely crust. Each swap changes the mouthfeel, so test a small batch first.
How do I prevent the Kataifi from burning?
Watch color closely and rotate the pan halfway through baking if your oven has hot spots. Remove when the strands are a honey color and crisp. If pieces near the edge brown faster, tent the tart loosely with foil for the last minutes.
Can I make these in a muffin tin instead of a tart pan?
Yes, small nests work beautifully in muffin tins as individual bites. Grease the cups well and shape the nests with a little more pressure so they hold their shape. Bake a minute or two less and check for an even golden color.
Are these suitable for a large party?
They travel well in boxes and are easy to pick up and eat. For a large crowd, plan to make several small batches to keep the crusts crisp. Assemble some parts ahead and finish with eggs just before serving.
From My Kitchen to Yours
I hope this Easter Egg Nest Tarts encourages you to experiment a little and trust your instincts the way I learned to trust mine. There is nothing quite like the satisfying crunch that sings under a glossy smear of chocolate and a few cheerful eggs on top. Make a few, try a variation, and notice the small changes that mean the most.
Baking does not have to be perfect to be wonderful. These nests are a reminder that simple ingredients and a touch of care can turn a small idea into a lovely shared moment. If you try them, leave a note about what you changed and what surprised you. I will be doing the same in my kitchen, one golden nest at a time.
Easter Egg Nest Tarts
Ingredients
Pastry and Filling
- 1 package Kataifi pastry, thawed Make sure to separate the strands gently.
- 1 cup Nutella Warmed slightly for easier spreading.
Toppings
- 1 cup Mini speckled chocolate eggs Choose a small size for aesthetic.
- 1 tablespoon Butter For greasing the tart pan.
Instructions
Preparation
- Preheat your oven to 350°F (175°C) and adjust the rack to the center.
- Grease a tart pan with butter using a pastry brush or paper towel.
- Separate the Kataifi pastry strands and nest them into the tart pan to form a crust.
Baking
- Bake the crust for about 10-15 minutes or until golden and crispy.
- Let the crust cool completely before proceeding.
Assembly
- Spread a generous layer of Nutella inside the cooled tart crust.
- Decorate the top with mini speckled chocolate eggs and gently press them into the Nutella.
- Serve and enjoy your cute Easter egg nests!
