The first time I pulled a tray of these Creamy White Chocolate Filled Cookies from the oven, the kitchen smelled like a soft bakery at dawn and I stayed for the small moment when the filling sank into the cookie like a quiet surprise; if you like seasonal twists and playful flavors, you might enjoy my take on candy cane white chocolate chip cookies as a next try after these.
What Drew Me to This Creamy White Chocolate Filled Cookies
I came to this cookie through a string of small experiments that began as curiosity and ended in comfort.
I wanted a cookie that felt familiar, like a shortbread that hugs your tea, but also held a creamy center that felt like a secret.
After a few rounds of testing with different cream amounts and melting times, I kept circling back to a filling that was glossy, soft, and not too runny.
That balance is what made this recipe feel honest and ready to share.
The Story Behind This Small-Batch Creamy White Chocolate Filled Cookies
This recipe grew out of late-night pans of one or two dozen cookies, the kind of small-batch runs that let you change one thing at a time.
I learned how a quarter cup of cream changes the white chocolate from firm to spreadable, and how chilling the dough too long can steal the tenderness I wanted.
It took tasting cookies warm and cool, noting how the center shifts from silky to set, before I wrote down the steps that feel right.
That slow, curious testing is why this cookie feels like a trusted outcome, not a guess.
The Rhythm of Making Creamy White Chocolate Filled Cookies
“The moment the texture shifts, you know it’s ready.”
There is a rhythm to this recipe that I enjoy, a kind of small choreography.
You start by creaming butter and the two sugars until the mixture lifts and looks pale.
From there the dough comes together quickly, and you switch from mixing to shaping to baking in a steady flow.
Watching the cookies change in the oven and then filling them while they cool feels like a gentle finish to a short story.
Ingredients You’ll Need
1 cup unsalted butter, softened — this gives a tender crumb and a rich mouthfeel.
1 cup granulated sugar — for structure and a clean sweet note.
1 cup powdered sugar — this helps with a soft, melt-in-your-mouth texture.
2 cups all-purpose flour — the backbone of the cookie, it keeps them holding together.
1/2 teaspoon baking powder — a touch of lift without blowing the texture apart.
1/4 teaspoon salt — balances sweetness and brings out the flavors.
1 cup white chocolate chips — the star of the filling, choose good quality for flavor.
1/4 cup heavy cream — this adds creaminess to the filling without making it runny.
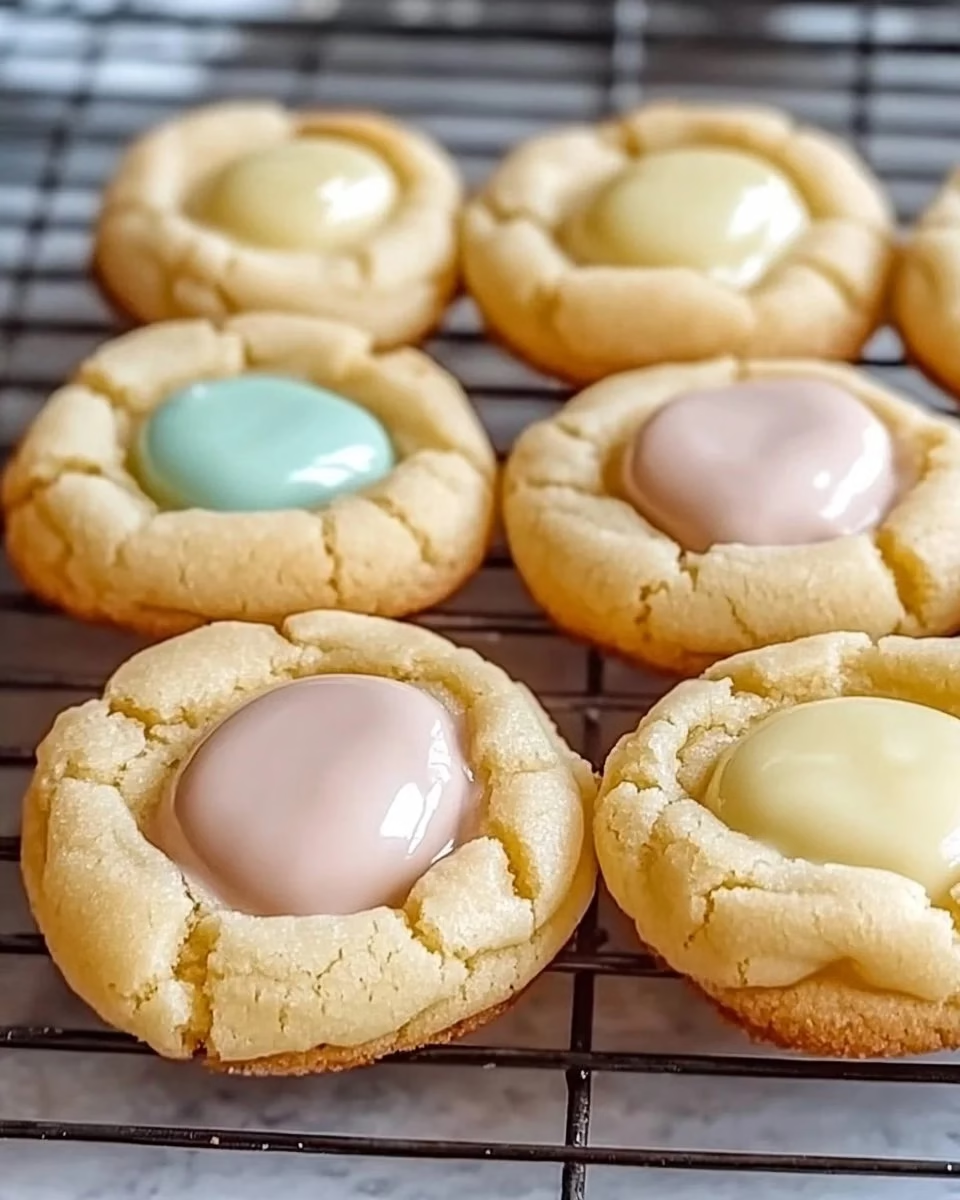
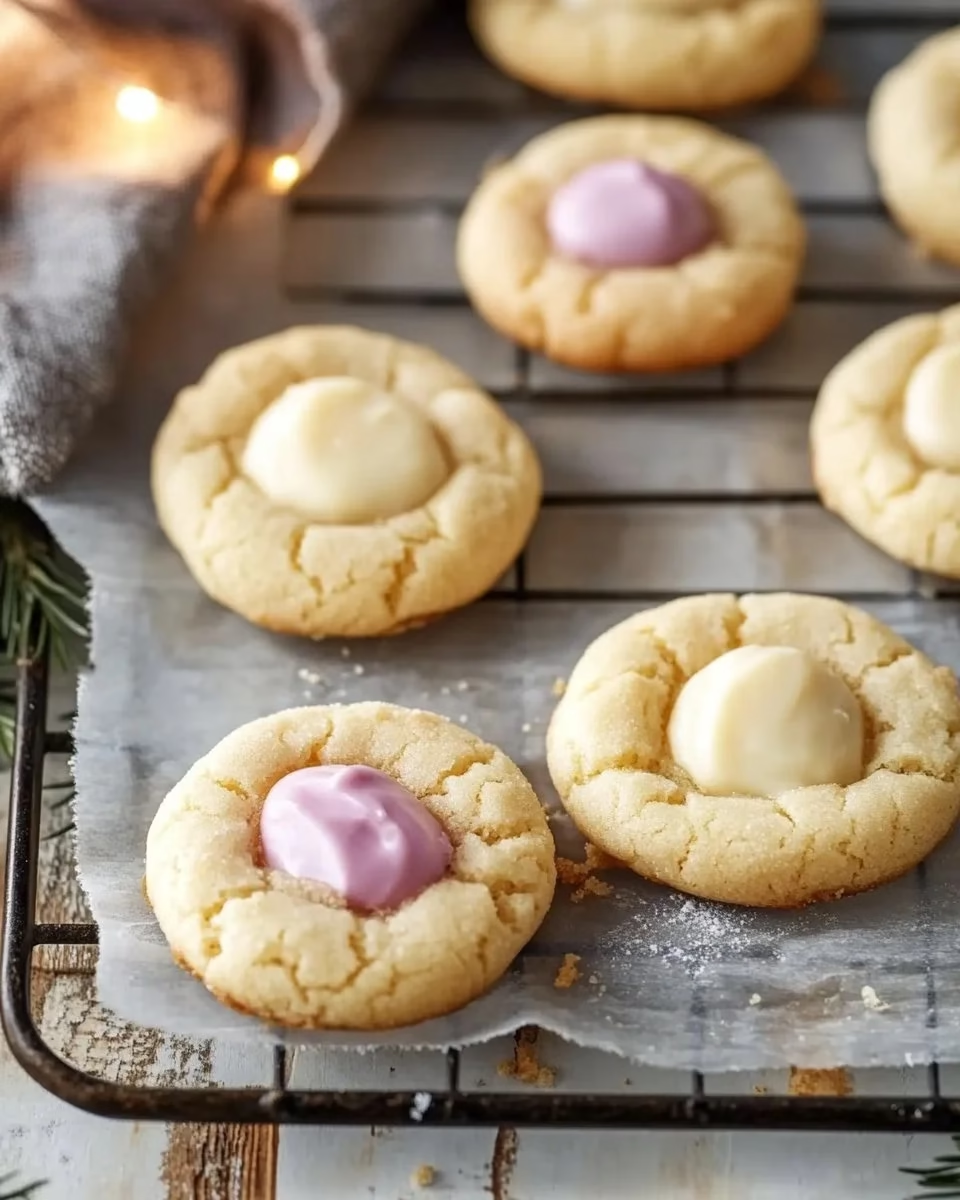
Food coloring (pastel shades) — optional, for playful, soft colors that suit special occasions.
Step-by-Step Directions
-
Preheat oven to 350°F (175°C).
Line a baking sheet with parchment or a nonstick liner so cookies slide off easily.
Give the oven time to reach the temperature so baking times are steady and predictable. -
In a bowl, cream together the butter, granulated sugar, and powdered sugar until light and fluffy.
Use a mixer on medium speed and stop when the mix looks pale and holds a ribbon for a few seconds.
Creaming air into the butter is the cue that the texture has softened and the sugars have dissolved. -
Mix in the flour, baking powder, and salt until a dough forms.
Add the dry ingredients in two additions and fold gently to avoid overworking the dough.
Stop once the dough comes together and looks smooth but still soft to the touch. -
Roll the dough into small balls and place them on a baking sheet. Flatten slightly.
Aim for uniform sizes so all cookies bake at the same rate and flatten lightly with your palm.
You want them close but not crowded, giving each cookie a little room to spread. -
Bake for 10-12 minutes until edges are lightly golden.
Watch the trays near the end and pull them when the edge shows a hint of color but the center looks soft.
The cookies will firm up as they cool, so remove them before they feel fully set. -
For the filling, melt white chocolate chips with heavy cream in a double boiler until smooth.
Stir gently and keep heat low so the chocolate melts evenly into the cream and takes on a glossy sheen.
The right texture is thick enough to spread but soft enough to pipe or spoon. -
Divide the filling into portions and tint with food coloring.
Work with small scoops in bowls and add a drop at a time until you reach gentle pastel tones.
Mix until the color is even and the filling still holds a soft sheen. -
Once cookies are cool, spread filling on half of the cookies and sandwich with the other half.
Use a small offset spatula or the back of a spoon and stop once the filling looks smooth and set at the edges.
The sandwich gives a little surprise of cream that is soft but stable to bite into. -
Enjoy your festive pastel treats!
Let the cookies rest a few minutes after assembling so the centers settle and slice cleanly when shared.
Serve at room temperature so the filling is creamy and the cookie has that tender bite.
Watching It Transform
As you move through the steps, look for clear signs that tell you how things are progressing.
When the creamed butter lifts and looks airy, you know you have incorporated enough air for a tender crumb.
In the oven, edges that blush gold signal a ready pull, while the centers still carry a pale look and a soft wobble.
Once filled, the center should be glossy and soft but not flowing from the edges when you set the sandwich down.
Sharing Creamy White Chocolate Filled Cookies
These cookies shine as a weekend baking project you can share without fuss.
Bring a small box to a neighbor, tuck a few into a lunch, or lay them out with coffee for a quiet morning treat.
They also make a lovely plate for a small celebration, their pastel filling catching the eye without feeling too precious.
Plate them on a simple dish and let the colors sit beside a bowl of fresh fruit or a pot of tea.
How This Dessert Is Meant to Be Enjoyed
I think these cookies are happiest when served in relaxed company, not as a showpiece but as a little delight.
They invite slow bites so you notice the textural contrast between the crumb and the cream.
You can make them for a testing afternoon with friends, passing notes about color and mouthfeel.
They reward sharing and small talk as much as they reward a quiet solo treat.
Keeping Creamy White Chocolate Filled Cookies Fresh
Store them in an airtight container at room temperature for up to two days for best texture.
If you want to keep them longer, place them in the fridge in a sealed container for up to a week, though the cookie may firm.
For the softest center, bring chilled cookies to room temperature before serving so the filling regains its creamy feel.
If moisture starts to soften the cookie too much, a quick five minutes in a low oven will crisp the edges again.
Storing Options and What to Expect
If you freeze the plain baked cookies, layer them with parchment in a freezer-safe container and freeze up to two months.
Thaw gently at room temperature, then fill with warmed filling and let them rest so the center sets.
If you freeze assembled sandwiches, wrap them tightly and expect the filling to firm; thaw slowly to regain the intended creaminess.
Note that flavors deepen over time, so a short rest can improve the overall taste, but texture will change.
Carol’s Baking Notes
H3: Look for texture, not just time
Timing in baking is a guide, but texture tells the true story. Watch the edge color and give a gentle nudge to the center with a finger if you are unsure.
A cookie that still feels slightly soft in the center will finish with the tender bite I want once it cools.
H3: The cream choice matters
I tested lighter creams and heavier creams and found that a quarter cup of heavy cream gives a filling that stays in place but remains silky.
If you try milk or a lower fat option, the filling will be less stable and may need refrigeration.
H3: How to handle food coloring
A little goes a long way with pastel shades. Add color slowly and stop once the hue is even.
Too much dye can change the texture, so patience here keeps the filling smooth.
H3: Small batch testing helps
Make one or two dozen first and write notes. Slight changes in oven temperature and humidity can shift bake times by a minute or two.
Adjusting in small steps keeps the results predictable and gives you room to play.
Little Things That Made a Difference
Using powdered sugar alongside granulated sugar softens the crumb in a way I liked immediately.
Flattening the dough balls just a touch ensured an even bake and left room for the creamy center.
Melting white chocolate slowly over low heat kept the texture glossy and smooth; rushing this step made it grainy.
Variations I’ve Tried
I like to experiment while staying close to the recipe’s structure so results are dependable.
Sometimes I fold a teaspoon of lemon zest into the dough for a bright note that pairs well with white chocolate.
Other times I stir a tiny pinch of sea salt into the filling to make the sweetness sing without getting cloying.
For a seasonal switch, I adapted the same filling to pair with warm spices and a maple note after tasting a related recipe; if you enjoy that flavor family, check how I paired it in chewy maple cinnamon cookies with white chocolate.
Each small change kept the structure the same but played with the experience in a new way.
Ways to Make It Your Own
Try sandwiching in pieces of jam for a fruit lift, or add finely chopped toasted nuts into the filling for crunch.
If you want a thinner center, use a little less cream and heat the mixture just a touch longer so it sets firmer.
For a gentler sweetness, cut back the granulated sugar by a couple of tablespoons and see how your palate responds.
Keep notes on each batch so your next one gets closer to the version you loved most.
FAQs About Creamy White Chocolate Filled Cookies
Can I make this ahead of time?
Yes, you can bake the cookies a day ahead and store them in an airtight container, then fill them the day you plan to serve.
Filling them just before serving keeps the centers freshest and prevents softening from moisture.
Do I have to use white chocolate chips?
You can try other melting wafers, but use a chocolate meant for melting so the filling stays creamy and smooth.
Lower quality chips may contain stabilizers that change the texture when melted.
What if my filling is too loose?
Chill it briefly in the fridge and stir; if it firms up too much, warm it gently in short bursts until spreadable.
You can also add a little more white chocolate to thicken it if needed.
Can I freeze the assembled cookies?
You can, but expect the filling to firm significantly. Thaw slowly in the fridge and then bring them to room temperature for the best eating texture.
If you prefer a soft center, freeze the plain cookies and add the filling after thawing.
How do I get even pastel colors?
Divide the filling into small bowls and add color drop by drop, stirring fully between additions.
Use a light hand and test a small dab on a white plate to judge the shade.
A Final Thought
I hope this Creamy White Chocolate Filled Cookies encourages you to try small experiments and trust the quiet signs you see in the kitchen.
Baking for me is about curious, careful steps that leave room for play and small serious notes, like how a texture shifts or how a color sits in the light.
If you make a batch, take a moment to notice the smell as the tray comes out of the oven and the way the filling looks when you press it between two cookies.
These are the little markers that turn a recipe into something you return to again and again.
Creamy White Chocolate Filled Cookies
Ingredients
Cookie Base
- 1 cup unsalted butter, softened This gives a tender crumb and a rich mouthfeel.
- 1 cup granulated sugar For structure and a clean sweet note.
- 1 cup powdered sugar This helps with a soft, melt-in-your-mouth texture.
- 2 cups all-purpose flour The backbone of the cookie, it keeps them holding together.
- 1/2 teaspoon baking powder A touch of lift without blowing the texture apart.
- 1/4 teaspoon salt Balances sweetness and brings out the flavors.
Creamy Filling
- 1 cup white chocolate chips The star of the filling, choose good quality for flavor.
- 1/4 cup heavy cream This adds creaminess to the filling without making it runny.
- Food coloring pastel shades Optional, for playful, soft colors that suit special occasions.
Instructions
Preparation
- Preheat oven to 350°F (175°C). Line a baking sheet with parchment or a nonstick liner.
- In a bowl, cream together the butter, granulated sugar, and powdered sugar until light and fluffy.
- Mix in the flour, baking powder, and salt until a dough forms.
- Roll the dough into small balls and place them on a baking sheet. Flatten slightly.
Baking
- Bake for 10-12 minutes until edges are lightly golden.
Making the Filling
- For the filling, melt white chocolate chips with heavy cream in a double boiler until smooth.
- Divide the filling into portions and tint with food coloring.
Assembly
- Once cookies are cool, spread filling on half of the cookies and sandwich with the other half.
- Let the cookies rest a few minutes after assembling so the centers settle.