
The kitchen filled with a soft sugar scent as soon as I opened the jar of cotton candy extract, and my little one pressed a sticky finger to the rim as if asking permission to taste the sky. In that moment, flickering afternoon light and small hands made the air feel like a county fair, and I knew this Cotton Candy Frosting Recipe would be the quiet party our week needed. If you love pairing pastel frostings with simple cakes, you might enjoy trying my cotton candy cake recipe for a full-on nostalgic celebration.

Cotton Candy Frosting
Ingredients
Frosting Base
- 1 cup unsalted butter, softened Fresh butter gives its richness and smoothness.
- 4 cups powdered sugar Choose a good quality powdered sugar for a silky texture.
- 2-3 tablespoons heavy cream or milk Adjust according to desired consistency.
- 1 teaspoon cotton candy flavoring extract Look for a sweet and candy-like extract.
Coloring
- 1 drop pink gel food coloring Adjust for desired shade.
- 1 drop blue gel food coloring Adjust for desired shade.
- optional cotton candy pieces Add just before serving for garnish.
Instructions
Preparation
- In a large mixing bowl, beat the softened butter with an electric mixer until light and fluffy, about 2 minutes.
- Gradually add the powdered sugar, 1 cup at a time, mixing on low until incorporated.
- Add the heavy cream and cotton candy extract, then increase the speed to medium-high and beat until smooth and fluffy, about 3 to 4 minutes.
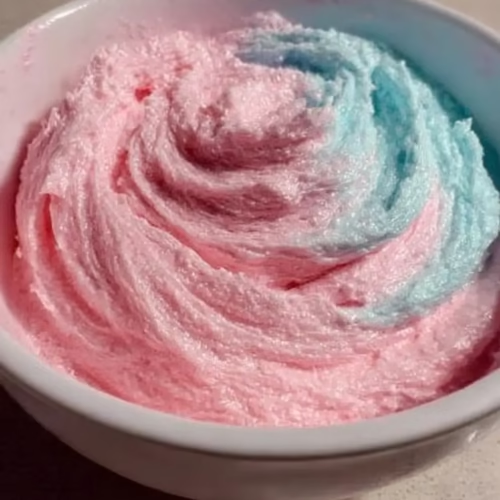
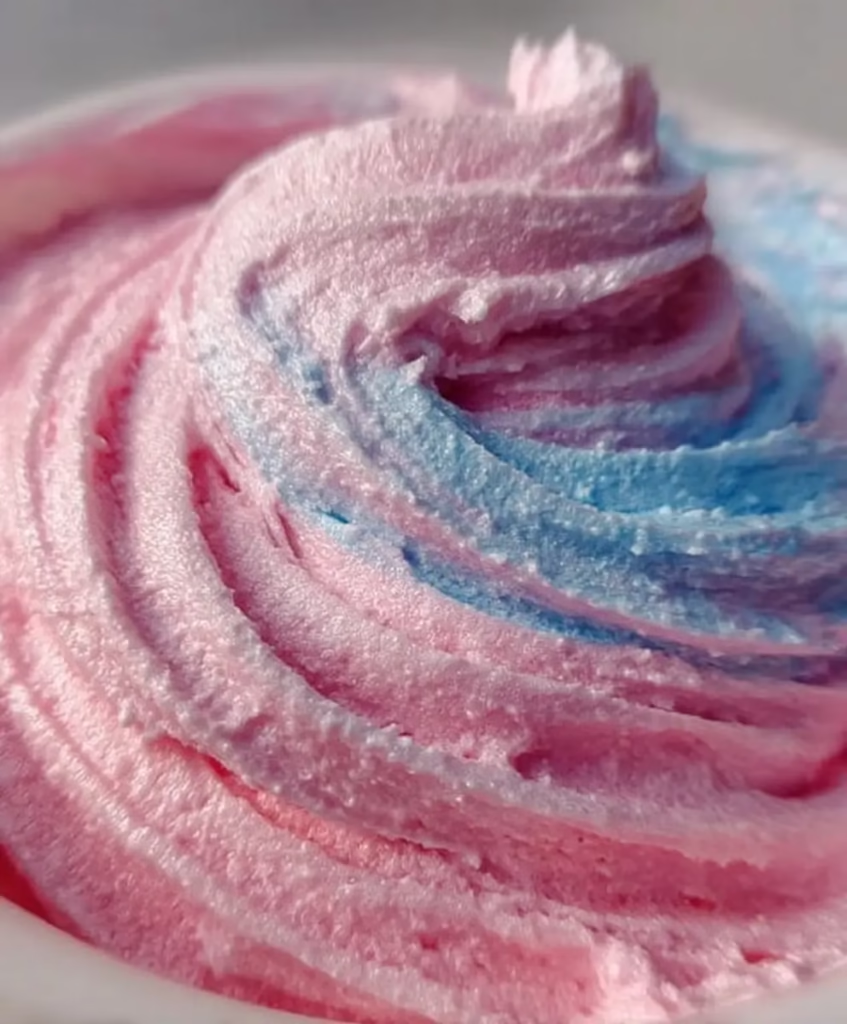
- Divide the frosting into two bowls. Tint one with pink gel food coloring and the other with blue, mixing until evenly colored.
Serving
- For a swirled effect, spoon the pink and blue frostings into a piping bag and pipe onto cupcakes or cakes.
- Garnish with cotton candy just before serving.
Notes
Nutrition
Why This Cotton Candy Frosting Recipe Means So Much
There are recipes that feed the body and recipes that feed memory. This Cotton Candy Frosting Recipe does both. I first made it on a gray February afternoon when the kids needed cheering and the pantry had cupboard staples and a bottle of cotton candy extract that had been waiting for the right moment.
What I remember most is the way the kitchen changed. The hum of the mixer sounded like a little engine running us forward, and the colors—soft pinks and pale blues—felt like a hug. My husband came home to a pile of cupcakes and a flour-flecked apron, and the small celebration that followed became one of those ordinary evenings I tuck away and revisit when life gets busy.
This frosting is not just a sugary topping. It is a bridge to birthdays that never had big plans, to backyard picnics after a rainstorm, and to the way small sweetness can make a tired week feel lighter. Even if you have never worked with extracts or gel colors, this recipe welcomes you in. The methods are simple, and the result is joyful.
How to Make Cotton Candy Frosting Recipe
“Every time I stir this pot, it smells just like Sunday at home.”
Making this frosting is a rhythm more than a race. You begin with a pale mound of butter and, with a few patient minutes, coax it into lightness. Powdered sugar folds in gently, and the cotton candy extract arrives near the end to keep its scent bright and fresh. When the colors meet, the kitchen looks like a soft sunrise.
Listen as the mixer turns the butter into clouds and watch the frosting swell and smooth. The beat of the blender is steady, the frosting shining as it becomes glossy. If you’re piping, the two colors stacked together will create stripes as you squeeze, and the first swirl you make is always the most exciting.
There is a quiet skill to knowing when a frosting is ready. It should feel airy, but not hollow. It should hold its shape when piped and still melt a little at the edges when it meets warm cake. I will walk through each step and share the small checks I use to keep things foolproof.
Ingredients You’ll Need
1 cup unsalted butter, softened
4 cups powdered sugar
2–3 tablespoons heavy cream or milk
1 teaspoon cotton candy flavoring extract
Pink gel food coloring
Blue gel food coloring
Cotton candy pieces (optional)
A little extra vanilla if you love a cozy aroma. Fresh butter gives this its richness and will make the frosting smoother. If you only have salted butter, cut the extra salt out of your baking that day and taste as you go.
Choosing a good powdered sugar will help the frosting be silky. If your sugar is a little lumpy, whisk it before you measure. The extract is the star here, so look for one that smells sweet and candy-like without being artificial. Gel colors give you bright hues with fewer drips, which keeps the frosting the right texture. And cotton candy pieces are a fun garnish that dissolve quickly at room temperature, so add them just before serving.
Step-by-Step Directions
In a large mixing bowl, beat the softened butter with an electric mixer until light and fluffy, about 2 minutes.
Beat on medium speed, watching the butter turn pale and airy. You will see tiny peaks form and the butter will look almost whipped. Breathe in the warm, buttery scent that starts to fill the kitchen.Gradually add the powdered sugar, 1 cup at a time, mixing on low until incorporated.
Add each cup slowly so the sugar blends without a dust cloud. Scrape the sides of the bowl now and then so nothing hides on the rim. Keep the mixer low at first, then raise to medium for a few seconds to smooth.Add the heavy cream and cotton candy extract, then increase the speed to medium-high and beat until smooth and fluffy, 3 to 4 minutes.
Pour the cream in and listen as the frosting softens and becomes glossy. The extract will bloom like perfume, and you will know it is right when the smell makes you think of summer fairs. Beat until the texture is whipped and pillowy.Divide the frosting into two bowls. Tint one with pink gel food coloring and the other with blue, mixing until evenly colored.
Stir each color until it looks even, like a painted sky. If you want a softer pastel, add the coloring a dot at a time. For a bolder look, a little more gel will go a long way. For a swirled effect, spoon the pink and blue frostings into a piping bag and pipe onto cupcakes or cakes. Garnish with cotton candy just before serving.
The two colors will sing together when they meet on the cake, and the first slice will show a faded watercolor inside.
Serving Cotton Candy Frosting Recipe With Family Warmth
Food tastes better when it is given with a story. I like to plate cupcakes on a simple white platter so the colors pop, then set that platter in the center of the table. Little hands reach in. Conversation starts easily. We make an unspoken game of guessing whether the cotton candy flavor is stronger on the top swirl or in the center.
For a birthday, I place a cluster of cupcakes on a cake stand and tuck a single candle into the center cupcake. For an afternoon treat, I pair a frosted sugar cookie with milk or a warm mug of tea. If we are having neighbors over, I arrange cupcakes in a shallow basket lined with a cloth napkin. The frosting looks like a promise of friendly sweetness.
If you are sharing at a small gathering, label the treats so anyone with food sensitivities can take note. A little bowl of extra cotton candy on the side feels whimsical and invites everyone to make the treat their own. The warmth of the moment matters more than perfect piping, so let the kids help if they want to smear a little pink on the rim.
Storing Cotton Candy Frosting Recipe for Tomorrow
This frosting keeps well when you care for it gently. Place any leftover frosting in an airtight container and chill for up to five days. Before you use it again, bring it back to room temperature and whip it for a minute or so to restore the light texture. The flavor will settle and sometimes taste even sweeter after resting overnight.
If you need to freeze it, scoop the frosting into a freezer-safe container, smooth the top, and press a piece of parchment or plastic wrap against the surface to keep air out. It will keep in the freezer for up to two months. Thaw in the refrigerator overnight, then let it come to room temperature and re-whip until the frosting is smooth.
When you store frosted cupcakes, keep them in a single layer in a cake box or container so the decorations do not get crushed. If the frosting softens at room temperature, pop the cupcakes in the fridge for a short spell to help them firm up. Take them out half an hour before serving so they are not too cold and the flavor comes through.
Amelia’s Kitchen Notes
Gentle sweetness matters. If your children prefer less sugary frostings, cut the powdered sugar by half a cup and add an extra tablespoon of cream to keep the texture. Taste as you go, and always err on the side of less first.
Color can be playful but subtle. Gel colors are forgiving because they add depth without thinning the frosting. Start with a tiny dot and build the shade until it feels right. Remember that color will deepen slightly as the frosting sits.
Workroom temperature matters. Cold butter makes lumpy frosting and overheated butter makes a runny mess. Leave your butter on the counter for 30 to 60 minutes before you begin. If the kitchen is very warm, keep the frosting in the fridge between steps for five minutes to regain structure.
If you want a different finish, my go-to swap for a rich, classic topping is a chocolate buttercream. For those times when you crave a deeper flavor, try my chocolate buttercream frosting recipe as an alternative or companion to the cotton candy frosting. It pairs beautifully with vanilla or chocolate cakes.
Clean as you go. Powdered sugar gets everywhere, so keep a small hand brush or damp cloth handy to sweep counters and the mixer base. That small habit saves you time and keeps the kitchen feeling calm.
Family Variations on Cotton Candy Frosting Recipe
Families make recipes their own with little changes that speak to taste and memory. For a citrus touch, fold in a teaspoon of fresh lemon zest to the frosting for a bright note that lifts the sweetness. The citrus cuts through the sugar and adds a grown-up edge while keeping the playful color.
If your kids love sprinkles, create a sprinkle bar with different shapes and textures and let them decorate. I like to keep a tin of pastel nonpareils and a jar of edible glitter for special occasions. Add a few crisp pearls for adults and leave the big sugary confetti for the kids.
For a dairy-free version, swap the butter for a vegan margarine that whips well and use a non-dairy milk like oat or almond for the cream. Choose a powdered sugar labeled vegan if that matters to your family. The flavor will be slightly different but still joyful and very party-ready.
If you want to make a layered effect inside a cake, pipe stripes of pink and blue frosting between cake layers. When you slice the cake, each piece will have a pretty gradient. This is a small trick that always makes a celebration feel more special.
FAQs About Cotton Candy Frosting Recipe
Can I make this ahead of time?
Yes, and honestly, it might taste even better the next day once the flavors have settled and come together. Store the frosting in an airtight container in the refrigerator and bring to room temperature before whipping it light again.
Is cotton candy extract strong?
Extracts can vary. Start with a teaspoon and add a bit more if you want the flavor to be bolder. Remember that extracts intensify as they sit, so a little goes a long way.
Can I pipe this frosting onto a layered cake?
Absolutely. The frosting holds its shape well when properly whipped. If your kitchen is warm, chill the frosted cake for a short time so the edges stay neat.
What if my frosting seems too thin?
Add more powdered sugar, a quarter cup at a time, and whip until it reaches the desired thickness. If it becomes too stiff, a teaspoon of cream at a time will bring it back.
Can I use natural food coloring?
Yes, vegetable-based colors and beet or blueberry powders can tint frosting, though the hues will be softer. Gel colors give the brightest pastel results with the least change to texture.
More Sweet, Seasonal Treats You’ll Love
If pastel frostings and nostalgic flavors make you linger a little longer in the kitchen, there are plenty of other comforting recipes waiting for you on the site. For easy, no-bake sweets, you might enjoy Marshmallow Fluff Fudge, No-Bake Blue Christmas Truffles, No-Bake Orange Creamsicle Truffles, or the always-loved Christmas Crack. When you’re baking with kids or craving playful textures, Banana Pudding Rice Krispie Treats, Halloween Popcorn Balls, Watermelon Gummies, and Homemade Gushers bring that same sense of fun and color to the table.
All of these recipes are part of the same collection of simple, memory-making sweets meant to be shared. And if you enjoy saving ideas, peeking behind the scenes, or seeing what’s baking next, you can find more inspiration over on Pinterest and Facebook , where these small celebrations continue beyond the kitchen.
