The aroma of rosemary mingling with savory cheese filled the kitchen as I prepared for our family’s annual holiday gathering. Each whiff reminded me of the warmth of love, laughter, and shared memories that filled our home each Christmas. Our Christmas Tree Shaped Charcuterie Board has become a cherished tradition, one that brings us all a little closer together. As I watch my children gather around, their eyes lighting up at the sight of this festive centerpiece, I know that this simple creation holds a special place in our family’s heart.

The Story Behind Our Favorite Christmas Tree Shaped Charcuterie Board
This charming charcuterie board has a way of bringing the spirit of the holidays to life. I first stumbled upon the idea during a cozy evening spent browsing through cookbooks. The moment I saw a charcuterie board shaped like a Christmas tree, I felt a surge of inspiration. It sparked memories of past Christmases spent with family and friends.
Growing up, our home would overflow with festive treats. Each dish carried a story; every flavor reminded us of joyful times together. I wanted to create something that would honor that legacy while also inviting my family to participate in its creation. This Christmas Tree Shaped Charcuterie Board does just that—everyone can help in their own way, whether by picking ingredients or arranging the delightful shapes. It soon became a beloved tradition, bringing friends and family together around the table.
The Simple Process Behind It
“Every time I stir this pot, it smells just like Sunday at home.”
Making this festive board is a joyful experience that combines intent and creativity. Starting with the fresh rosemary sprigs, the process begins with a gentle excitement as I arrange them into the shape of a tree. The texture of the rosemary beneath my fingers is a comforting reminder of holiday flavors yet to come. Each step in assembling this board is a celebration of color, flavor, and the sense of togetherness that fills our home.
As I prepare the components, I am enveloped in the vibrant hues of fresh fruits and tantalizing cheeses, their aromas weaving together to form a symphony of holiday cheer. The crunch of nuts and the softness of cheese create a delightful contrast, making the preparation as satisfying as the final presentation.
Ingredients You’ll Need
To create this delightful centerpiece, gather the following ingredients:
- 10 fresh rosemary sprigs (more or less depending on size)
- 1 celery stalk
- Red, green, and black seedless grapes (clipped into small clusters or remove stems completely if you like)
- 4 ounces sharp cheddar (cut into ¾-inch squares or whatever size you like)
- 4 ounces Monterey Jack (cut the same size as other cheeses)
- 4 ounces cheddar (mild or medium; cut into equal size as other cheeses)
- ½ cup fresh cranberries
- 1-2 star fruits (sliced)
- 1 cup assorted nuts
- 1 green kiwi fruit (sliced)
Each ingredient brings something special. Fresh rosemary not only shapes the tree but also infuses the air with its aromatic essence. The crunch of the nuts adds texture, while the sweet burst of grapes complements the sharp cheese perfectly. You can even add a little extra vanilla if you love a cozy aroma in the kitchen.
Step-by-Step Directions
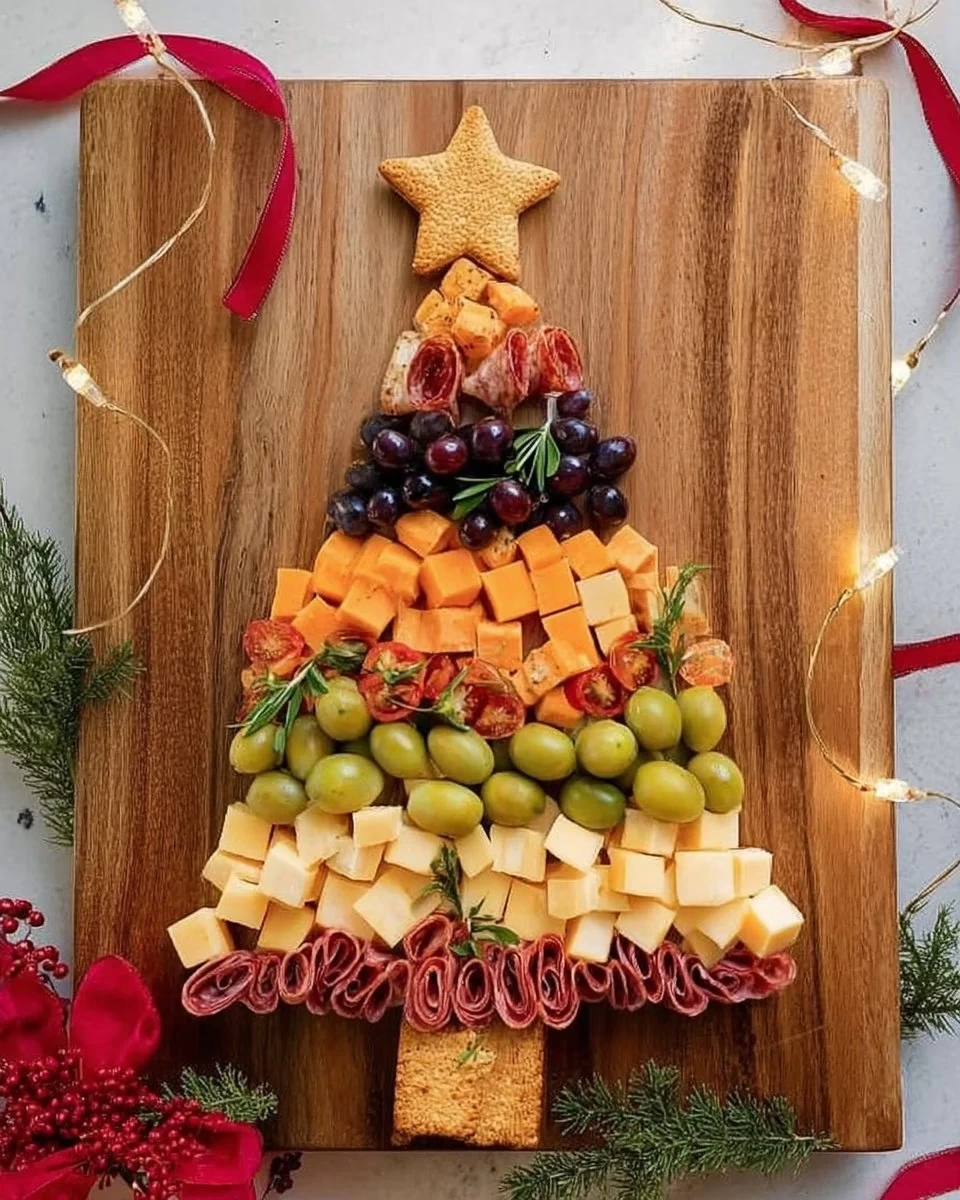
Start by making the outline of your tree using the sprigs of rosemary. Begin at the top, spreading out farther as you go down. You may need to adjust and rearrange them as you start adding your edible ingredients.
Place the celery stem at the bottom for the trunk of the tree, adjusting the length to whatever looks good to your eye. This entire process is kind of by sight, allowing creativity to guide you.
At the bottom of your “tree,” begin with a row of cheese, followed by a layer of red grapes. Next, add another layer of cheese, then green grapes, and finish with a layer of black grapes.
For the top of the tree, arrange kiwi slices in a triangle shape. This soft fruit provides a stunning color contrast and a delightful taste.
Crown your creation with a slice of star fruit at the very top. If you cannot find star fruit, you can be creative with any other garnish that serves as a “star.”
Add additional star fruit slices randomly over the “tree.” Scatter cranberries around the tree for a pop of color and a burst of tart flavor.
Finally, place the assorted nuts sporadically across the tree. If you have room, use the nuts to form a “pot” at the base of the celery trunk, which works best with almonds in a square shape.
Your beautiful creation is ready to shine! You can assemble it up to four hours ahead of serving. Just cover it in plastic wrap and refrigerate until you are ready to serve.
Bringing Christmas Tree Shaped Charcuterie Board to the Table
As the clock strikes the hour for our gathering, the excitement in the air is palpable. The Christmas Tree Shaped Charcuterie Board takes center stage, perfectly boasting the joyful colors of the season. The moment guests arrive, their eyes light up in delight.
When we gather around the table, there is something magical about sharing this creation. Our family tradition includes inviting everyone to taste and share their favorite pieces. We chat and laugh as we reach for cheese soaked in the flavors of the rosemary and the sweetness of the fruits. The togetherness of this simple act sparks conversation and storytelling that connects us, reminding us why these moments are cherished.
Keeping It Fresh and Comforting
As much as we love the Christmas Tree Shaped Charcuterie Board, there are always some leftovers. Storing them is simple and keeps the board fresh for the next day. Cover any uneaten portions tightly with plastic wrap and place them in the refrigerator.
The next day, flavors will mellow and deepen, making every bite a comforting delight. Each cheese and fruit charmingly marries together, creating tastes that remind us of the laughter shared the night before.
Tried-and-True Tips
Ingredient Substitutions: Don’t hesitate to swap out ingredients based on what you have on hand. If you prefer Gouda over Monterey Jack or want to use different nuts, it will still come together beautifully.
Prepping Ahead: Assemble your board in advance, but keep it covered. This way, the ingredients remain fresh and vibrant for serving.
Cleanup Tricks: After the festivities, focus on the board’s base. Use a damp cloth to gather crumbs, making cleanup quick and easy.
How We’ve Made It Our Own
Our family has added personal touches to the Christmas Tree Shaped Charcuterie Board over the years. Some seasons, we might use pomegranate seeds, their jewel-like color enhancing the board. On special occasions, we even try artisanal cheeses that are unique to our local shops.
The beauty of this dish is that it evolves with us, reflecting the ever-changing nature of family traditions.
FAQs About Christmas Tree Shaped Charcuterie Board
Can I make this ahead of time?
Yes, and honestly, it might taste even better the next day once the flavors have settled and come together.
What can I do with leftover ingredients?
You can always use leftover fruits and cheeses in salads or sandwiches. These bites make a great addition to breakfast in the morning.
Is this kid-friendly?
Absolutely! Involving your children in assembling the board not only makes it a fun family activity but can also encourage them to try new flavors.
A Warm Note From My Kitchen
Creating this Christmas Tree Shaped Charcuterie Board brings me great joy. It reminds me of the warmth of family, the richness of our traditions, and the connections we build through shared meals. I hope that as you embark on this culinary journey, this board infuses your kitchen with happiness and togetherness just as it does in mine. Remember, cooking is not just about preparing food; it is about crafting memories that last forever, one bite at a time.

Christmas Tree Shaped Charcuterie Board
Ingredients
For the Charcuterie Board
- 10 pieces fresh rosemary sprigs More or less depending on size
- 1 stalk celery For the trunk of the tree
- 1 cup assorted nuts For adding texture
- 4 ounces sharp cheddar Cut into ¾-inch squares
- 4 ounces Monterey Jack Cut into equal size as other cheeses
- 4 ounces cheddar (mild or medium) Cut into equal size as other cheeses
- ½ cup fresh cranberries For a pop of color
- 1-2 pieces star fruits Sliced, for decoration
- 1 green kiwi fruit sliced For topping the tree
- 1 cup red, green, and black seedless grapes Clipped into small clusters
Instructions
Assembly
- Start by making the outline of your tree using the sprigs of rosemary. Begin at the top, spreading out farther as you go down.
- Place the celery stem at the bottom for the trunk of the tree, adjusting the length to whatever looks good to your eye.
- At the bottom of your tree, begin with a row of cheese, followed by a layer of red grapes. Next, add another layer of cheese, then green grapes, and finish with a layer of black grapes.
- For the top of the tree, arrange kiwi slices in a triangle shape.
- Crown your creation with a slice of star fruit at the very top.
- Add additional star fruit slices randomly over the tree and scatter cranberries around for a pop of color.
- Finally, place the assorted nuts sporadically across the tree.
