I cracked the last egg of the night under the kitchen light and paused to listen to the small, comforting sounds of the house settling.
The yolk was a warm, sunlit mound and the smell of vinegar and mustard teased the air like holiday cheer.
That quiet moment, spoon in hand, is how Christmas Deviled Eggs became less of a checklist and more of a little ritual in my kitchen.
Why This Christmas Deviled Eggs Became a Favorite
This recipe matters because it grew out of odd little experiments and quiet evenings testing what felt right.
I tried more mustard, less mayo, a dash more vinegar, and then backed off, watching the texture and taste come into harmony.
It only felt complete when the filling was creamy but not heavy, tangy but not sharp, and easy to dollop into the egg white without falling apart.
What drew me most was how forgiving it is for beginners and how satisfying it is for curious cooks.
Once you learn to read the texture of the filling, you can make small changes and keep the results dependable.
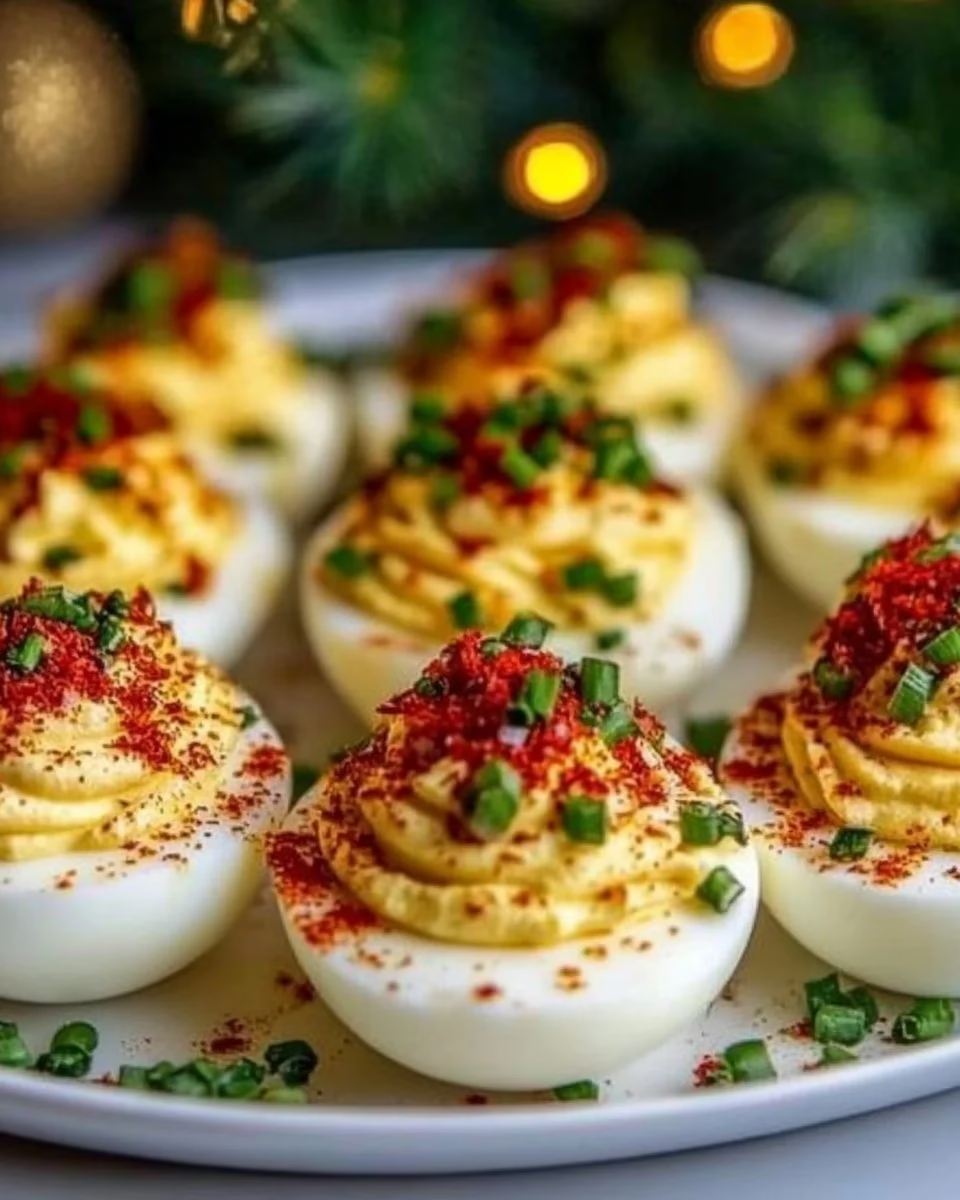
I also love how familiar flavors can feel new when served with a sprinkle of paprika and a scatter of chives.
Sometimes I test a twist alongside the classic to keep the practice playful.
Once, I tried a pumpkin-spiced note to remind me of autumn salads, similar to other variations like pumpkin deviled eggs I read about.
It reminded me that small changes can make familiar things feel festive without losing the heart of the recipe.
The Rhythm of Making Christmas Deviled Eggs
“The moment the texture shifts, you know it’s ready.”
The rhythm feels a bit like making a batch of cookies, slow and observant.
You cut, scoop, mash, and then pause to feel the filling under your spoon.
Look for a glossy, slightly satiny sheen and a filling that holds its shape without cracking.
At first the yolks are crumbly and separate, then they come together as you add the mayo and mustard.
The vinegar brightens the mixture and thins it just enough to pipe smoothly.
Once the filling feels soft but set, you know it will sit nicely in the whites and hold up on a platter.
There is a kind of quiet satisfaction when the filling pipes into the egg and the surface settles to a gentle mound.
Sprinkling paprika and chopped chives is the last little flourish, like dusting a finished tart with sugar.
These are the small cues that tell you it is ready to be shared.
Ingredients You’ll Need
- 12 hard-boiled eggs
- 1/2 cup mayonnaise (this adds richness without overpowering)
- 2 tablespoons Dijon mustard (this brings gentle tang and depth)
- 1 teaspoon white vinegar (this brightens and helps set the filling)
- 1/4 teaspoon salt (this balances and enhances flavor)
- 1/8 teaspoon black pepper (this adds a little warm bite)
- Paprika, for garnish (this adds color and a hint of earth)
- Chopped chives, for garnish (this gives a fresh green note)
These are simple, familiar items you can find at any market.
Each one plays a quiet role in the final result, from structure to flavor to visual charm.
If you treat them with small attention, they reward you with consistent, lovely deviled eggs.
Step-by-Step Directions
- Cut the hard-boiled eggs in half lengthwise.
- Work on a clean board and use a sharp knife for smooth cuts.
- Line them up so the white halves sit steady and ready for filling.
- Carefully scoop out the yolks and place them in a medium bowl.
- A small spoon or melon baller works well to keep the whites intact.
- Save the whites on a plate so they stay chilled while you make the filling.
- Add the mayonnaise, Dijon mustard, white vinegar, salt, and black pepper to the bowl with the yolks.
- Mash the mixture with a fork or a small whisk, watching the texture shift.
- Stop once you have a smooth, creamy filling with a soft sheen.
- Using a spoon or a piping bag, fill the egg white halves with the yolk mixture.
- If piping, a medium star tip makes pretty swirls; if spooning, aim for neat mounds.
- Watch for filling that holds its shape and does not slide off the whites.
- Sprinkle the deviled eggs with paprika and chopped chives.
- Dust paprika lightly for color and a hint of mellow spice, then scatter chives for freshness.
- These final touches lift the look and give a small contrast in flavor.
- Chill the filled eggs in the refrigerator for at least 30 minutes before serving.
- This resting time helps the filling set and the flavors to mingle gently.
- Serve chilled and watch them disappear from the platter.

When I Serve Christmas Deviled Eggs
I often bring these to small holiday gatherings where bites are meant to be savored slowly.
They sit well on a mixed platter alongside pickles, small cheeses, and roasted nuts.
In a casual family line-up, they are an approachable finger food that everyone recognizes and loves.
These are also a sweet choice for a quiet weekend when you want a small, comforting treat.
They pair nicely with tea or a light sparkling drink and make a simple snack feel special.
For a full spread, place them near other retro classics and fresh veggies to balance texture and color.
If you serve them at a party, consider a platter with different heights and small garnishes.
A sprinkle of extra chives, a few lemon wedges, or a small bowl of extra paprika invites guests to tweak their bites.
This keeps the experience interactive and a little playful.
I sometimes plan a small tasting station with a seasonal drink for a more festive touch.
A bright sip like a festive Christmas punch pairs well without overshadowing the eggs.
It is a cozy way for friends to graze, chat, and compare tiny variations together.
Keeping Christmas Deviled Eggs Fresh
Store the filled eggs in a shallow container with a lid, lined with parchment to keep surfaces clean.
They will stay best for up to two days in the refrigerator if kept chilled and covered.
Beyond that, the texture of the filling can start to soften and the whites can become waterlogged.
If you need to make the yolk mixture ahead, keep it in a sealed jar or bowl and refrigerate.
Fill the whites only when you are ready to serve to preserve the clean look of the platter.
If the filling firms when chilled, give it a quick stir to bring back a spreadable softness.
Note that the flavor will mellow after resting, which many people prefer.
The mustard and vinegar settle into the yolk for a softer, more rounded note after a few hours.
Taste before adding the final garnish to make sure the balance still sings.
When transporting, keep the eggs on a level tray and cover them to prevent any shifting.
A small cooler bag or insulated box helps if you are traveling a longer distance.
If the day is warm, pack an ice pack beneath the tray to keep them safe and fresh.
Carol’s Baking Notes
- Texture matters more than exact measurements in small batches.
- I found that a half cup of mayo gives richness without heaviness, but a tablespoon more or less changes the mouthfeel.
- If your filling feels too firm, add a little more mayo or a drop of vinegar until it loosens.
- Use Dijon mustard for depth and a silkier finish.
- Regular yellow mustard brings a different, sharper profile that can overpower the egg.
- The Dijon blends into the yolk, giving a smooth tang that lifts every bite.
- Mash the yolks finely for a creamier filling.
- A fork works well, but for ultra-smooth texture, press through a fine sieve or use a small hand blender carefully.
- The smoother the paste, the better it pipes and the more luxurious it feels in your mouth.
- Chill before serving to let flavors marry.
- I always try to make them at least 30 minutes ahead, and often I make them early in the day.
- Resting lets the sharp edges soften and lets the paprika and chives settle gently on the surface.
- Don’t over-salt at first.
- A quarter teaspoon is usually enough for the batch, but taste as you go.
- The mayonnaise and mustard contribute salt and depth, so add a little less and adjust to your prefered balance.
Variations I’ve Tried
A smoky twist: add a tiny pinch of smoked paprika to the filling for a warm, campfire note.
It plays nicely with the dusting of regular paprika on top and gives a subtle, cozy flavor.
Herby and bright: fold in a teaspoon of finely chopped dill or tarragon for a fresher green lift.
These herbs pair well with chives and make the eggs feel springlike, even during winter gatherings.
Creamier swap: blend half the mayo with half Greek yogurt for a tangier, lighter filling.
This keeps the texture smooth but adds a yogurt tang that can be very pleasant for those who like less richness.
Crunchy garnish: top a few deviled eggs with a tiny sprinkle of toasted pine nuts or crushed smoked almonds.
The crunch adds contrast and a nutty depth that catches you by surprise.
Spiced holiday flavors: for a playful seasonal edge, mix a pinch of ground allspice into a small portion of filling.
Keep it subtle so the egg flavor still shines through and the spice only whispers in the background.
FAQs About Christmas Deviled Eggs
Can I make this ahead of time?
Yes, the filling can be made a day ahead and stored in a covered container in the refrigerator.
Fill the whites closer to serving time for the best texture and presentation.
What if my filling is too runny?
If it seems loose, add more mashed yolk or a touch of additional mayo to thicken.
Chill briefly to let it firm up, then check the consistency again before filling.
How do I keep the egg whites from slipping?
Make sure your whites are dry and well chilled before filling, and use a clean, dry spoon or piping bag.
Press the filling gently into a slight hollow so it nests securely and does not fall off.
Can I change the garnish?
Absolutely, feel free to use thinly sliced scallions, a tiny piece of pickle, or a single caper.
Small garnishes can change the character of each bite without changing the core technique.
Are there egg safety tips?
Keep the eggs refrigerated until just before serving and consume within two days.
If serving outdoors in warm weather, keep them on ice or chilled in a cooler to avoid spoilage.
A Final Thought
I hope this Christmas Deviled Eggs brings a quiet joy to your table and invites a little kitchen curiosity.
Test a small change, taste it, and take note of the texture shifts that mean the filling is just right.
From my kitchen to yours, may these simple, comforting bites make a holiday moment sweeter and a little more playful.
Christmas Deviled Eggs
Ingredients
Main Ingredients
- 12 pieces hard-boiled eggs
- 1/2 cup mayonnaise adds richness without overpowering
- 2 tablespoons Dijon mustard brings gentle tang and depth
- 1 teaspoon white vinegar brightens and helps set the filling
- 1/4 teaspoon salt balances and enhances flavor
- 1/8 teaspoon black pepper adds a little warm bite
Garnish
- to taste Paprika adds color and a hint of earth
- to taste Chopped chives gives a fresh green note
Instructions
Preparation
- Cut the hard-boiled eggs in half lengthwise using a sharp knife.
- Carefully scoop out the yolks and place them in a medium bowl, saving the whites on a plate.
- Add the mayonnaise, Dijon mustard, white vinegar, salt, and black pepper to the bowl with the yolks.
- Mash the mixture with a fork or whisk until smooth and creamy.
Filling
- Using a spoon or piping bag, fill the egg whites with the yolk mixture, ensuring it holds its shape.
- Sprinkle with paprika and chopped chives for garnish.
Chilling
- Chill the filled eggs in the refrigerator for at least 30 minutes before serving.