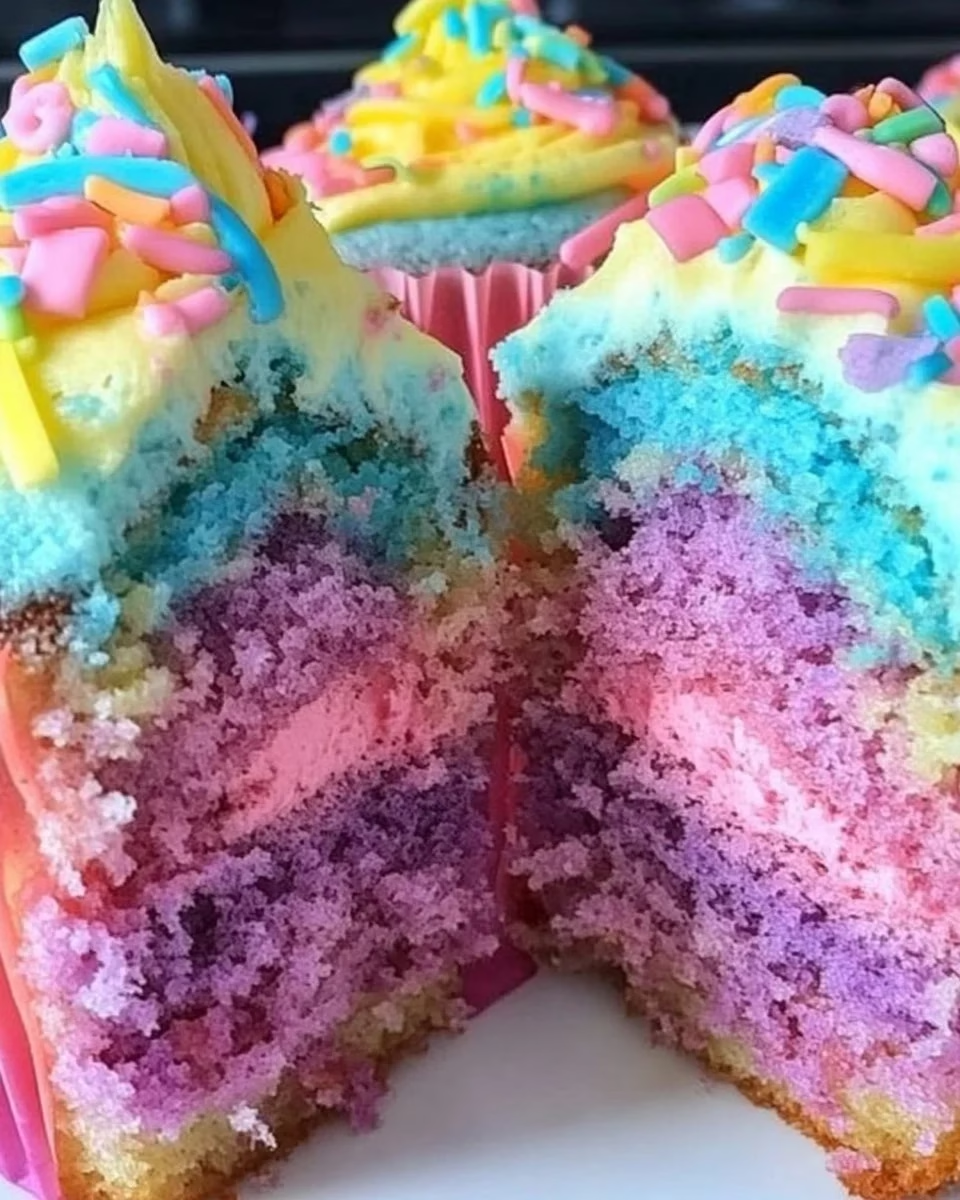
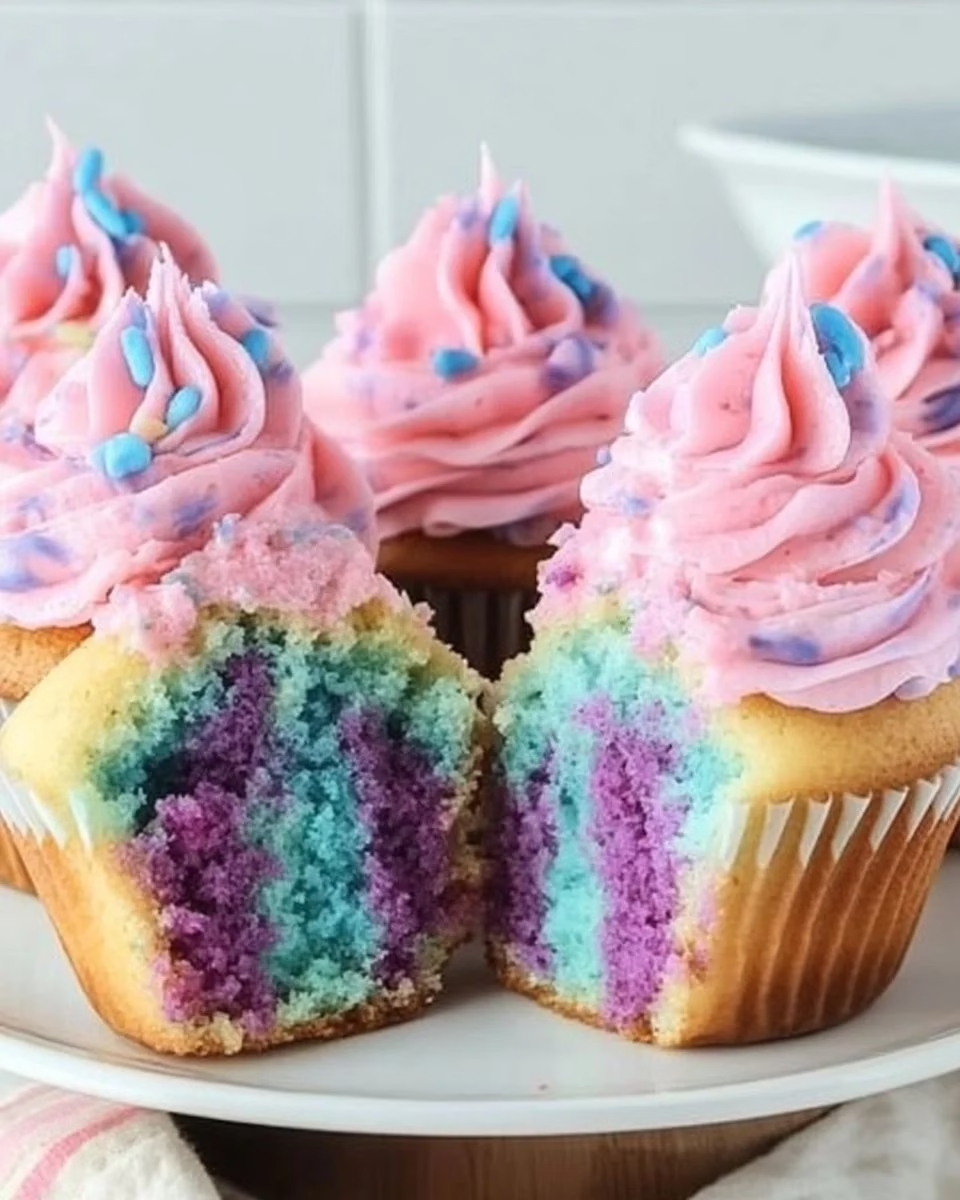
The kitchen lights were low and a faint vanilla scent curled up from the tray as I nudged a fresh batch of Celebración de Cupcakes de Mármol from the oven, watching the tops bloom and crack into soft peaks. I love that moment when the chocolate and vanilla swirl offers a quiet surprise in each bite, like a small celebration in every cupcake. I often think about how a simple marbling trick can feel like a tiny feast, and sometimes I pair these with richer friends for testing, like the luxurious notes I explored in my chocolate espresso cupcakes with salted caramel buttercream recipe chocolate espresso cupcakes with salted caramel buttercream, to see how texture and flavor change across a platter.
Why This Celebración de Cupcakes de Mármol Became a Favorite
This little recipe found its place in my kitchen because it is honest and forgiving. I wanted something that felt like a celebration without fuss, a recipe that would rise reliably in a small pan and still let me fiddle with swirls and toppings. It took a few trial runs to balance tenderness with structure so the cupcakes would be soft, not soggy, and hold a neat dome that begged for a quick swirl of frosting.
I tested the batter in different bowls and with different mixing speeds until the crumb felt right in my hand. I learned to watch the batter closely as I folded the dry flour in, stopping when it moved like thick cream. That gentle balance between too much mixing and not enough is where these cupcakes find their best texture.
What Drew Me to This Celebración de Cupcakes de Mármol
There is charm in two colors dancing in each bite. I was drawn to this recipe because it gives home bakers a modest chance to play with a classic technique and still get dependable results. The marbled look makes each cupcake feel special, and it invites you to experiment with flavors without risking a complicated set of steps.
I also wanted something that felt right for small gatherings, like a lazy Sunday brunch or an impromptu garden party. These cupcakes are friendly to newcomers and open to small innovations, which is a balance I chase in most of my tests. When I tested the first dozen, the simplest change — a touch more milk — smoothed the batter and made the crumb softer, and I kept that version because it kept the cupcake light and inviting.
The Rhythm of Making Celebración de Cupcakes de Mármol
“The moment the texture shifts, you know it’s ready.”
There is a quiet rhythm to making these cupcakes. Start by creaming butter and sugar until the mixture looks pale and airy; you will notice a lighter sheen and a gentle lift when you whisk. When you add eggs, one at a time, the batter will seem to hold together more smoothly and you will see tiny ribbons form as you beat.
From there, folding in the flour asks for a soft hand. You want the batter to move like thick cream with a slow ribbon falling back into the bowl. Once you split the batter and add cocoa to one half, you will see a richer, slightly deeper sheen and a thicker fall, signaling the chocolate portion is ready to marble.
How This Celebración de Cupcakes de Mármol Comes Together
The steps are few but each part matters. After the batter is mixed, divide it evenly and tint one half with cocoa, stirring until the chocolate is just blended. Spoon alternating dollops of each into the lined pan to make a marbled pattern; a gentle swirl with a skewer will deepen the design without overmixing.
While baking, look for the cupcakes to rise and set at the center, with a thin crack on top signaling that the crumb is baked through. A toothpick should come out clean or with a few moist crumbs, not wet batter. Cooling them on a wire rack keeps the bottoms crisp while the tops lose that oven warmth and firm slightly for frosting.
Ingredients You’ll Need
1 1/2 cups all-purpose flour, this helps with structure
1 cup granulated sugar, for sweetness and tender crumb
1/2 cup unsalted butter, softened, adds richness without overpowering
2 large eggs, bind and add lift
1/2 cup milk, keeps the batter moist and soft
1 teaspoon vanilla extract, brightens the flavor
1 1/2 teaspoons baking powder, gives gentle rise
1/2 teaspoon salt, balances the sweetness
1/4 cup cocoa powder, for the chocolate half and a deep note
Easter-themed sprinkles (optional), for a playful finish
Step-by-Step Directions
- Preheat your oven to 350°F (175°C) and line a cupcake pan with cupcake liners. Make sure the oven is fully up to temperature before the batter goes in so the cupcakes start to rise evenly. Having everything measured and ready helps the process move without fuss.
- In a large bowl, cream together the softened butter and granulated sugar until light and fluffy. Watch for the mixture to gain volume and a slightly paler color, which shows air has been incorporated. Stop when the texture feels airy and a spoon leaves a soft trail.
- Add the eggs, one at a time, mixing well after each addition. Stir in the milk and vanilla extract, and watch the batter become silkier and smoother. The batter should look cohesive and flow slowly when you tilt the bowl.
- In a separate bowl, whisk together the flour, baking powder, and salt. This step lifts lumps and gives a light, even mix of the leavening. A quick whisk also helps the flour breathe so it blends gently into the wet mix.
- Gradually add the dry ingredients to the wet ingredients until just combined. Fold with a spatula and stop when the flour streaks vanish and the batter moves like thick cream. Watch for a smooth sheen and avoid overmixing to keep the cupcakes tender.
- Divide the batter in half. To one half, add the cocoa powder and mix until combined. The chocolate batter will thicken and darken; mix until it looks even but do not beat vigorously.
- Alternate spooning the vanilla and chocolate batter into the lined cupcake pan to create a marbled effect. Drop dollops in and then swirl gently with a skewer if you like, stopping once the swirl looks pretty. Be careful not to overwork the pattern so the two colors stay distinct.
- Bake for 18-20 minutes or until a toothpick inserted into the center comes out clean. Look for a gentle dome and a thin, slightly firm skin on top that springs back when touched. A few moist crumbs on a toothpick are fine but avoid baking until the batter dries out.
- Allow to cool completely, then decorate with your favorite frosting and sprinkle with Easter-themed sprinkles, if desired. Cooling fully keeps the frosting from sliding and lets the crumb set to the right texture. Add sprinkles just before serving to keep them bright and crisp.
Sharing Celebración de Cupcakes de Mármol
These cupcakes are made for sharing in small, easy ways. I like to bring a tray to a neighbor’s porch or set a small box on the kitchen counter for friends who drop by. They are light enough for an after-school treat and pretty enough for a casual party.
Plate them on a simple white platter so the marbled tops stand out, or make a small tower on a cake stand for a table centerpiece. Pair them with a mild coffee or a light tea so the flavors do not compete; a milky coffee can highlight the chocolate note while a floral tea keeps the vanilla whispering.
When I serve them warm, the frosting softens and the crumb feels extra tender, which is perfect for an immediate treat. If you plan a longer gathering, cool them and serve at room temperature so guests can appreciate the texture and the frosting keeps its shape.
Keeping Celebración de Cupcakes de Mármol Fresh
Store cooled cupcakes in an airtight container at room temperature for two days. The crumb will stay soft and the tops will keep their shape if you avoid the fridge for short storage. If you need to keep them longer, refrigerate in a sealed container for up to five days, but know the cold can firm the crumb slightly.
To revive a slightly stale cupcake, warm it in a microwave for ten to fifteen seconds and let it rest for a moment before serving. This will soften the crumb and bring back a gentle aroma of vanilla and cocoa. For frozen storage, wrap each cupcake in plastic wrap then place in a freezer-safe bag for up to three months, and thaw at room temperature before frosting.
Carol’s Baking Notes
- Watch the batter texture more than the clock. A clock is a guide, but the batter’s look and flow tell you when it is mixed enough and when it is ready for the oven. When you see a smooth ribbon as you fold, that is your sign.
- Use room-temperature eggs and butter. They blend more evenly and help the batter trap air during creaming, which gives a lighter crumb. If your butter is too cold, the batter will need longer mixing and could end up dense.
- Measure the flour with care. Spoon it into the measuring cup and level off rather than scooping directly. Too much flour tightens the crumb and makes the cupcakes dry.
- Don’t over-swirl the batter in the pan. A few gentle moves with a skewer make a beautiful marbled look, but too much stirring blends the two batters into a single brown, and you lose the surprise in each bite. Keep the swirls playful and light.
- Try a quick toothpick check near the end of the bake time. If the centers look set and the tops spring back, you are likely done. A tiny moist crumb on a toothpick is fine; wet batter is not.
Variations I’ve Tried
One simple change is to add a teaspoon of instant coffee to the chocolate batter. It deepens the chocolate without making the cupcake taste like coffee, and it pairs beautifully with vanilla frosting. I liked the subtle lift it gave, and it highlighted the cocoa’s brightness.
I sometimes fold in a tablespoon of sour cream to the batter for a tangy softness. It makes the crumb denser but silkier, and it keeps well for a day or two. Another fun version is a lemon-vanilla swirl where you substitute two teaspoons of lemon zest for some of the vanilla; it gives the vanilla half a bright lift.
For a richer finish, try a light espresso touch as in the warm mocha treats I paired with earlier testing and a full espresso frosting in a different trial. If you want to explore that path, my notes on espresso cupcakes with espresso frosting show how coffee and cocoa can play together in a small cupcake format.
FAQs About Celebración de Cupcakes de Mármol
Can I make this ahead of time?
Yes, you can bake these a day ahead and keep them in an airtight container at room temperature. Frost them just before serving for the best look and texture.
Can I use oil instead of butter?
You can, but the texture will change slightly. Oil tends to make cupcakes a touch moister and denser, while butter gives a richer flavor and a slightly firmer structure that holds frosting well.
What if my batter looks too thick after adding cocoa?
A thicker chocolate batter is normal because cocoa absorbs moisture. Stir in a teaspoon or two of milk if it feels much thicker than the vanilla side, but add it sparingly so the texture stays balanced.
How do I get a more dramatic marble?
Drop larger spoonfuls of each batter into the pan and swirl once or twice with a skewer. Avoid too many twists; a few deliberate moves create bold, pretty veins of color.
Can I freeze undecorated cupcakes?
Yes, wrap them well and freeze for up to three months. Thaw at room temperature and frost when cooled to avoid condensation marring the frosting.
A Final Thought
I hope this Celebración de Cupcakes de Mármol gives you a reason to play with batter and color, to try a new swirl or a tiny flavor nudge. Baking is one of those quiet experiments that rewards patience with small, honest joys, and these cupcakes are a friendly place to start. Make a test batch, share a few, and keep a note on what you change; that is how recipes become your own. From my kitchen to yours, may these little cakes bring a bright moment and a new idea to your next baking day.
Celebración de Cupcakes de Mármol
Ingredients
Cupcake Base
- 1.5 cups all-purpose flour This helps with structure.
- 1 cup granulated sugar For sweetness and tender crumb.
- 0.5 cups unsalted butter, softened Adds richness without overpowering.
- 2 large eggs Bind and add lift.
- 0.5 cups milk Keeps the batter moist and soft.
- 1 teaspoon vanilla extract Brightens the flavor.
- 1.5 teaspoons baking powder Gives gentle rise.
- 0.5 teaspoon salt Balances the sweetness.
- 0.25 cups cocoa powder For the chocolate half and a deep note.
- as needed optional Easter-themed sprinkles For a playful finish.
Instructions
Preparation
- Preheat your oven to 350°F (175°C) and line a cupcake pan with cupcake liners.
- In a large bowl, cream together the softened butter and granulated sugar until light and fluffy.
- Add the eggs, one at a time, mixing well after each addition. Stir in the milk and vanilla extract.
- In a separate bowl, whisk together the flour, baking powder, and salt.
- Gradually add the dry ingredients to the wet ingredients until just combined.
- Divide the batter in half. To one half, add the cocoa powder and mix until combined.
Baking
- Alternate spooning the vanilla and chocolate batter into the lined cupcake pan to create a marbled effect.
- Bake for 18-20 minutes or until a toothpick inserted into the center comes out clean.
- Allow to cool completely on a wire rack.
Decoration
- Decorate with your favorite frosting and sprinkle with Easter-themed sprinkles, if desired.