The smell of butter and warm flour that slips through the kitchen when these biscuits come out of the oven is one of my favorite small wonders. It pulls the house together in a way that feels like a hug, and it tells everyone that for a little while, time slows and we sit down to enjoy simple comfort. If you love a crisp outside and a pillowy inside, you might also like my air fryer biscuits recipe, but these Cathead Biscuits are the kind that keep people talking until the last crumb is gone.
The Story Behind Our Favorite Cathead Biscuits
Cathead Biscuits have been a part of my family for as long as I can remember. My grandmother used to call them big biscuits, and that name stuck because each one is proud and round and too good to rush. They are the kind of biscuit you split and butter on a cold morning, or use to mop up the last of a gravy on a weeknight.
The reason they mean so much is simple. They show up at births, graduations, and late-night conversations at the kitchen table. When my kids were small, we made a game of who could get the biggest biscuit. It was never just about size. It was about the laughter that filled the room while we shaped the dough and the way the smell stayed with us for hours.
These biscuits are born from basic things: flour, butter, and buttermilk. That makes them honest. When I make them, I think of hands that have pressed dough before mine, and I remember to move slowly enough to notice the sound of butter hitting flour and the first puff of steam when they leave the oven. That memory is as much a part of the recipe as the ingredients.
Bringing Cathead Biscuits Together
“Every time I stir this pot, it smells just like Sunday at home.”
Making Cathead Biscuits has a rhythm that feels like a small ritual. I start by measuring and setting everything out, because that tiny bit of order helps me breathe. The flour looks soft and white in the bowl, the butter sits cold and cubed, and the buttermilk waits like a little promise of tenderness.
When the dry mix and the butter meet, you can hear a soft crumble as you cut the fat into the flour. When you add the buttermilk, the dough comes together in a way that makes you want to stop and watch. It is a quiet, satisfying transformation that feels almost like coaxing warmth and texture out of the ingredients.
As you pat the dough and cut it into rounds, you will notice the edges turn slightly tacky and the centers soft and generous. That is when you know they will puff and brown in the oven. The sound of the oven door closing and the crackle that comes from hot butter is the music of the kitchen for the next fifteen minutes.
Ingredients You’ll Need
4 cups all-purpose flour
1 tablespoon baking powder
1 teaspoon baking soda
1 teaspoon salt
1/4 cup cold butter, cubed
1 1/2 cups buttermilk
A few warm notes on these ingredients. Use fresh butter when you can because it gives this its richness. If your buttermilk is a little low, a splash of milk and a teaspoon of lemon juice will stand in quietly. A little extra vanilla is not traditional, but if you love a cozy aroma, it will make the kitchen smell like a memory.
Step-by-Step Directions
-
Preheat oven to 475°F (245°C).
Set your rack in the middle to give them even heat. Warmth should feel steady, not wild. A hot oven is what makes the outsides crisp while the insides stay soft. -
In a large bowl, mix flour, baking powder, baking soda, and salt.
Whisk them together until the mixture looks even and pale. The dry mix should smell faintly of flour and lift easily when you pour it. -
Cut in cold butter until mixture resembles coarse crumbs.
Use a pastry cutter or your fingers and keep the butter cold. You want little flecks of butter visible, like tiny islands in flour. -
Stir in buttermilk until a dough forms.
Add the buttermilk and fold gently until the dough comes together and feels slightly sticky. Stir until glossy where it catches the light, then stop. -
Turn dough onto a floured surface and knead gently.
Press and fold the dough once or twice, just enough to bring it into a soft ball. Overworking will make them tough, so be gentle and deliberate. -
Pat the dough into a thick sheet and cut into large rounds.
Use a biscuit cutter or a glass and press straight down without twisting. The rounds should be large, proud, and thick like little pillows. -
Place on a baking sheet, slightly touching.
Arrange the biscuits so they almost touch; this helps them rise tall and bake with soft sides. You will see the dough glisten with tiny beetles of butter. -
Bake for 15-20 minutes until golden brown.
Wait for the edges to turn golden and the tops to puff into soft peaks. Breathe in the aroma that fills your kitchen and know that the best part is almost ready. -
Serve warm with butter, jam, or gravy.
Split them open and butter immediately so the butter melts into each crevice. Serve them hot while the crumb is still tender and the outside sings a little when you bite into it.

How We Enjoy Cathead Biscuits at Home
At our table, biscuits are never just a bread. They are a reason to linger and talk. On Sunday mornings we spread butter and homemade jam and take turns telling stories from the week. On colder evenings they appear beside a pot of stew or a plate of fried chicken and act like a soft passport to comfort.
I like to place them on a warm platter, piled high, and let everyone reach in. Little traditions matter. One of ours is to pass the jar of honey around and drizzle it slowly. We say nothing when the honey hits the warm biscuit; silence is part of the ceremony, full of small pleasure.
For a brunch, I slice the biscuits and use them as a base for a stack of scrambled eggs, a thin slice of ham, and a spoonful of salsa. Kids love dunking pieces in gravy and grown ups often pair a biscuit with a strong cup of coffee. The variations are endless and sweet in their simplicity.
Keeping It Fresh and Comforting
If you want to save some for the next day, wrap the biscuits in a clean kitchen towel and tuck them into a bread box or a container. They keep best at room temperature for up to two days. The texture will change a little; the crust softens, and the crumb deepens in flavor.
To reheat, I like to revive them in a low oven at 350°F for about 8 to 10 minutes. That brings back the warmth and a little crispness. If you are trying to decide whether or not to reheat in a different appliance, you can find a guide on whether biscuits can be cooked in an air fryer that will help you choose the best method for your kitchen.
Leftovers also make excellent breakfast sandwiches. Split them, warm them, add cheese and a fried egg, and you have a small, honest meal that tastes like Sunday any day of the week.
Amelia’s Kitchen Notes
- Cold butter is your friend. Keep it cubed and chilled until the moment you cut it into the flour. This is what makes pockets of steam and lifts the biscuit from within.
- Don’t twist your cutter. Press straight down and lift. Twisting seals the edge and keeps the biscuit from rising tall. Trust the push.
- Be gentle with kneading. Two folds and a press is usually enough. Overworking turns air into toughness, and we want fluff.
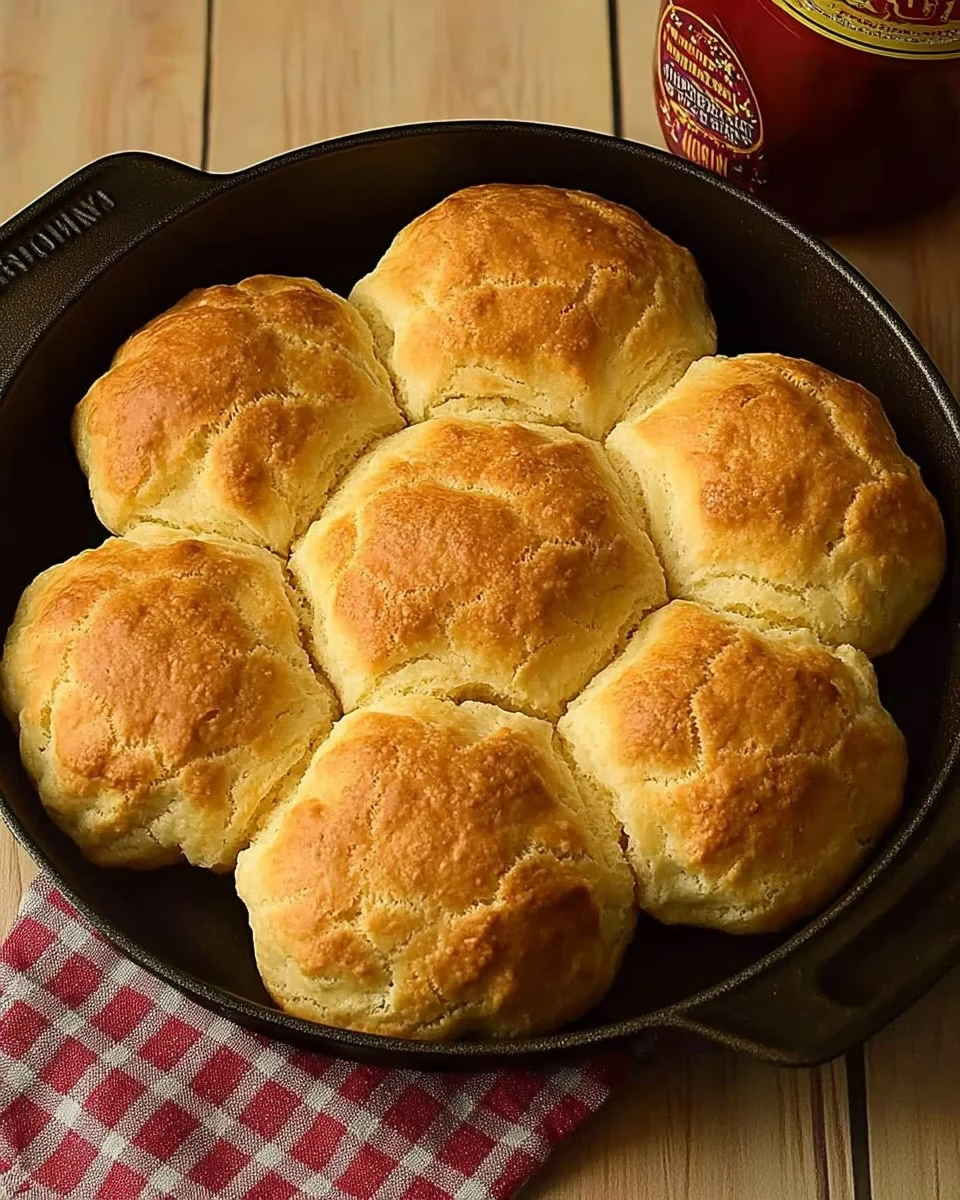
- Try baking in a cast iron skillet if you like crisper sides. Place the dough rounds snugly and bake. The skillet keeps the heat even and gives a nice edge.
- If your buttermilk is thin, measure and then wait a moment after mixing. The dough tells you when it needs a touch more or less.
These tips are small, real, and earned from the kind of quiet practice that happens between meals and conversations. I share them like a friend who has watched a thousand biscuits brown.
Family Variations on Cathead Biscuits
We change these biscuits to suit the moment. In winter, I add a teaspoon of chopped rosemary and a bit of grated cheddar for a savory twist. The kids like everything sweet, so we sometimes add a tablespoon of sugar and top the biscuits with a little cinnamon butter.
For a heartier version, fold in some cooked, crumbled bacon and a couple of chopped scallions. It makes the biscuits feel like a whole meal. In spring, we stir in chopped chives and a touch of lemon zest to brighten them. Each change still keeps the biscuit friendly and familiar.
If you want a drop-biscuit feel, add a bit more buttermilk and drop spoonfuls onto a baking sheet. They bake into rounder, more rustic shapes and are great when you need biscuits in a hurry. All of these variations keep the soul of the Cathead Biscuit while giving you room to play.
How to Serve Cathead Biscuits With Family Warmth
Serve them warm on a wide platter and pair with familiar sides. A bowl of thick gravy for sharing is a simple centerpiece. A jar of jam and a dish of salted butter make everyone happy. Arrange a stack of plates and let people help themselves.
Make a ritual of it. Tell a small story as you put the platter down. Ask someone to pass the butter or to tell about the best thing that happened that week. Food connects us and biscuits do that quietly, with no fuss. They give permission to slow down and enjoy the company.
I might also serve these with roasted vegetables and a simple green salad for a weeknight dinner. The biscuits take the role of comfort and soak up any sauce or juices with a satisfying silence. They never steal the show; they add the comfort.
Little Lessons From My Kitchen
- Measure flour by spooning into the cup and leveling. Scooping with the cup packs the flour and makes a denser biscuit. A light hand yields a fluffier crumb.
- Chill your baking sheet for 10 minutes before placing the biscuits if your kitchen is warm. Cool metal keeps the butter from melting too fast and helps them rise.
- If you like a glossy top, brush with a bit of melted butter right when they come out of the oven. It makes them shine and gives a soft crust.
- Keep a small bowl of cold water nearby when you work with dough. A wet finger seals the edges and helps when you need to smooth tops.
- Clean as you go. The mess is part of the joy, but washing one bowl while the biscuits bake makes the cleanup feel light.
These small practices save time and keep the process joyful. No one needs pressure in the kitchen, just a few handy steps that help you feel confident.
FAQs About Cathead Biscuits
Can I make this ahead of time?
Yes, you can make the dough and keep it covered in the fridge for a day. When you are ready, pat it out and cut the biscuits so they bake fresh and still have that lovely lift.
Can I use a different fat than butter?
You can use lard or shortening if you prefer a different texture or flavor. Butter offers great flavor, but other fats can produce a slightly flakier biscuit.
What if I do not have buttermilk?
Mix 1 1/2 cups milk with 1 1/2 tablespoons lemon juice or vinegar and let it sit for five minutes. It is a simple stand-in that gives you the same tender result.
How do I know when they are done?
Look for a golden top and edges, and a hollow sound when you tap the bottom gently. The centers should be cooked through but still soft to the touch.
Can I freeze the biscuits?
Yes, once baked and cooled, freeze in an airtight container with layers of parchment in between. Reheat from frozen in a 350°F oven for about 15 minutes until warm.
A Few Ways We Make This Our Own
Sometimes a biscuit becomes a family tradition because of one small change that someone in the house makes. My mother always added a pinch of black pepper to the dough when we had soup. My husband loves a slather of garlic butter. My daughter makes biscuits with a sprinkle of coarse sugar on top for brunch.
I encourage you to try a version that fits your table. Add grated cheese, a handful of chopped herbs, or a spoonful of honey to the dough. These changes keep the biscuit alive in your home and give everyone a small way to make it theirs.
When guests come, I will sometimes set out a small board with butter, jam, honey, and a savory spread. Let people choose. The choice becomes a kind of conversation about taste, and that is a lovely thing to share.
Storing Cathead Biscuits for Tomorrow
If you want to save them for the next day, cool them completely, then place in a lightly sealed container or a paper bag. At room temperature they stay tender for a couple of days. The flavor actually deepens overnight, and I find them almost better for it when reheated.
To reheat gently, wrap in foil and warm in a low oven for 8 to 10 minutes. Unwrap for the last minute to bring back a little crisp. If you are in a hurry, a quick zap in the microwave for 15 to 20 seconds will soften them and make them ready for butter in an instant.
If you plan to freeze, freeze in a single layer until firm, then stack with parchment between layers and keep in a good airtight container. Thaw overnight in the fridge and warm in the oven in the morning.
A Final Thought
I hope this Cathead Biscuits brings a little warmth and inspiration to your kitchen, the same way it does in mine. These biscuits are honest and simple, and they have a way of making ordinary moments feel like small celebrations. When you pull one from the oven and split it open, I hope you hear laughter, remember a quiet memory, and feel a gentle kind of home.
Until the next recipe, may your kitchen be full of good smells and your table full of good company.
Cathead Biscuits
Ingredients
Dry Ingredients
- 4 cups all-purpose flour Measure by spooning into the cup and leveling.
- 1 tablespoon baking powder
- 1 teaspoon baking soda
- 1 teaspoon salt
Wet Ingredients
- 1/4 cup cold butter, cubed Keep it cubed and chilled until cutting.
- 1 1/2 cups buttermilk If thin, add a splash of milk and a teaspoon of lemon juice.
Instructions
Preparation
- Preheat oven to 475°F (245°C). Set rack in the middle.
- In a large bowl, mix flour, baking powder, baking soda, and salt until even.
- Cut in cold butter until mixture resembles coarse crumbs.
- Stir in buttermilk until dough forms and is slightly sticky.
- Turn dough onto a floured surface and knead gently.
- Pat the dough into a thick sheet and cut into large rounds.
- Place biscuits on a baking sheet, slightly touching.
Baking
- Bake for 15-20 minutes until golden brown.
- Serve warm with butter, jam, or gravy.
