The warm kitchen light pooled across the counter as I pulled the last tray from the oven, and for a moment I just listened to the tiny snap of an edge as it cooled. The scent of butter and vanilla filled the room and I thought of little hands pressing cookie cutters into dough, leaving imperfect ears and smiling faces. If you like playful bakes that still come from dependable steps, you might enjoy a similar kind of magic like the Easter Oreo Bunny Cookies I sometimes test alongside these. That quiet, slightly sticky moment when the buttercream is spread and a sprinkle is nudged into place is what baking feels like for me.
The Story Behind This Small-Batch Buttercream Bunny Cookies
I began testing this Buttercream Bunny Cookies recipe because I wanted a cookie that behaved like a classic sugar cookie but felt softer and more forgiving to decorate. The early batches were crisp and brittle, and the frosting slid off like a tiny boat in a storm. After a few small changes to butter, egg, and timing, the dough relaxed into something tender yet steady.
There was a night when I adjusted the mixing time by just a minute and the dough turned silkier. I remember thinking that was the moment the cookie stopped fighting me and started being friendly. That kind of tip comes from repeated small-batch testing, from watching textures and learning to listen to the dough.
This recipe matters because it lets you play with color and shape without guessing the science. It is built to be forgiving for a beginner and satisfying for someone who loves to tinker. I wanted a cookie that brings people together, whether for a spring party or an afternoon tea.
The Rhythm of Making Buttercream Bunny Cookies
“The moment the texture shifts, you know it’s ready.”
Start with calm motions and a clear pace. Cream butter and sugar until that first glossy sheen appears and the bowl looks lighter. Watch for the way the dough pulls away from the bowl as you add flour; that is your cue that the balance is right.
When rolling, let the dough warm a little if it feels stubborn, and chill it briefly if it gets too soft. The cookie’s edge color tells you how much longer in the oven; a pale golden rim is the note I look for. Once decorated, give the frosting time to set so each bunny keeps its personality.
Ingredients You’ll Need
2 3/4 cups all-purpose flour
this helps give the cookie structure without making it stiff
1 teaspoon baking powder
this lifts and gives a gentle rise so the shape holds
1/2 teaspoon salt
this balances sweetness and brings out the butter
1 cup unsalted butter, softened
this adds richness without overpowering
1 1/2 cups granulated sugar
this sweetens and helps the cookie brown lightly
1 large egg
this binds and adds tenderness
1 teaspoon vanilla extract
this lends familiar warmth and rounds the flavors
Buttercream frosting
this is your canvas for color and texture
Food coloring (for decorating)
a few drops go a long way; gel color works best for bright shades
Sprinkles (optional)
add sparingly for contrast and a playful finish
Step-by-Step Directions
-
Preheat the oven to 350°F (175°C). Make sure the rack sits in the middle of the oven so the cookies bake evenly and do not brown too quickly. This steady heat sets the shape and keeps edges gentle and light.
-
In a bowl, mix together flour, baking powder, and salt. Whisk them so the rising agent and salt distribute evenly through the flour and you avoid any pockets of flavor that feel off later.
-
In a separate large bowl, cream together the butter and sugar until light and fluffy. Watch for a smooth sheen and a slightly pale color, which shows the sugar has dissolved enough and air has been folded in.
-
Beat in the egg and vanilla extract. Add the egg in one go and mix just until incorporated so the dough stays tender and not too dense.
-
Gradually add the dry ingredients to the creamed mixture and mix until combined. Stir until the dough holds together and looks even, stopping once it feels soft but set to keep the cookie tender.
-
Roll out the dough on a floured surface and cut into bunny shapes using cookie cutters. Use a light touch and lift the cutter straight up to keep ears and details from smudging.
-
Place cookies on a baking sheet and bake for 8-10 minutes or until the edges are lightly golden. Keep an eye on them from minute eight; the center may look a touch soft but it will firm as it cools.
-
Let the cookies cool completely on a wire rack. Cooling fully is the secret to steady decorating and it helps the buttercream sit without sliding.
-
Decorate cooled cookies with buttercream frosting and food coloring, and add sprinkles if desired. Work in small batches with thin layers at first, then add a second layer for highlights or texture.

Watching It Transform
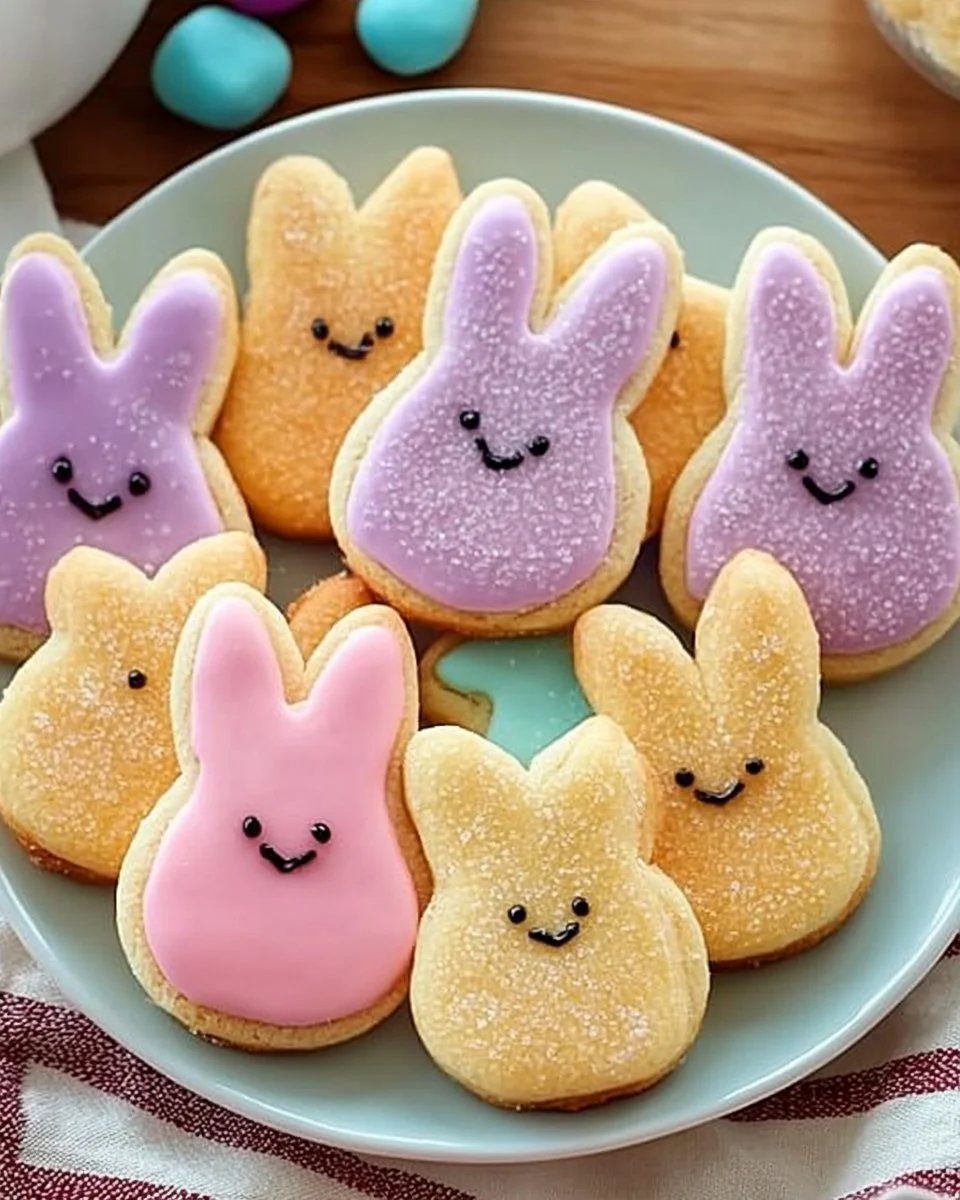
There is a small moment when the cookies come from the oven and the aroma takes over the kitchen. The edges should look gently browned while the centers hold a soft, tender look. That contrast keeps the bite interesting.
Once cooled and decorated, each bunny becomes its own little portrait. I like to let the buttercream reach a light crust before piling on extra details so colors do not blur. That pause makes decorations look cared for and keeps textures clean.
When I Serve Buttercream Bunny Cookies
These cookies shine on a table that invites people to linger. They are the kind of dessert that asks for a small cup of tea and a slow conversation. I like to place them on a simple platter with fresh flowers for weekends or in a tin for a neighborly surprise.
They also work for a casual party or a preschool bake day because the shapes are friendly and the decorating can be as simple or detailed as you like. For a family dessert, let everyone choose a color and a sprinkle to make their own bunny. It becomes part of the memory.
Keeping Buttercream Bunny Cookies Fresh
Store undecorated cookies in an airtight container at room temperature for up to three days. Layer them between sheets of parchment to prevent sticking and preserve the shaped edges.
Once decorated, keep them in a single layer or separate layers with parchment and store in a cool spot. If the frosting has set, a loose cover works, but avoid the fridge unless it is quite warm; refrigeration can dry the cookies and dull the buttercream.
If you want to make dough ahead, wrap and chill it for up to two days or freeze for up to one month. Thaw in the refrigerator and bring to a slightly rollable temperature before cutting shapes to avoid cracking.
Carol’s Baking Notes
-
Texture over timing. I learned to trust texture more than the clock. If the dough looks smooth and pulls away slightly from the bowl, it is usually ready to chill and roll. That small visual cue beats a strict minute count.
-
Butter temperature matters. Softened butter should give with steady pressure but not feel greasy or melting. Too warm and the cookie spreads; too cold and it will be tough. Soft but cool is the sweet spot.
-
A light hand with flour when rolling helps keep the edges tender. Dust your surface but pull the dough together gently so it does not dry out while cutting shapes. Less is more when you need the dough to stay pliable.
-
Use gel colors for bright pastels. A tiny dot goes a long way and keeps the frosting from becoming watery. It also lets you blend shades while keeping the frosting thick enough to pipe.
-
Test one cookie first. If the shape puffs or spreads more than you like, a quick chill of the dough for 10 minutes fixes it. Small tests save batches and grant confidence before you commit.
Variations I’ve Tried
I love swapping extracts and adding small ingredients to tune the cookie to the season. A teaspoon of almond extract can make a soft, nutty background, while lemon zest brightens the dough and pairs well with pale yellow frosting. When I want a richer note, I replace two tablespoons of flour with almond flour to add a subtle chew and a hint of nuttiness.
For a playful twist, I sometimes press a small chocolate chip into the center before baking to make the bunny look like it has a tiny button belly. Another version I tried adds a thin layer of jam between two flat cut cookies for a sandwich effect, and that fruit tang plays beautifully with sweet buttercream.
If you are curious about different cookie projects, a similar approach to flavor swaps worked well when I tested an almond-cherry variation that combined tender dough with bright fruit notes, much like the almond cherry cookies I keep on hand for late spring. That experiment reminded me how small ingredient swaps give each batch a fresh personality.
Questions I Had While Testing
Can I make this ahead of time?
Yes, and in some cases it actually sets better after resting, especially once the texture has fully settled. Dough keeps in the fridge for a couple of days or frozen for longer, and decorated cookies can be made a day ahead if kept cool.
What if my cookies spread too much?
Try chilling the dough before cutting and again briefly on the sheet before baking. Also check that your butter was not too warm and that you did not overmix once the flour went in.
How thick should I roll the dough?
I aim for about 1/4 inch to 3/8 inch. That thickness keeps the cookie sturdy enough to hold frosting but thin enough to keep a light bite.
Can I use powdered sugar in the dough instead of granulated?
I prefer granulated for the way it helps the cookie brown and gives a slightly firmer texture. Powdered sugar can make a softer result, which might be fine but will change the structure.
Is there an oven trick for consistent baking?
Use a middle rack and rotate the pan halfway through if your oven has hot spots. A tray lined with parchment helps the bottoms brown evenly and keeps edges from overcooking.
Sharing Buttercream Bunny Cookies
I picture these cookies wrapped in a small box or stacked with parchment between each layer when I bring them to a friend. For a spring gathering, arrange them on a shallow wooden board with small bowls of extra sprinkles and piping tips, so people can customize their own bunny. That interactive element turns a plate of cookies into a shared activity.
For a classroom or bake sale, pack them into simple cello bags and tie with a ribbon. A small card with the flavor notes invites conversation and shows you cared about the details. In my tests, recipients loved receiving a variety of pastel colors and tiny themed sprinkles.
If I am serving them at home, I pick a platter that complements the frosting colors and keep the plate within reach so people can help themselves. Little touches—like a few fresh mint leaves or a scattering of edible flowers—make the presentation feel thoughtful without much fuss.
Helpful Tips Before You Start
Plan your decorating in layers. Pipe a base coat of buttercream, let it set, and then add fine details so colors do not run into each other. Working in thin layers also keeps the frosting from sagging.
Keep tools at hand. Have a small offset spatula, a round piping tip, and a toothpick ready for tweaks and texture. A damp cloth for wiping edges speeds things up and keeps your colors clean.
Measure ingredients carefully but trust feel for mixing. Baking is precise, but texture tells you more about readiness than strict times. Use sight and touch to guide your final choices.
From My Kitchen to Yours
I hope these Buttercream Bunny Cookies inspire you to try a few playful experiments while relying on a simple, trusted base. Let the dough teach you its rhythms and enjoy the small surprises that come from tiny adjustments. Baking these has taught me patience and a gentle curiosity that always makes the result feel like more than a recipe.
There is joy in sharing cookies that are pretty enough to photograph and honest enough to taste like home. Make a few changes, test a color, and then share one with someone you love. That, to me, is the best part of baking.
Buttercream Bunny Cookies
Ingredients
Cookie Dough Ingredients
- 2 3/4 cups all-purpose flour Helps give the cookie structure without making it stiff
- 1 teaspoon baking powder Lifts and gives a gentle rise so the shape holds
- 1/2 teaspoon salt Balances sweetness and brings out the butter
- 1 cup unsalted butter, softened Adds richness without overpowering
- 1 1/2 cups granulated sugar Sweetens and helps the cookie brown lightly
- 1 large egg Binds and adds tenderness
- 1 teaspoon vanilla extract Lends familiar warmth and rounds the flavors
Decoration Ingredients
- Buttercream frosting Your canvas for color and texture
- Food coloring A few drops go a long way; gel color works best for bright shades
- Sprinkles Add sparingly for contrast and a playful finish
Instructions
Preparation
- Preheat the oven to 350°F (175°C), ensuring the rack is in the middle of the oven.
- In a bowl, mix together flour, baking powder, and salt. Whisk to distribute evenly.
- In a separate large bowl, cream together butter and sugar until light and fluffy.
- Beat in the egg and vanilla extract until just incorporated.
- Gradually add the dry ingredients to the creamed mixture and mix until combined.
- Roll out the dough on a floured surface and cut into bunny shapes using cookie cutters.
- Place cookies on a baking sheet and bake for 8-10 minutes until edges are lightly golden.
- Allow cookies to cool completely on a wire rack.
Decoration
- Decorate cooled cookies with buttercream frosting, food coloring, and add sprinkles if desired.
