The first time I let honey darken on the stove, the whole house filled with a warm, toasted sweetness that felt like a slow sigh from the oven. I remember standing at the counter with my apron tied, a child on my hip and the radio playing softly, watching the honey move and darken as if it were turning its own story into color. That moment — the smell of caramelized honey, the hush of the kitchen, and the small thrill of curiosity — is how Burnt Honey Pie became one of those recipes that marks Sunday afternoons and quiet celebrations alike. If you like honey pies, you might enjoy this take that reminds me of my travels and tastes of Greece, like this Melopita Greek Honey Pie, which shares that honeyed, comforting feeling in a different shape.
Why This Burnt Honey Pie Still Feels Like Home
This pie is a simple thing that turns into something soulful. It began as an experiment in my kitchen when I wanted a dessert that tasted both childhood-sweet and grown-up toffee-like at the same time. Turning honey until it takes on that deep amber color and a toasted scent feels a little like waiting for a secret to reveal itself.
It matters because it asks for presence. There is no rushing the honey, no skipping the moment when the aroma shifts from floral to toasted. That moment is where the flavor lives. Serving this pie at our table has become shorthand for comfort: the kind that heals after a long week and the kind that gathers people together for small celebrations.
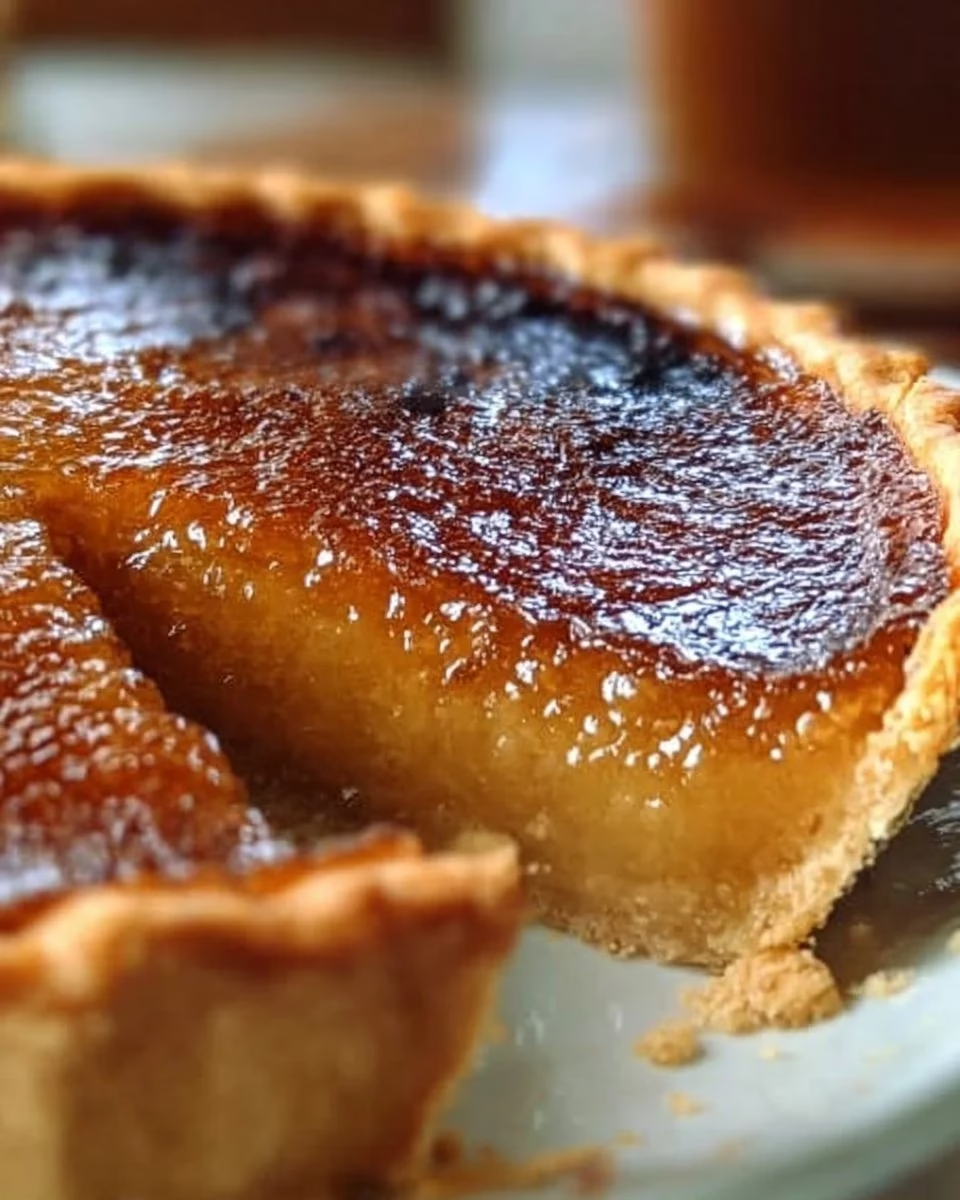
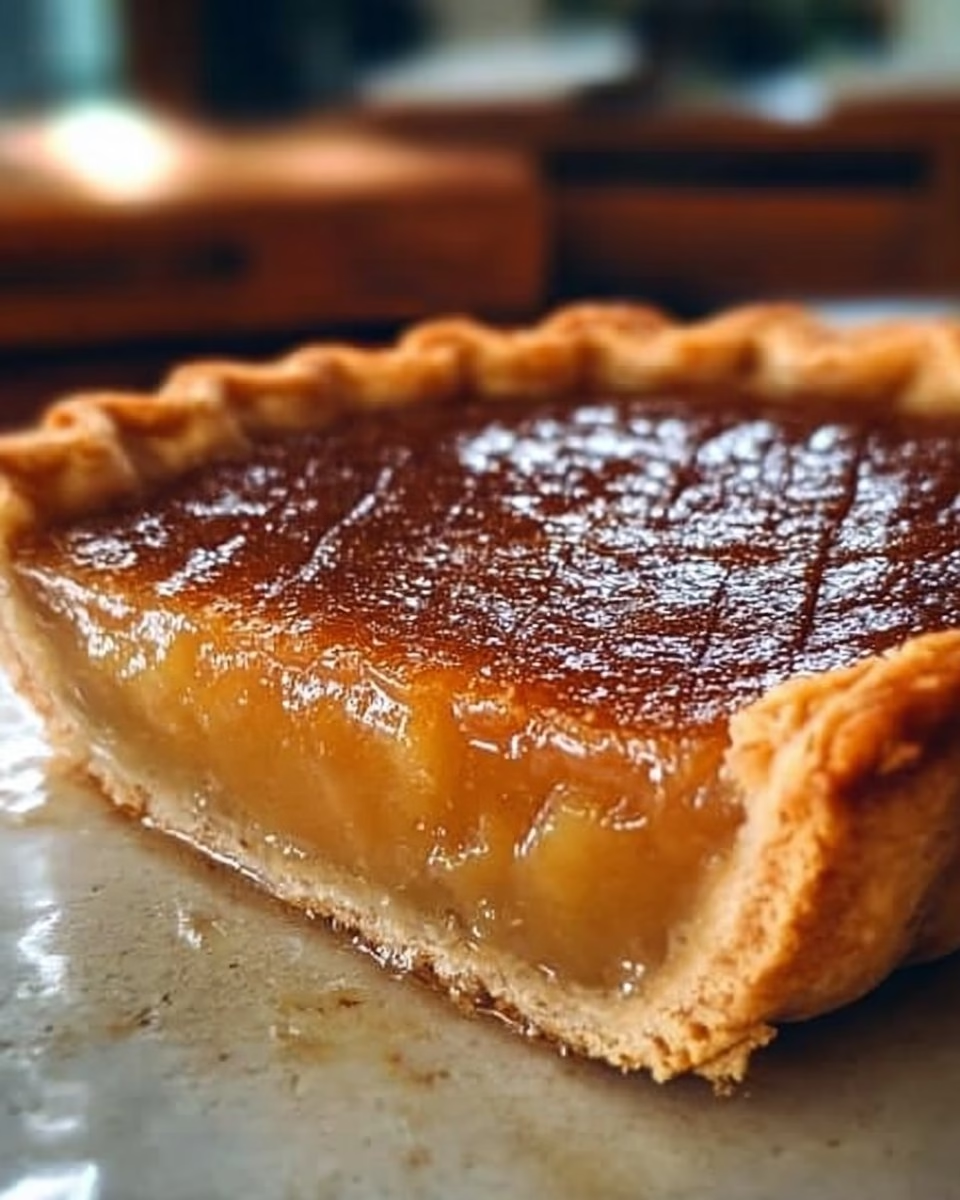
For our family, Burnt Honey Pie is less about perfection and more about the ritual. My husband jokes that it always arrives cracked in the middle, and my kids love to scoop the edges where the filling meets the crust. That imperfection is part of its charm. The flaky crust, the custardy center, and the warm, caramel notes of burnt honey create a combination that feels both simple and indulgent.
The Story Behind Our Favorite Burnt Honey Pie
I made the first version of this pie on a rainy afternoon, the sort that slows everything down. I wanted something that smelled like toffee and summer blossoms at once, something that tugged at old memories of my grandmother’s kitchen without copying them exactly. Honey had always been our pantry’s quiet hero — a drizzle on toast, a kiss in tea. Turning it into a pie felt like giving it a proper spotlight.
My grandmother taught me to watch and wait in the kitchen, to trust the senses rather than the clock. She would say, “Listen to the sound of the pan and you’ll know when it’s ready.” That patient listening is exactly what making burnt honey asks of you. When the honey speaks in caramel and amber, you will know it has reached a place of depth and warmth.
Over the years, Burnt Honey Pie built a reputation in our family for being the dessert that could close a conversation or start a memory. The kids learned to settle at the table while a slice cooled. My husband learned to bring the tea. I learned that the crust can be store-bought when life is busy, and it still tastes like an embracing hand on a cool evening.
How to Make Burnt Honey Pie
“Every time I stir this pot, it smells just like Sunday at home.”
Making this pie is a gentle rhythm. It feels like tending a small, golden garden: the honey moves slowly, thickening and darkening, and you watch the color like you would watch light through leaves. The sound is important too. Honey bubbles in a different way as it deepens; it sings lower and steadier, telling you to pay attention.
As you stir, you will see the glossy transformation. Liquid honey becomes something denser, with a color that reads like late afternoon sun. Once the burnt honey meets the eggs and cream, the mixture calms into a custard that holds the toasty notes without being harsh. Pouring it into the crust is the satisfying part, the moment when the work of the stove meets the promise of the oven.
From there, baking is a quiet, patient stage. The oven warms the filling gently so it sets with a tender jiggle in the center. The edges rise and set a touch faster, creating a soft contrast between firmer rim and silky middle. When the pie cools, the flavors settle and open up. The burnt honey breathes into the custard and the crust, and what comes out at the table is something you can sink into with a spoon and a deep breath.
Ingredients You’ll Need
1 cup honey
1 pie crust (store-bought or homemade)
3 large eggs
1/2 cup heavy cream
1/2 cup whole milk
1/4 teaspoon salt
1 teaspoon vanilla extract
A little extra vanilla if you love a cozy aroma.
Fresh butter gives this its richness if you make the crust from scratch.
Good quality honey will reward patience here, but even a simple wildflower honey will warm up beautifully.
Step-by-Step Directions
-
Preheat the oven to 350°F (175°C).
Set a rack in the middle and let the oven come to temperature so your pie cooks evenly.
A steady oven makes the filling set slowly and prevents cracks.
Take a moment to breathe in the quiet of the kitchen before you begin. -
In a saucepan over medium heat, cook the honey until it’s deep amber and smells toasty, about 5-10 minutes.
Watch the honey closely and stir gently so it darkens evenly and does not burn.
You want to achieve a deep color that smells like caramel and roasted nuts, not a bitter, acrid note.
When it reaches that deep amber, remove it from heat and let the steam settle. -
In a mixing bowl, whisk together eggs, cream, milk, salt, and vanilla.
Whisk until the mixture is smooth and slightly glossy, with no streaks of white from the eggs.
This creates a silky base that will carry the burnt honey’s flavor into every bite.
Work patiently so the eggs are fully blended and the mixture is even. -
Slowly stir the burnt honey into the egg mixture until well combined.
Add the honey in a thin stream while whisking so the heat distributes and the eggs do not scramble.
Stir until the filling is glossy and the color is even, a warm golden-caramel tone.
You should feel the texture thicken a little as it all comes together. -
Pour the filling into the pie crust.
Fill the crust almost to the top, leaving a little space for gentle movement as it bakes.
Tap the pan lightly on the counter to settle the filling and release any air bubbles.
Admire that glossy, rich surface for a quiet second before it goes into the oven. -
Bake for 30-35 minutes until the filling is set but still slightly wobbly in the center.
Check it at the 30-minute mark and watch for the edges to turn a soft golden hue.
The center should have a gentle jiggle when you give the pan a small shake.
This texture promises a custardy finish once it cools. -
Let cool before serving.
Cool the pie on a wire rack so the filling can firm gently and the flavors mellow.
When the pie reaches room temperature, the burnt honey notes deepen and settle into a smooth custard.
Serve with a dollop of whipped cream or a thin slice of sharp cheese to balance the sweetness.
Serving Burnt Honey Pie With Family Warmth
Serving this pie is as much about the moment as the food. I like to bring it to the table warm but not hot, so everyone can watch the steam curl up and the scent settle into the room. There is something almost ceremonial about cutting the first slice; it is a small offering that says, let us pause together.
Plating matters simply. A thin wedge on a small plate, a spoonful of lightly whipped cream, and a cup of strong tea makes an honest presentation. For grown-up gatherings, try a single shaven shard of dark chocolate or a few toasted walnuts on top to add texture and a contrast to the honeyed custard. My kids love a scoop of vanilla ice cream melting at the edge, the cold meeting the warm in a sweet, forgiving way.
At our house, we pair slices with quiet conversation and slow sips of something warm. Sometimes we savor it after a long walk, when the body needs comfort. Other times it closes a meal where laughter lingered long at the table. The pie fits into many roles with ease.
Storing Burnt Honey Pie for Tomorrow
This pie keeps kindly in the fridge. Cover it loosely with plastic wrap or a pie dome and it will stay moist and true for up to three days. I have to say that the flavors often taste richer the next day. The burnt honey relaxes into the custard and the whole slice feels more unified.
If you want to reheat a slice, do it gently. A brief warm-up in a low oven or a few seconds in a microwave will do, but avoid overheating which can make the custard weep. Let it come slightly back to room temperature before serving to let the aromatics open and the texture return to its best.
When you travel with a pie, such as to a friend’s house or a potluck, keep it cool and upright. A little insulation and a careful hand will protect the glossy top and help it arrive with the same warmth it left your kitchen with.
Amelia’s Kitchen Notes
Tip 1: Watch the honey. Honey can go from deep amber to bitter quickly, so keep your attention on it. A steady hand and a wooden spoon make a world of difference, and you will learn to recognize the moment it turns from sweet to toasted.
Tip 2: Temper the eggs gently. When you add the hot honey to the eggs, do it slowly so the eggs don’t cook. A thin stream and a constant whisk will give you a smooth, silky filling every time.
Tip 3: Crust shortcuts are fine. If life is busy, a good store-bought crust saves time without taking away the heart of this pie. That said, a homemade crust with cold butter and a little love will always sing alongside the burnt honey.
Tip 4: Let it rest. Cooling this pie slowly gives it time to set and for the flavors to calm and blend. Resist the urge to dig in while it is still piping hot; the texture is best once it has settled.
Tip 5: Clean-up is easier if you soak the pan. Honey is sticky, and a quick soak after you finish makes scrubbing kinder to your hands. Warm soapy water will loosen that caramelized goodness with very little fuss.
Family Variations on Burnt Honey Pie
We have played with this recipe in small ways that feel like home. Once we added a quarter cup of toasted almond flour to the filling for a nutty lift. Another winter we spread a thin layer of jam on the crust before pouring in the filling, which gave a tart counterpoint to the honey.
For a salt-and-sweet play, try a sprinkle of flaky sea salt on top right after it comes out of the oven. That bright, crunchy contrast makes each bite sing with a little more complexity. If you enjoy a creamier texture, a little more heavy cream will do it, and if you like it lighter, add a splash more milk and cut the cream down.
We also enjoy exploring similar family favorites. If you want a different honey-forward pie with a crisper edge, try this Salted Honey Pie for another way to bring honey to the table. Each variation keeps the same heart but allows a new kind of memory to form.
FAQs About Burnt Honey Pie
Can I make this ahead of time?
Yes, and honestly, it might taste even better the next day once the flavors have settled and come together. Keep it covered in the fridge and let it come to room temperature for a short while before serving.
What type of honey should I use?
A strong, flavorful honey gives the best result because the burnt notes need a good base. Wildflower, clover, or a local raw honey will all work. Avoid overly floral varieties if you want a more neutral caramel tone.
My filling cracked in the center. Is it ruined?
Not at all. A small crack is a natural part of custard pies and does not affect the taste. If you prefer a smooth top, try a gentle water bath or lower oven temperature next time, but remember that imperfections are part of the pie’s charm.
Can I make this without heavy cream?
You can substitute more whole milk, but the texture will be a touch lighter and less rich. For best custard stability, keep some cream in the recipe when you can, or consider adding a touch of full-fat yogurt for creaminess.
How do I know when the honey is ready?
Watch for a deep amber color and a toasted, almost nutty aroma. It should not smell burnt or bitter. The tiny bubbles will slow and become silkier as the sugars concentrate.
A Warm Note From My Kitchen
Making Burnt Honey Pie has taught me to slow down and listen. It has taught my kids that sweetness can be grown slowly and that waiting rewards us with deeper flavors and fuller conversation. When I set the pie on the table and the room fills with its toasted aroma, I see the same small smiles and relaxed shoulders again and again.
This pie is my invitation to you. Invite someone over, set a plate, and let the kitchen do what it does best: make a place where people feel seen and nourished. Whether you are an early cook or a parent with flour on your sleeve, this recipe offers a way to turn a handful of pantry staples into something that tastes like a memory.
Conclusion
If you are curious to see a professional take or a special variation on this idea, this version from Burnt Honey Pie – Flamingo Estate is a lovely companion to the home-style approach I share here. I hope this recipe gives you that same warm, toasty feeling in your kitchen and encourages you to make room for little rituals that bring your family together.
Burnt Honey Pie
Ingredients
For the Filling
- 1 cup honey Good quality honey rewards patience.
- 3 large eggs Make sure to whisk until smooth.
- 1/2 cup heavy cream For a rich texture.
- 1/2 cup whole milk Can be substituted for a lighter texture.
- 1/4 teaspoon salt
- 1 teaspoon vanilla extract A little extra for a cozy aroma.
For the Crust
- 1 pie crust store-bought or homemade A homemade crust adds richness.
Instructions
Preparation
- Preheat the oven to 350°F (175°C). Set a rack in the middle.
- In a saucepan over medium heat, cook the honey until it's deep amber and smells toasty, about 5-10 minutes.
- In a mixing bowl, whisk together eggs, cream, milk, salt, and vanilla until smooth and glossy.
Combining Ingredients
- Slowly stir the burnt honey into the egg mixture until well combined.
- Pour the filling into the pie crust, leaving a little space for movement as it bakes.
Baking
- Bake for 30-35 minutes until the filling is set but still slightly wobbly in the center.
- Let cool on a wire rack before serving.