I remember the first time I shaped these little bunnies late at night, the kitchen quiet except for the thrum of the refrigerator and the soft clink of a spoon against a bowl. The ganache smelled of warm cream and chocolate, glossy and inviting, and I found myself grinning at how a small indentation could suggest a pair of ears. If you enjoy playful truffles, you might also enjoy my take on chocolate orange truffles that play with bright flavor in a similar small-batch way.
The Story Behind This Small-Batch Bunny-Shaped Chocolate Truffles
This recipe began as a tiny experiment. I wanted something unfussy that still felt special. I tested it in small batches, learning that a 1 hour chill time made all the difference between a sticky mess and a smooth, shapable center.
I tacked on a gentle indentation so the bunnies could wear ears, and suddenly the truffles felt playful. Each tweak came from watching textures closely and making a note: too warm, and the center slips; too cold, and the bite feels firm rather than tender.
What keeps me coming back is the mix of comfort and small surprises. Friends smile when they see the bunnies, but they really pause at the first mouthful. That creamy center and crisp outer shell is what makes this recipe a favorite in my little kitchen.
The Rhythm of Making Bunny-Shaped Chocolate Truffles
“The moment the texture shifts, you know it’s ready.”
Making these truffles has a rhythm that felt obvious after a few tests. Heat the cream until it gently simmers, pour it over the chocolate, and wait while the mixture softens into a glossy ganache. You watch for that smooth sheen and stir until the color and texture look uniform.
Then you cool and shape, feeling the mixture change from soft and tawny to firm and dense in the fridge. When you dip the balls into melted chocolate, you look for a thin, even coat and tap off any excess so a light shell forms. The whole process asks you to notice small shifts in texture and temperature, and those cues tell you when to move on.
Ingredients You’ll Need
8 oz 225g high-quality milk or dark chocolate, chopped
this is the heart of the truffle so pick chocolate you like to eat
1/2 cup heavy cream
this adds richness and makes a smooth, tender center
2 tbsp unsalted butter (softened)
this helps with structure and gives a silkier mouthfeel
1 tsp vanilla extract (optional)
this lifts flavors without taking over
Pinch of salt
this balances sweetness and brightens the chocolate
12 oz 340g milk or dark chocolate, melted (for dipping)
use extra for coating so you have enough to dip and recoat if needed
1/4 cup white chocolate (optional for decorative bunny details)
this is for simple faces and ears that pop visually
Edible decorations like colored sprinkles or sugar eyes (optional)
these make each bunny unique and are perfect for playful details
If you like a chewy contrast, try adding a cookie crumble layer or look at my chocolate coconut cookie truffles to borrow an idea for texture and crunch by swapping fillings. The chocolate coconut cookie truffles use mix-ins that change the way the nutty flavors and texture play with the ganache.
Step-by-Step Directions
-
Make the Truffle Filling: In a heatproof bowl, place the chopped chocolate. In a saucepan, bring the heavy cream to a simmer, then pour the hot cream over the chopped chocolate and let it sit for a few minutes before stirring until smooth. Add the softened butter, vanilla extract, and a pinch of salt, stirring until fully combined. Let the mixture cool for about 30 minutes, then refrigerate for 1 hour or until firm.
-
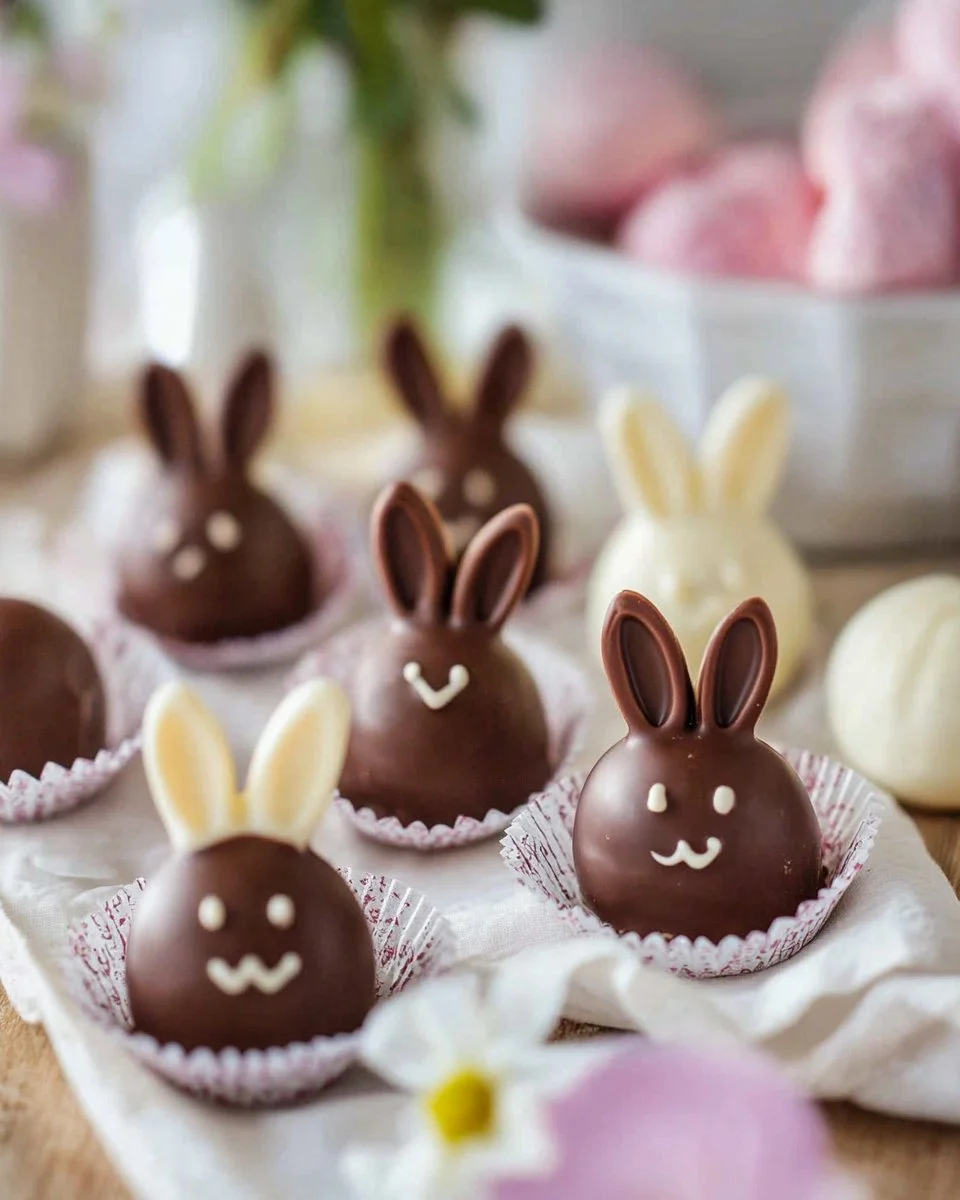
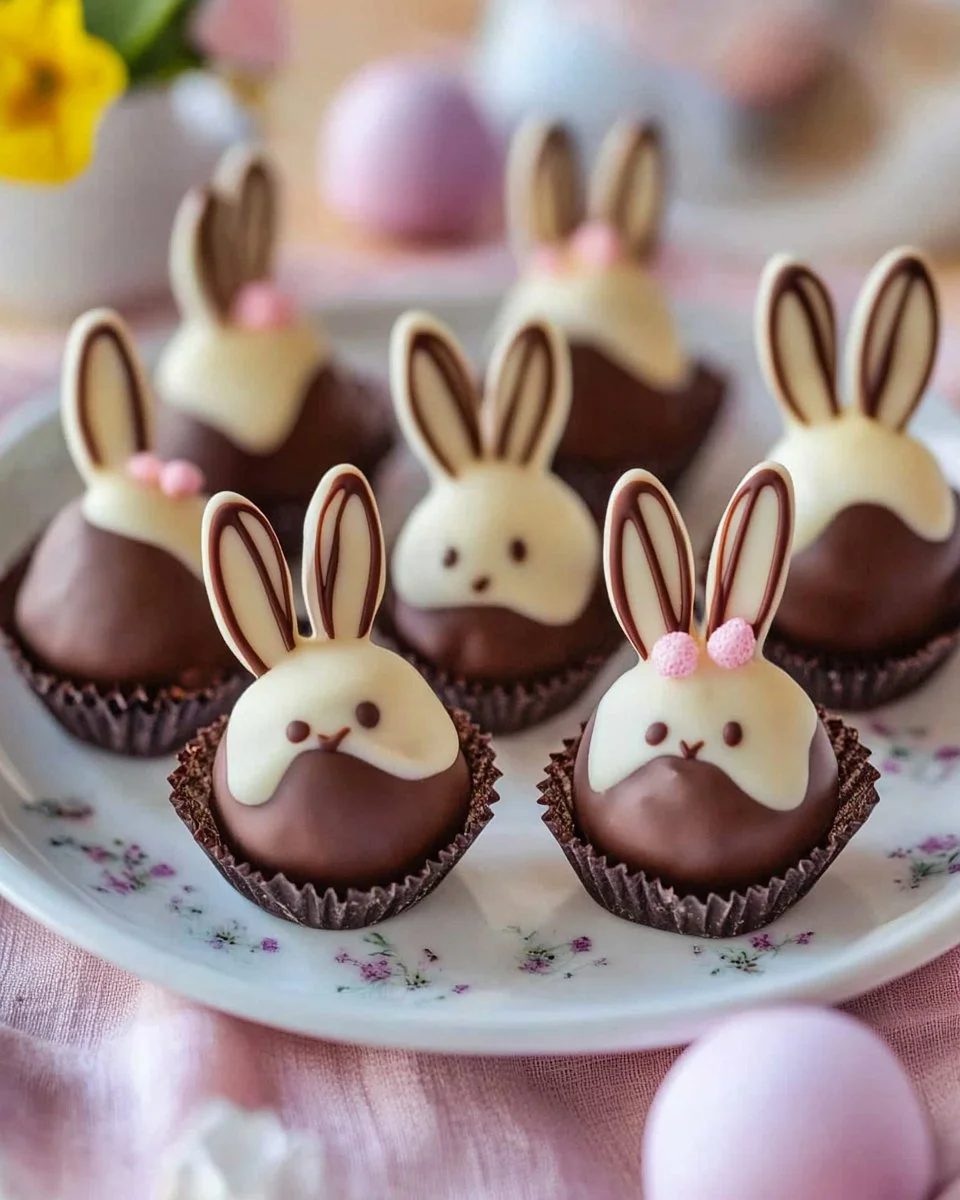
Shape the Truffles: Once firm, scoop out portions of the truffle mixture with a melon baller or spoon and roll them into balls, keeping your hands cool so the mixture does not soften too much. Lightly press one side of each ball to form a slight indentation for the bunny’s ears, which gives character without extra work. Refrigerate for another 20 minutes so they keep their shape when dipped.
-
Coat the Truffles in Chocolate: Dip each truffle into the melted milk or dark chocolate, using a fork or dipping tool and tapping off any excess so the shell stays thin and even. Place on a parchment-lined baking sheet to set, watching for a smooth surface without drips. Let the truffles cool at room temperature or refrigerate to set faster, but avoid rapid chilling that can dull the gloss.
-
Decorate the Bunnies: Melt the white chocolate and pipe bunny ears and facial features on each truffle with a small piping bag or a zip bag with a tiny corner cut. Add edible sugar eyes or use small chocolate chips while the white decoration is still wet, and sprinkle with edible glitter or colored sprinkles if desired. Work in batches so you can focus on neat faces and small, consistent details.
-
Set and Serve: Allow the decorations to set before serving so nothing smears when you plate them. Store the truffles in an airtight container in the fridge for up to 1 week and let them come closer to room temperature for 10 minutes before serving to soften the center slightly. Watch for a balance of crisp shell and creamy center when you bite into one, and enjoy how a small ornament like an ear brings a smile.
When I Serve Bunny-Shaped Chocolate Truffles
I like to bring these truffles to small gatherings where people can graze and chat. They work well on a modest dessert plate with a few fresh berries and a cup of tea. The bunnies feel special without being formal, and guests often appreciate the handmade look.
For a cozy night at home, I pair a few truffles with a glass of cold milk or a demitasse of strong coffee. The contrast between bitter coffee and the sweet, creamy center is delightful. I also tuck a few into small paper cups as little gifts; they travel well if kept cool.
If you plan a dessert table, lay the truffles on a plain white plate so the ears and faces stand out. Scatter a few edible flowers or a handful of sprinkles nearby for color. The truffles are small, so people enjoy taking two or three rather than committing to a large slice of cake.
Keeping Bunny-Shaped Chocolate Truffles Fresh
Store these truffles in an airtight container in the fridge to keep their shape and stop the ganache from sweating. They last up to one week chilled, though they taste best within four days when the textures shine most clearly.
If you want to keep them longer, place the truffles in the coldest part of your freezer for up to one month. Thaw them slowly in the refrigerator for a few hours before serving, and then let them sit at room temperature for ten minutes to regain softness.
Be mindful of humidity. In very humid kitchens the outer chocolate can bloom or get sticky. If the shells soften or bloom a bit, the flavor will still be fine but the look may change. A gentle scrape of a clean knife can tidy the bottoms if condensation forms.
What I Learned While Testing
-
Temperature matters more than time. I learned that watching the feel of the ganache matters more than staring at the clock. A ganache that seems just glossy and holds its shape will give a tender center, while one that cools too hard becomes dry.
-
Keep your hands cool for shaping. Warming the truffle mixture too much while rolling will soften it and make the shell thicker when you dip. If your kitchen is warm, place a shallow tray in the fridge and roll a few at a time over the cool surface.
-
Tap off excess coating for a thin shell. A thin chocolate shell gives a pleasant snap and keeps the inside from becoming overly sweet. Tap the fork against the rim and let gravity do most of the work.
-
Small decorations go a long way. Tiny sugar eyes and a white chocolate ear can make a charming character. Resist overloading with sprinkles which can distract from the chocolate flavor.
-
Chocolate quality is not a show of wealth but of taste. Use the best chocolate you can reasonably access. You do not need a luxury bar, but choosing chocolate with flavor notes you like will make the truffles more enjoyable.
Variations I’ve Tried
Classic dark center and milk coating. This is the one that balances bitterness and sweetness and is my go-to when I want the chocolate to sing.
Salted caramel heart. I mixed a spoonful of firm caramel into the center before rolling and sealed it in the ganache. When you bite it, you get a little melt and a salty echo.
Nutty crunch. I stirred finely chopped toasted hazelnuts into the ganache for texture. It changed the mouthfeel but kept the truffle’s elegant shape.
Spiced chocolate. I added a small pinch of cinnamon and cayenne to the cream for warmth and a tiny lift. This variation is unexpected and works well when you want a truffle with personality.
Citrus brightening. I stirred a teaspoon of finely grated orange zest into the ganache before chilling. It made each bite fresher, especially when paired with a milk chocolate shell.
These small shifts keep the method intact and still let you experiment without risking the whole batch. Try one change at a time so you can notice which element made the difference.
FAQs About Bunny-Shaped Chocolate Truffles
Can I make this ahead of time?
Yes, and in some cases it actually sets better after resting, especially once the texture has fully settled. Store the truffles chilled and allow them to warm slightly before serving so the center softens.
What if my ganache is grainy after I stir it?
Graininess usually means the chocolate did not melt smoothly or the cream was too cool. Warm it gently over a double boiler and stir slowly until smooth. If it does not come together, a quick blitz with an immersion blender can smooth it.
Can I use different types of chocolate for the coating?
Absolutely. Dark chocolate gives a more intense shell while milk chocolate is sweeter and creamier. If you temper the chocolate, you will get a nicer shine and snap, but a careful melt and cool method still yields good results for home bakers.
How do I make the ears stay upright?
For simple ears, pipe small triangles of white chocolate on parchment and let them set. Once firm, you can press them gently into the indentation while the shell is still tacky so they adhere. If the shell has fully set, use a tiny dab of melted chocolate as glue.
Are these safe to freeze?
Yes, freeze them in a single layer in an airtight container for up to one month. Thaw slowly in the refrigerator and then rest at room temperature before serving to restore the center’s texture.
A Final Thought
I hope this Bunny-Shaped Chocolate Truffles recipe invites you to play a little in the kitchen. Treat the steps like friendly guidelines and trust the visual and tactile cues the recipe offers. The most joyful part of baking for me is the quiet moment when you set down the last truffle and realize you made something that brings a smile.
Make a small batch, share it, and notice how a tiny touch of decoration can turn simple chocolate into a moment of delight. From my kitchen to yours, I hope these bunnies encourage you to experiment gently and enjoy the results.
Bunny-Shaped Chocolate Truffles
Ingredients
For the Truffle Filling
- 8 oz high-quality milk or dark chocolate, chopped This is the heart of the truffle, so pick chocolate you like to eat.
- 1/2 cup heavy cream This adds richness and makes a smooth, tender center.
- 2 tbsp unsalted butter, softened This helps with structure and gives a silkier mouthfeel.
- 1 tsp vanilla extract This lifts flavors without taking over.
- 1 pinch salt This balances sweetness and brightens the chocolate.
For Dipping and Decoration
- 12 oz milk or dark chocolate, melted Use extra for coating so you have enough to dip and recoat if needed.
- 1/4 cup white chocolate Optional for decorative bunny details.
- Edible decorations like colored sprinkles or sugar eyes These make each bunny unique and are perfect for playful details.
Instructions
Make the Truffle Filling
- In a heatproof bowl, place the chopped chocolate.
- In a saucepan, bring the heavy cream to a simmer, then pour the hot cream over the chopped chocolate and let it sit for a few minutes before stirring until smooth.
- Add the softened butter, vanilla extract, and a pinch of salt, stirring until fully combined.
- Let the mixture cool for about 30 minutes, then refrigerate for 1 hour or until firm.
Shape the Truffles
- Once firm, scoop out portions of the truffle mixture with a melon baller or spoon and roll them into balls, keeping your hands cool so the mixture does not soften too much.
- Lightly press one side of each ball to form a slight indentation for the bunny’s ears.
- Refrigerate for another 20 minutes so they keep their shape when dipped.
Coat the Truffles in Chocolate
- Dip each truffle into the melted chocolate, using a fork or dipping tool, and tapping off any excess so the shell stays thin and even.
- Place on a parchment-lined baking sheet to set.
- Let the truffles cool at room temperature or refrigerate to set faster.
Decorate the Bunnies
- Melt the white chocolate and pipe bunny ears and facial features on each truffle.
- Add edible sugar eyes or use small chocolate chips while the decoration is still wet.
- Work in batches to ensure small, consistent details.
Set and Serve
- Allow the decorations to set before serving.
- Store the truffles in an airtight container in the fridge for up to 1 week.
