The first time I made these Buckeye Brownies, the kitchen smelled like warm cocoa and peanut butter, and I remember standing at the counter watching the batter settle into the loaf pan. It was a quiet afternoon, the kind that asks for gentle work and small comforts, and sharing a slice with a neighbor felt like passing along a piece of home. If you like a softer topping or a different way to finish your bars, I also keep a note for brownies with silky frosting that pairs well with the same basic brownie base.
Buckeye Brownies
Ingredients
Brownie Base
- 1/2 cup unsweetened cocoa powder Room temperature helps with texture.
- 1/2 cup all-purpose flour Adds structure without heaviness.
- 1/2 cup granulated sugar Provides sweetness and chew.
- 1/4 cup brown sugar Adds a gentle molasses note.
- 1/4 cup butter, melted Gives richness to the brownies.
- 2 pieces eggs Room temperature blends smoothly.
- 1 teaspoon vanilla extract Adds warmth to the chocolate.
- 1/4 teaspoon salt Balances sweetness and enhances flavor.
Peanut Butter Filling
- 1/2 cup creamy peanut butter Provides a smooth center.
- 1/4 cup powdered sugar Sweetens the filling.
Instructions
Preparation
- Preheat your oven to 350°F (175°C) and grease a standard loaf pan.
- In a mixing bowl, combine melted butter, granulated sugar, and brown sugar. Stir until glossy.
- Add eggs and vanilla extract; stir until combined.
- In a separate bowl, whisk together cocoa powder, flour, and salt. Gradually mix with the wet ingredients until just combined.
- In another bowl, mix creamy peanut butter with powdered sugar until smooth.
Baking
- Pour half of the brownie batter into the prepared loaf pan.
- Spoon the peanut butter mixture over the brownie batter, then pour the remaining batter on top.
- Bake for 25-30 minutes or until a toothpick comes out with a few moist crumbs.
Cooling and Serving
- Let cool before slicing into bars.
- Serve warm or at room temperature with coffee or milk.
Notes
Nutrition
The Story Behind This Buckeye Brownies
This recipe has lived in my kitchen for years, not because it is fancy, but because it is honest. I first scribbled it down from a well-worn recipe card passed from a friend who loved simple sweets, and over time I tuned it to the kind of comfort I wanted to share. It never asked for special gadgets or hard-to-find items, only a patient hand and a warm oven.
I make these brownies when I want to show care without fuss. They are for after-school snacks, for holiday boxes, and for quiet afternoons when a cup of coffee needs a companion. The familiar peanut butter layer in the middle always brings a little surprise, like finding a note in a coat pocket that reminds you someone thought of you.
There is a steady rhythm to this recipe that I adore. Measure, mix, nestle the batter, spread the peanut butter, and watch the kitchen change from raw ingredients to small, brown squares. It is a simple loop of work and waiting, and it rewards you with dependable, homey flavor.
What Makes This Buckeye Brownies So Reliable
Part of what makes these brownies so dependable is the balance of texture and taste. The cocoa and sugars form a gently fudgy base, while the peanut butter center offers a creamy contrast. I find that the small loaf pan gives the brownies a cozy, even bake that is forgiving if you peek too often.
The recipe is also forgiving with timing. If you pull the pan a few minutes early, the center stays soft and tender. If you leave it a touch longer, the edges firm up and gain a slight chew that some people love. That flexibility makes it perfect for home bakers who want good results from familiar steps.
I like to think of reliability as comfort you can count on. These Buckeye Brownies are that kind of comfort. You will find the same scents, the same textures, and the same soft smiles when you share them.
Bringing Buckeye Brownies Together
“Some recipes just feel right the moment they come together.”
The process for these brownies moves gently. Start by melting the butter and stirring it with the sugars until it looks smooth and glossy. Add the eggs and vanilla and feel the mixture lighten as you stir. When you fold in the dry ingredients, stop as soon as the batter holds together; overmixing can make the brownies stiff rather than tender.
For the peanut butter center, simply stir until the powdered sugar is fully incorporated and the texture becomes silky and spreadable. When you layer the batter and the peanut butter, take a moment to smooth things with a spatula, but do not worry about perfect lines. The layers will find their own balance in the oven.
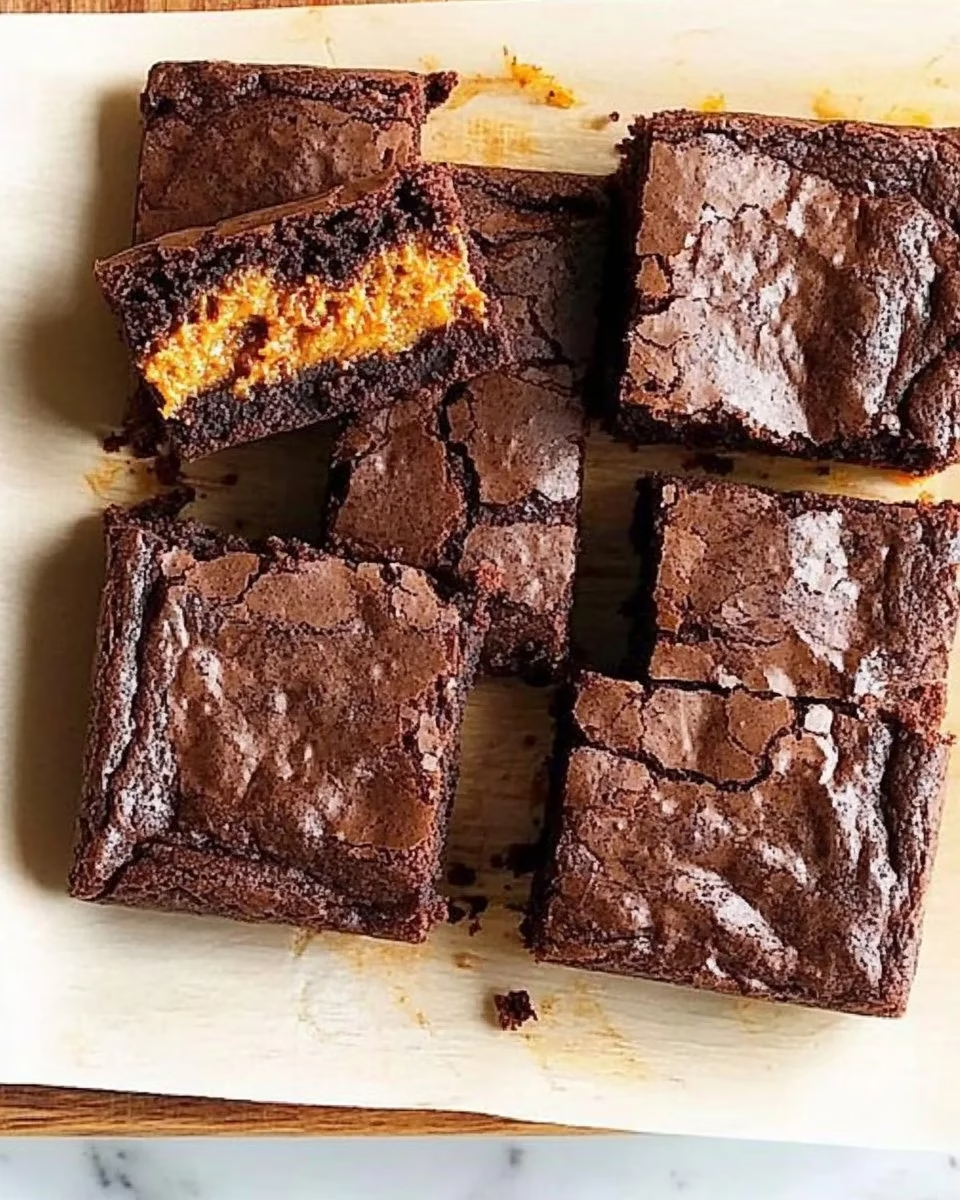
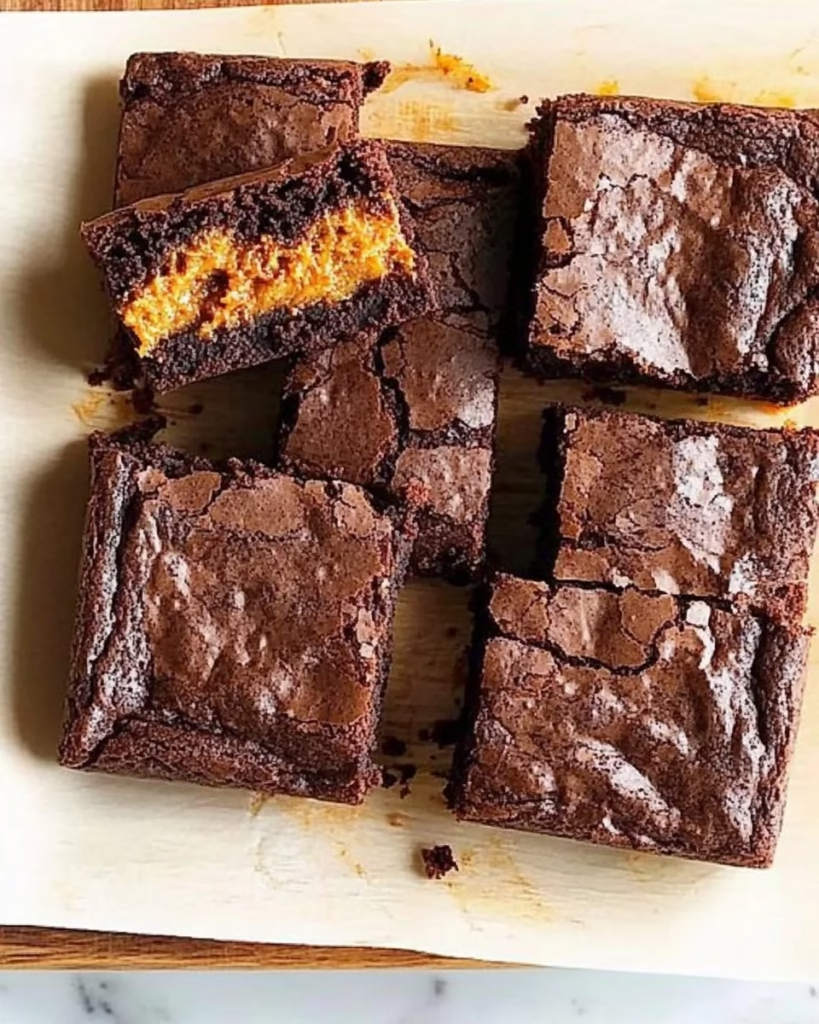
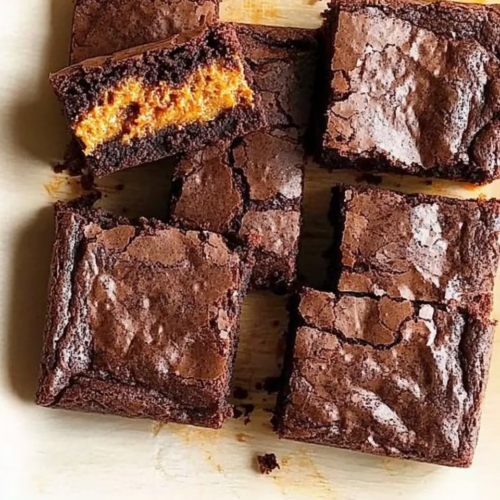
Watch for cues from your oven. The brownies are done when a toothpick comes out with a few moist crumbs. The edges will look a touch set and perhaps lightly pulled from the pan. Let them cool enough to slice cleanly, and you will see the peanut butter center framed by tender cocoa brownie.
Ingredients You’ll Need
1/2 cup unsweetened cocoa powder – room temperature helps with texture and brings classic chocolate flavor.
1/2 cup all-purpose flour – this adds structure without making the bars heavy.
1/2 cup granulated sugar – for sweetness and a bit of chew.
1/4 cup brown sugar – this adds a gentle molasses note and keeps the crumb tender.
1/4 cup butter, melted – butter gives the brownies a full, familiar richness.
2 eggs – room temperature eggs blend more smoothly and help the batter set.
1 teaspoon vanilla extract – this adds warmth and lifts the chocolate.
1/4 teaspoon salt – brings out the chocolate and balances sweetness.
1/2 cup creamy peanut butter – creamy gives a smooth center that contrasts the brownies.
1/4 cup powdered sugar – this sweetens and firms the peanut butter into a spreadable filling.
Each ingredient is a small promise. Nothing is showy, and everything works together to make a simple, comforting result. Keep your ingredients close and measured before you begin; that small bit of order makes the rest feel calm.
Step-by-Step Directions
Preheat your oven to 350°F (175°C) and grease a standard loaf pan. Prepare the pan with a light coating of butter or nonstick spray, and give the oven time to reach temperature so the batter goes into steady heat. A warmed pan and oven help the brownies rise and set evenly.
In a mixing bowl, combine melted butter, granulated sugar, and brown sugar. Stir until the sugars dissolve into the butter and the mixture looks glossy and even. Mix until smooth, watching for no large sugar grains, which can give a gritty texture.
Add eggs and vanilla extract to the mixture, stirring until combined. Beat gently until the batter becomes slightly lighter in color and feels cohesive. This is the moment when the batter takes on that soft, familiar sheen.
In a separate bowl, whisk together cocoa powder, flour, and salt. Sift if you like, or whisk well to break up clumps so the cocoa blends smoothly into the wet mix. Gradually add the dry ingredients to the wet ingredients until just combined.
In another bowl, mix creamy peanut butter with powdered sugar until smooth. Stir until the powdered sugar disappears and the mixture becomes thick but spreadable, like a soft paste. Taste a small dab to check sweetness and texture, then adjust with an extra pinch of powdered sugar if you prefer a firmer center.
Pour half of the brownie batter into the prepared loaf pan. Smooth it gently so the layer is even, tapping the pan once on the counter to settle any air pockets. The first layer should cover the bottom in a thin, even blanket.
Spoon the peanut butter mixture over the brownie batter, then pour the remaining brownie batter on top, spreading to cover. Work gently to keep the peanut butter from mixing into the bottom layer, and use a spatula to finish with a smooth top. The layers do not need to be perfect; rustic tops make warm, homemade slices.
Bake for 25-30 minutes or until a toothpick comes out with a few moist crumbs. Watch the edges for slight pulling away from the pan and a faint firming on the surface. If you prefer a gooier center, take them out at the earlier part of the time; for firmer slices, give them the full time.
Let cool before slicing into bars and enjoy! Let the loaf sit until the top sets and you can press lightly without leaving a mark. When cool, run a knife along the edges and slice into bars, wiping the knife between cuts for cleaner pieces.

Serving Buckeye Brownies With Care
I like to serve these brownies slightly warm or at room temperature, depending on the moment. When they are warm, the peanut butter feels soft and comforting, almost like a hug. When cooled, the layers hold together more neatly and the texture feels more cake-like.
A simple cup of coffee or a small glass of milk never goes amiss. For company, I slice them into modest bars and arrange them on a small plate so everyone can help themselves. If I bring them to a gathering, I wrap a few in parchment and tie them with twine; it is a small thing, but it says I thought of you.
For a more indulgent finish, a light dusting of powdered sugar or a small smear of melted chocolate on top makes them feel a little more special without losing the homey tone. I rarely fuss with elaborate decorations; these brownies taste like care, and that is decoration enough.
How We Enjoy Buckeye Brownies at Home
On school mornings, I tuck a bar into a lunchbox alongside an apple. In the late afternoon, they appear with a kettle of tea while the house settles from the day. On rough days, a single square is quiet comfort, and on good days, they are a treat to share.
We often break them into smaller pieces for a family tasting and talk about which edge pieces are best. My husband loves a slightly chewy edge, while my children prefer the soft, peanut-buttery middle. There is comfort in these small preferences, and the brownies invite those little divides and laughs.
When guests arrive, I place them on a simple platter and leave the kettle on. Watching them reach for a slice creates the same warmth I remember from the first time I made them, and that quiet repetition feels like home.
Storing Buckeye Brownies for Later
Store these brownies at room temperature in an airtight container for up to three days, and they will stay soft and pleasant. If you want them to last longer, refrigerate in a sealed container for up to a week; the peanut butter center will firm slightly, and the flavors will settle.
To reheat, warm a single bar in the microwave for about 10 to 15 seconds, or place slices in a low oven at 300°F (150°C) for a few minutes. The heat brings back the soft textures and makes the peanut butter center feel freshly made. If you plan to freeze, wrap bars individually in plastic and place them in a freezer-safe bag for up to three months.
When thawing, let the bars come to room temperature slowly for best texture. A quick thaw in the microwave works in a pinch, but slow thawing keeps the crumb tender and the peanut butter creamy.
Mary’s Baking Notes
- Measure with care. A light scoop and level for the flour keeps the brownies tender instead of dry. I spoon the flour into the cup and level with the back of a knife for steady results.
- Room temperature eggs blend more smoothly with butter, and the batter comes together without overworking. If you forget to set eggs out, place them in warm water for a few minutes to take the chill off.
- Stir the batter until just mixed. Overmixing can make brownies cakier than fudgy, and for this recipe I prefer a soft, slightly dense texture. Fold the dry ingredients gently and stop when the streaks vanish.
- Watch your oven carefully in the final minutes. Ovens vary, and the difference between a moist center and a dry bar can be five minutes. A toothpick with a few moist crumbs is the cue I trust most.
- Let the loaf cool before slicing. That brief wait makes cleaner slices and helps the layers settle. If you are impatient, cool for at least 20 minutes and then slice with a sharp, warm knife for smoother cuts.
These notes are small habits that have kept this recipe reliable in my kitchen. They come from repeating the same steps, paying attention, and learning what subtle cues the batter gives.
Family Variations on Buckeye Brownies
There are a few small changes we like to make for different moods and seasons, and each one keeps to the familiar heart of the recipe. For a nutty crunch, stir 1/4 cup chopped roasted peanuts into the peanut butter filling. The texture adds a pleasing contrast without changing the homey taste.
If you prefer a deeper chocolate flavor, add a tablespoon of brewed coffee to the wet ingredients. It blends into the batter and makes the chocolate feel richer without being overtly coffee-flavored. For a winter twist, fold in a pinch of cinnamon or a scant teaspoon of molasses to echo holiday baking.
For a richer center, swap the creamy peanut butter for a mix of half peanut butter and half chocolate-hazelnut spread. It keeps the idea of a peanut butter middle but adds a smoother, more indulgent layer. For a lighter version, reduce the powdered sugar in the filling by a tablespoon and accept a softer center.
If you enjoy exploring similar textures, try a spiced match with my notes on decadent spiced gingerbread brownies for a seasonal cousin that shares the same cozy spirit. These small shifts keep the recipe feeling fresh and still very much like the loaf you know.
Tried-and-True Baking Tips
- Keep an eye on sugar texture. Stir your sugars into the melted butter until the mix looks smooth; that step helps avoid a sandy finish. A glossy mix tells you you are on the right track.
- Slice with care. Use a sharp knife and wipe it between cuts to make tidy bars. Running hot water over the blade and drying it before slicing can help with neat pieces.
- Room temperature matters. Let the loaf rest long enough that the peanut butter center firms slightly for cleaner slices. If you cut too soon, the bars can fall apart a bit, though they will still taste good.
- Adapt with ease. If you wish to double the recipe, use a larger pan and adjust baking time. Watch the bake closely and test with a toothpick for doneness.
- Trust your senses. Smell, sight, and touch tell you more than clocks. When the top looks set and the center yields a bit to a gentle press, you are close.
These tips come from doing this recipe many times and noticing what truly changes the outcome. They are small comforts that add up to dependable results.
FAQs About Buckeye Brownies
Can I make this ahead of time?
Yes, and it often holds up beautifully, especially when stored properly and allowed to rest overnight. The flavors will mellow a touch and the peanut butter center will set for cleaner slices.
Can I use crunchy peanut butter instead of creamy?
Yes, crunchy will give more texture in the center and a pleasant contrast to the soft brownie. Keep in mind the filling may be slightly more rustic, and some people prefer the smoothness of creamy for neat bars.
What if my brownies come out too dry?
If the brownies bake too long they can dry out, but you can rescue them by serving slightly warm with a cup of milk or tea. Next time, reduce the bake time by a few minutes and look for a toothpick with moist crumbs.
Can I make these in a square pan instead of a loaf pan?
Yes, a square pan works fine; the bake time may change a little. Check for doneness a few minutes earlier and use the toothpick test. The thinner layers may bake faster, so keep an eye on the edges.
How do I get clean slices?
Let the loaf cool enough to firm the layers, use a sharp knife, and wipe the blade between cuts. A warm knife helps, as does allowing the loaf to sit for 20 to 30 minutes before slicing.
More Sweet, Seasonal Treats You’ll Love
If Buckeye Brownies bring comfort to your kitchen, there are plenty of other cozy bakes waiting for you. For soft, nostalgic sweetness, my Marshmallow Fluff Fudge is always a favorite, especially around the holidays. When you’re craving something playful and no-bake, Banana Pudding Rice Krispie Treats offer that familiar pudding flavor with a fun crunch.
you can always find me sharing from my kitchen on Pinterest and over on Facebook.
.
